
This past summer, the Boy Scouts added a new Programming Merit Badge to their Merit Badge Series. To fulfill requirement 5, a Boy Scout has to modify or create three programs in a variety of languages and development environments. Because it is free and simple to use, Xojo is a great choice to help a Scout meet requirement 5.
To help Scouts earn their Programming Merit Badge, here is a sample project to convert a temperature from fahrenheit to celsius with instructions to help guide the Scout.
To get started, download Xojo for your computer. Xojo works on Mac OS X, Windows or Linux.
Start Xojo
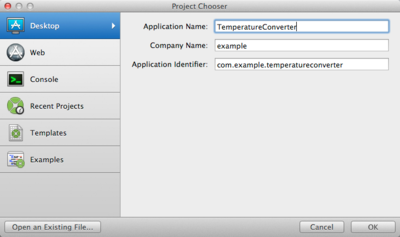
Install and run Xojo. In the Project Chooser window, select Desktop. Enter “TemperatureConverter” as the Application Name and click OK.
Design the Window Layout
When you click OK, the main window layout editor appears. This is where you design the Window layout. Design your Window so that it looks like this:
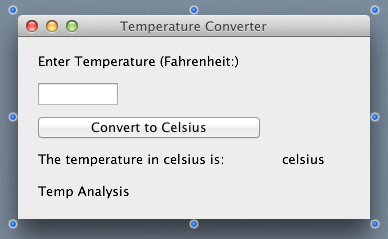
You add controls to the Window by dragging them from the Library on the right. Drag four “Label” controls to the Window for the text. After you drag each Label onto the layout, click the “pencil” icon in the toolbar to type the text that appears in the Label.
Drag a “TextField” control for the box to type the temperature and a “Button” control for the convert button. After dragging the button, you can also use the pencil icon in the toolbar to enter the text that appears within it.
Once you have all the controls positioned on the window and their text updated, you can change their names to make the code you will write easier to understand. First, display the Inspector by clicking Inspector on the toolbar. Now click on the Convert Button on the layout to show its properties. Change its Name property from “PushButton1” to “ConvertButton”.
Next is the text field. Click on it and change its Name property in the Inspector from “TextField1” to “TempField”.
The converted temperature is displayed in the Label that says “celsius”. Click it and change its Name property to “CelsiusLabel”.
Lastly, click the “Temp Analysis” label and change its Name property to “AnalysisLabel”.
Add Source Code
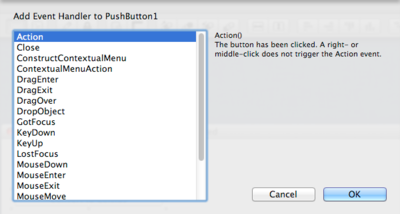
Now you can add the code. Double-click the Convert Button to show the Event Handler window. Select the “Action” event handler and click OK.
The Code Editor then appears where you can enter this code:
Dim fTemp As Double // Fahrenheit temperature
Dim cTemp As Double // Celsius temperature

// Get fahrenheit temperature from the field,
// convert it to a number and store it in
// the fTemp variable
fTemp = TempField.Text.Val

// Convert the fahrenheit temp to celsius using the
// formula: c = (5/9) * (fahrenheit-32)
cTemp = (5/9) * (fTemp-32)

// Display the celcius temperature, formatting it to
// show two decimal places
CelsiusLabel.Text = Format(cTemp, "-##.00")

If fTemp > 100 Then
  AnalysisLabel.Text = "Hot! Wear sunscreen."
  AnalysisLabel.TextColor = RGB(255, 0, 0) // Color red
ElseIf fTemp < 32 Then
  AnalysisLabel.Text = "Cold! Wear gloves."
  AnalysisLabel.TextColor = RGB(0, 0, 255) // Color blue
Else  AnalysisLabel.Text = ""
  AnalysisLabel.TextColor = RGB(0, 0, 0) // Color black
End If
Run Your Project
After entering the code, you can now try running your project. Click the Run button on the toolbar and you should see the window appear on the screen. Type in a temperature and click the Convert button to see the converted value and possible text about the temp:
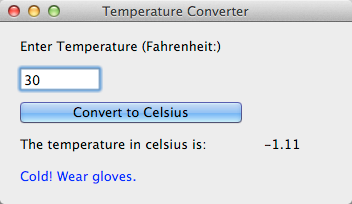
That’s it! You’v now created you first application using Xojo!
You can download the full project from here: TemperatureConverter
Learn More
Want to learn more? Here are some additional things you can try:
- Change the text displayed for cold and hot temperatures.
- Modify the temperatures used to display the analysis text. Perhaps try a temperature like 80 and change the message accordingly.
- Create a third temperature range (say from 30 to 60) and add a new message to display.
- Add a new field for Wind Speed and use it in conjunction with the temperature to calculate and display the Wind Chill Factor, which is calculated using this formula: windchill = 35.74 + (0.6215*fTemp) – (35.75*windSpeed)^(0.16) + (0.4275*fTemp*windSpeed)^(0.16)