
Got an hour (or less)? Here’s a quick app you can make with Xojo that will save you time and help your child practice their spelling words more often.
My son comes home each week with a list of spelling words he needs to practice. We read the words to him and he writes them on his practice sheet. It occurred to me that this would be a great use of Xojo, so I whipped up a quick app he can use to type in the words and have his computer read them back to him. He gets the practice of typing in the words once and then can have the computer read them back as many times as necessary until he has spelled them all correctly.
You can create this app in just a few minutes. To get started, grab a free copy of Xojo: http://www.xojo.com/download
Create Your App and Window Layout
Run Xojo and click on “Desktop”, enter the Application Name of “SpellingPractice” and press OK.
Looking at the main window, you can add a few controls. Drag a Label, a Generic Button and a Text Area from the Library to the window layout so that it looks similar to this (click to zoom the image):
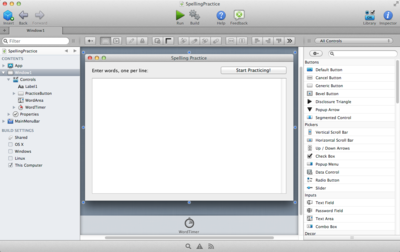
Click on the Label control and press return to change its text to something like this: “Enter words, one per line:” (you may want to resize it so all the text fits). Next, click on the Button and press return to change its text to something like “Start”.
Now that your window layout is done, you can try running it to see what it looks like (using the Run button on the top toolbar). Quit your app to get back to Xojo. After you run it, don’t forget to save it!
Now it is time to actually write some code.
Add Code
The app should speak all the words that are entered in the Text Area, but should pause after saying each word. Xojo has a built-in control for doing things after small periods of time. This control is called the Timer. The Timer can be used to say one word every five seconds.
So the next step is to add a Timer to the window layout. You can drag the Timer from the Library (like you did with the other controls). Since a Timer is not displayed on the window, it appears on the Shelf at the bottom. Click on the Timer, select the Inspector (using the toolbar button on the top right) and change the Mode property to be “Multiple” and the Period property to be “5000”. This tells the Timer to run its code every 5 seconds (which is 5,000 milliseconds).
Now it is time to add some properties of your own to the window so you can track what is happening. The first property to add is called “Practicing” and it is a Boolean. Click the “+” button on the window toolbar and select “Property” to add the property. Change the new property name to “Practicing” (in the Inspector) and change its Type to “Boolean”. This property will be True (Yes) when the practice has started (which means the words are being spoken) and False (No) when not practicing.
The next property to add is an array to store the words that were entered. An array is a list of items and this array simply contains an entry for each word that was entered in the Text Area. Add another property and change its name to “Words()”. Don’t forget the parenthesis at the end which is what indicates that this is an array. Change its type to “String”.
The last property to add is the counter that will track the place in the array so you know which word to speak. Add your last property and change its name to “CurrentWord”. You can leave its type as Integer.
With these three properties, you can now write code that will use them.
The first bit of code that is needed will change the text of the button between “Start Practicing!” and “Stop Practicing!” and hides the words. Xojo uses an event-based system where specific events are called based on user actions. In this case, the user action is clicking the button which triggers the Action event of the button. So our code goes in the Action event handler. Click on the button and add an event handler by clicking on the “+” button on the window toolbar and select “Event Handler…”. In the dialog that appears choose “Action” and press OK. This displays the Code Editor.
Now you can add the code that switches the button text:
If Not Practicing Then
  CurrentWord = 0 // Start at the first word
  Practicing = True // You are practicing now
  Me.Caption = "Stop Practicing!" // Change button text
  TextArea1.Visible = False // Hide the words
Else
  Practicing = False
  Me.Caption = "Start Practicing!" // Change button text
  TextArea1.Visible = True // Show the words
End If
The above code changes the boolean value to indicate if you are practicing, changes the text of the button and hides or shows the words.
Try running your project (use the Run button on the toolbar). You will be able to click the button and see the text change and the Text Area with the words appear and disappear.
Now it is time to gets the words into the array. Xojo has built-in commands that allow you to quickly convert a list of text into the format used by an array. This code takes the text that was entered into the Text Area, separates it by line and puts them into your array property:
Words = TextArea1.Text.Split(EndOfLine)
You can add this line to your existing code in the PracticeButton Action event handler so it looks like this:
If Not Practicing Then
  CurrentWord = 0 // Start at the first word
  Words = TextArea1.Text.Split(EndOfLine) // Put the words into the array, one per line
  Practicing = True // You are practicing now
  Me.Caption = "Stop Practicing!" // Change button text
  TextArea1.Visible = False // Hide the words
Else
  Practicing = False // You stopped practicing
  Me.Caption = "Start Practicing!" // Change button text
  TextArea1.Visible = True // Show the words
End If
The last bit of code actually speaks a word in the array, which is the job of the Timer that you previously added to the window. Click on the Timer and add its Action event handler to it using the same steps as above. This code first checks if there are words in the list and if you are in practice mode. If so, it speaks the current word and then increments the counter to the next word. When it gets to the end, it starts over at the beginning:
If Words.Ubound >= 0 And Practicing Then
  Speak(Words(CurrentWord)) // Speak the current word
  CurrentWord = CurrentWord + 1 // Move counter to next word

  If CurrentWord > Words.Ubound Then
    // If the end of the list was reached, go back to the beginning
    CurrentWord = 0
  End If
End If
That’s it! Now try running your program. Add a couple words to the Text Area and click the “Start Practicing” button to hear your computer speak them to you.