
You have heard it many times: coding with Xojo is not just powerful and fun, it is fast, really fast! This is thanks to the fact that you have at your disposal the powerful Xojo Framework, with a lot of classes ready to use doing the hard work behind the scenes. In fact, this article shows you how can create a multi-platform RSS Reader…writing just 33 lines of code!

It won’t be an RSS Reader with all the bells and whistles – 33 lines of code does have its limits. But you will learn how useful some of the available Xojo classes are, and you can use the code as the starting point for your own more dazzling RSS Reader. Ready? Start your engines with the Xojo IDE!
URLConnection, the class to talk HTTP
Undoubtedly, URLConnection is the main class we are going to use in this tutorial. In fact, we will create our own subclass based on URLConnection, so we can write the specialized behaviour that we expect from an RSS feed parser.
But before that, and as you can read in the documentation available about the URLConnection, this class allows us to receive and send information using the HTTP protocol. So, using a new instance (object) from our class we will be able to get the XML data associated with an RSS feed. For that we just have to make the request against the remote Web Server using the “Get” method from our URLConnection sublcass.
For instance, we can get the data associated with an RSS feed using the standard URLConnection class this way:
Var http as new URLConnection
Var feedXML As String = http.Send("GET,"http://blog.xojo.com/feed/")
As you can see, the “Send” method expects two mandatory parameters. The first one is the “Method” —Get in this case—, and the second is the source URL we are going to use to get the response (the data). The third parameter is optional and it allows us to set the timeout period associated with the request (defaults to 60 seconds).
Whether we use the timeout parameter or not, we would be using this method in a asynchronous way. That is, the code execution flow will continue is way while the connections retrieve the requested data.
The RSSReader Class
Now is time to write the subclass that will do the main work: get the XML data associated with the RSS source, and parse the nodes to retrieve just the information we want to use. For instance, in this tutorial we are interested only on the “Title” and the associated URL, so when the user selects any of the available items, we can show the full article on an HTML Viewer.
- Add a new Class to the project using Insert > Class, and write “RSSReader” as the Class “Name” on the associated Inspector.
- Add “URLConnection” on the “Super” field of the Inspector. This is the way we have to identify our class as a subclass of the standard URLConnection, thus inheriting its exposed methods, events and properties.
- Add a Property, using “items(-1)” for the “Name” field of the associated Inspector, and “Pair” for the “Type” field. This will be Array in charge of storing all the retrieved items from the RSS feed.
- Add a new Method named “GetFeed”, typing “url As String” on the “Parameters” field of the associated Inspector. Write this line of code in the Code Editor for the method (we could have opted for using a Computed Property or assigning directly the property with a Public scope, at your choice!):
If url <> "" Then Me.Send("Get",url)
ContentReceived, here comes the data
Let’s write the code in charge of parsing the received data from the requested URL! For that, we need to add the ContentReceived Event to our Class.
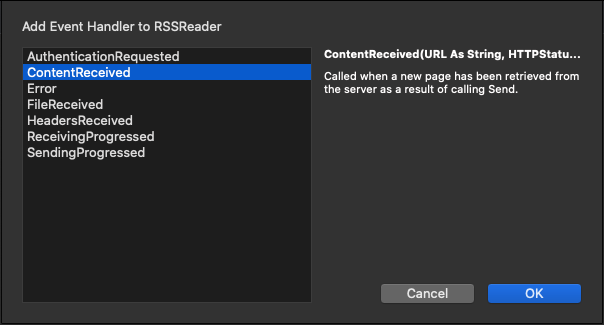
Make sure to select the RSSReader item in the Project Navigator and choose the Insert > Event Definition option from the menu. On the resulting window, select the ContentReceived item and confirm pushing the “OK” button. As result, Xojo will add the selected event to our class, with the Code Editor avilable and ready so you can write the following code:
If httpStatus = 200 Then
  content = DefineEncoding(content, encodings.UTF8)
  parseNodes(content)
  RaiseEvent refresh(items)
end
After we define the text encoding for the received content (UTF8), the following line calls the “parseNodes” method (not created yet). This method is the one responsible of parsing the received data. Once this has been done, the next line of code will raise the “refresh” event on the class instance, passing along the already parsed data.
Define your own Event: communication with the instance
Raising an Event is the way our class has to communicate with the instance you’ll add to the project, so it can interact with other UI components or methods, for example. For that, and with the RSSReader item still selected in the Project Navigator, select the Add to “RSSReader” > Event Definition option. Type “Refresh” in the Event Name field, and “items() as Pair” in the Parameters field. That’s all, you’ve created your own Event Handler for the subclass!
XMLDocument and XPath
Time to add the “parseNodes” method to the RSSReader Class, typing “content as String” as Parameter on the associated Inspector. Don’t forget to define the Scope of this method as Private, so it can’t be called from outside the class. Then, write the following code for the just created method:
Try
  Var xml As New XmlDocument(content)
  If xml <> Nil Then
    Var nodes As XmlNodeList = xml.Xql("//item")
    Var title, url As String
    For n As Integer = 0 To nodes.Length - 1
      title = nodes.item(n).Xql("title").Item(0).FirstChild.Value
      url = nodes.item(n).Xql("link").Item(0).FirstChild.Value
      items.Append( New pair( title, url ) )
    next
  End If
Catch e As XmlException
  MessageBox e.Reason
End Try
The XMLDocument class available in the Xojo Framework allows us to easily edit and travel the XML structure, as is the case of the RSS feeds! In addition, we can use XPath (1.0) to make the queries on the XML structure. As you can see, I used the “//item” expression combined with the Xql method to get a list with all the nodes of interest from the XML document.
Once we have the nodes, we just need to use the For… Next loop in order to retrieve the “fields” that we are interested on from each available node. For that, we are going to use the Xql method too. Finally, we just need to create a new Pair with that information and store it on the Items property.
The User Interface
We have finished all the “hard work”, so now is time to create the user interface for our RSS Reader!
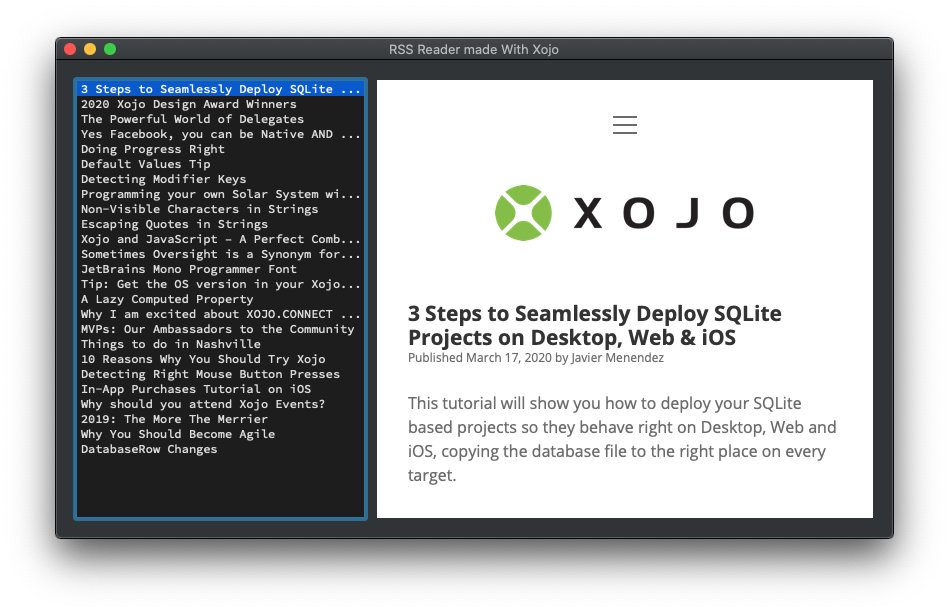
Choose the Window1 control in the Navigator to access its Layout Window. Then, add a new ListBox and HTMLViewer from the Library and arrange these controls as shown by the following image:

As you can see in the bottom of the Layout Editor, we added a RSSReader instance to the Window1 tray. For that, you only need to drag the RSSReader item from the Navigator and drop it in that area of the Layout Editor.
Adding the Refresh Event Handler to our instance!
We are mostly done! With the just added RSSReader1 instance to our project, select it in the Project Navigator and use the contextual menu to choose the Add to “RSSReader1” > Event Handler option. In the resulting dialog, select the “Refresh” Event Handler and click on the “OK” button in order to get it added to the instance.
Write the following code snippet for the added “Refresh” method:
Listbox2.RemoveAllRows

For Each item As pair In items
  Listbox2.AddRow item.Left.StringValue
  listbox2.RowTagAt(Listbox2.LastAddedRowIndex) = item.Right.StringValue
Next
Showing a Webpage on the HTMLViewer
Choose the Listbox1 control on the Project Browser an add the Change Event. The only line of code you have to write is the responsible to load the webpage associated with the item choosen by the user on the ListBox:
If Me.SelectedRowIndex <> -1 Then HTMLViewer1.LoadURL me.RowTagAt(me.SelectedRowIndex)
Start engines!
In order to finish the tutorial, we just need to add a line of code to the Open Event to the Window1:
RSSReader1.GetFeed("https://blog.xojo.com/feed" )
As you can see, it was really easy and works seamless on macOS, Windows and Linux!
You can download the Xojo Project from this link.
You can watch the video (in Spanish only) that talks you though this example.