
Have you ever wondered how entering mailto:blah@spam.com into the URL field in your web browser automatically brings up your mail app (i.e. Outlook for most Windows users)? Well you’re in luck because this article explains it all. Enjoy!
Ok, now that you’ve read that article let’s take a closer look at how you, as a Xojo developer, can handle this. Well, as you’ve diligently read in the above article, the first step is to register your application to handle a particular URI scheme by modifying the registry. The preferred approach is to do this as part of your Application’s installation process because at that point the user has given access rights to install your app and access rights therefore to modify the registry. This is the general structure as discussed in the MSDN article:
HKEY_CLASSES_ROOT
    alert
        (Default) = "URL:Alert Protocol"
        URL Protocol = ""
        DefaultIcon
            (Default) = "alert.exe,1"
        shell
            open
                command
                    (Default) = "C:\Program Files\Alert\alert.exe" "%1"
Where “alert” is your URI scheme, so if you navigate to a URI like alert:Hello, your web browser will launch your application with an extra command line argument: “alert:Hello”
The MSDN article goes into detail about how spaces, quotes, or backslashes affect your command line arguments depending on how the URI is invoke (i.e. Web Browser vs. ShellExecute/Run command). The take home message is just to avoid spaces, quotes, or backslashes in your URI if possible.
If you simply want to create a quick test to see how this works, you could execute the following Xojo code to add this URI scheme to the registry:
Dim reg As New RegistryItem("HKEY_CLASSES_ROOT")
reg = reg.AddFolder("alert")
reg.DefaultValue = "URL:Alert Protocol"
reg.Value("URL Protocol") = ""

Dim defaultIcon As RegistryItem = reg.AddFolder("DefaultIcon")
defaultIcon.DefaultValue = """" + App.ExecutableFile.NativePath + """,1"

Dim commandItem As RegistryItem = reg.AddFolder("shell").AddFolder("open").AddFolder("command")
commandItem.DefaultValue = """" + App.ExecutableFile.NativePath + """ ""%1"""
Because you’re modifying the registry, you will need to run your application as administrator (i.e. contextual/right click your app and select “Run as administrator” in the menu). This will add the necessary registry entries.

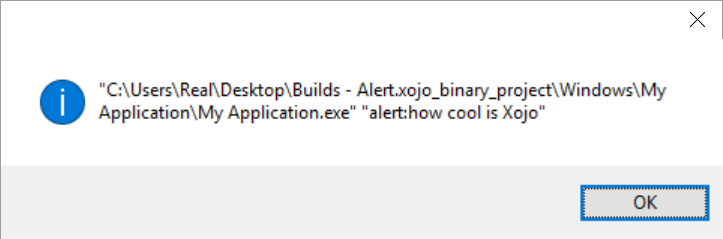
After this is done, your URI scheme is ready to be tested. Launch Internet Explorer and enter “alert:hello” in the URL field. After pressing Enter, your Application that added those registry entries will be launched. Now all you need to do is check the System.CommandLine property to see what alert message was passed. For example, if I added a MsgBox System.CommandLine to my App.Open event, I’d get something like this after entering “alert:how cool isXojo” in the URL field in Internet Explorer.
As you can see it’s very easy to set this up and handle the custom URI schemes in your application. Just be aware of the potential security issues that malicious people could be passing to your command line and handle those appropriately.
To use custom URIs on Mac OS X visit this post: Let Your OS X Desktop App React to Custom URIs