
Wouldn’t it be nice to have a TextField with Autocomplete for Xojo Apps, like we are used to in the Xojo IDE? You know, you start to type a word and the autocomplete feature suggests a possible matching word and finally you just have to press the ‘Tab’ key in order to complete the writing of the word. Let’s see how we can implement it, using language features like Subclassing and Class Interface, among others!
Creating the Class Interface
Our Xojo project will use three main items: a subclass from the TextField class, a Class Interface definition, and a Class that will do the job of the Dictionary containing the suggested words for the Autocomplete feature and that will conform to the Class Interface. This way, you’ll be able to use any object as the Dictionary source, as long as it conforms to the expected Class Interface.
Note: The Dictionary referred to here is not the Xojo Dictionary class, but is our collection of suggested words for use by autocomplete.
In fact let’s start creating a Class Interface; so run the Xojo IDE and create a new Desktop project.

- Add a new Class Interface to the project selecting Insert > Class Interface.
- Write ‘TextAutocompleteSource” in the Name field of the Inspector. This one will be the Data Type for the created Class Interface.
- Select the icon for the ‘TextAutocompleteSource’ in the Navigator (the leftmost column in the IDE Window), open the contextual menu and choose the ‘Add to “TextAutocompleteSource” > Method’ option. This action will bring us to the Inspector, so we can define the new Method signature.
- The first of the methods will be in charge of adding a new word to the dictionary, so use ‘AddWordToDictionary’ as the Method Name, and type ‘Value As String’ in the Parameters field.
- Add a second Method, name it ‘Match’, type ‘Value As String’ in the Parameters field, and ‘String’ for the ‘Return Type’ field. This will be the invoked method in order to find and return a word suggested for the received string.
That’s all we need for our Class Interface. Simple, isn’t? Remember that Class Interfaces just deal with Method definitions, and the classes that conform to it will be responsible for implementing the code for the methods.
Defining our Dictionary
Now is time to create a new class that will play the role of the main Dictionary for the app of this Tutorial. This one will implement, in fact, the Class Interface defined in the previous section. This means that will implement the real functionality for the methods defined in the TextAutocompleteSource Class Interface.
- Create a new Class selecting Insert > Class from the main Toolbar or from the Insert menu.
- Type ‘StringStack’ in the Inspector as the name of the new Class. This will be the name for the just created Data Type.
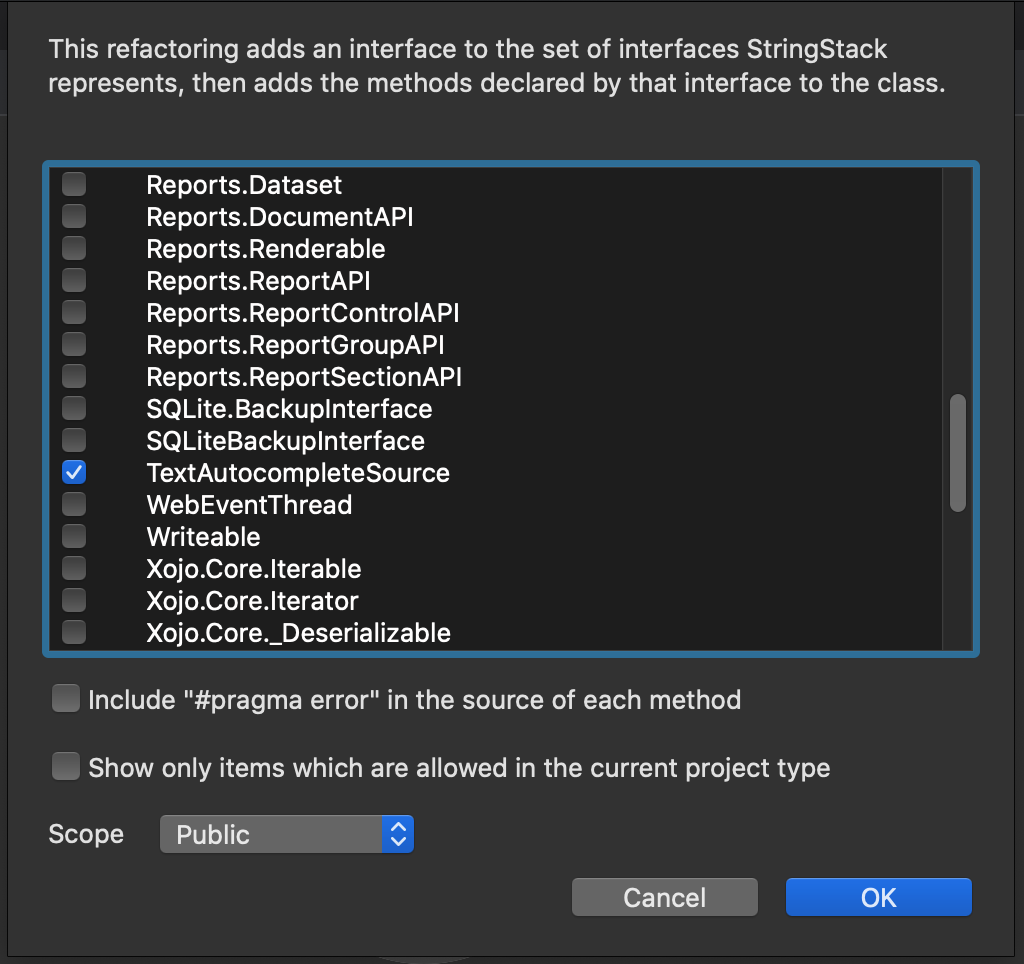
- From the Inspector, click on the Choose button near to the ‘Interfaces’ label. As a result, this action will open a new Window showing all the available Class Interfaces… including the one created by us in the previous section! Select this one (TextAutocompleteSource) and confirm the selection clicking the ‘OK’ button.

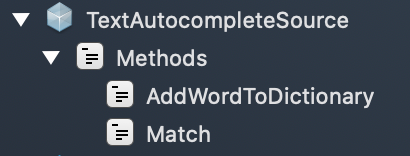
- As result, Xojo will add the methods declared in the selected Class Interface. We will implement the code for these two methods in a later step.
- Add a new Property to the class: with StringBack selected, choose Insert > Property. In the resulting Inspector, type ‘Collector(-1)’ in the Name field. This means, that our Property will be an Empty Array. Type ‘String’ for the ‘Type’ field and choose ‘Private’ as the Scope for the property.
- Let’s implement the code for the Class Interface methods! Select the ‘addWordToDictionary’ method and type the following code in the associated Code Editor:
if not Value.IsEmpty then Collector.Addrow(Value)
Select now the ‘Match’ method and type the following code in the associated Code Editor:
Var n As Integer = Value.Length
Var t As String
For Each item As String In Collector
  t = element.Middle(0, n)
  if t = Value then return item
Next
Return ""
This method is the one responsible to find a suggested word for the received string. Probably you’ll want to improve the algorithm in your own implementation (depending mainly on the kind of object you will use as a Dictionary), but this one will serve for our testing app.
Adding a Constructor to the Class
Now we are going to define a very special method to the Class: the Constructor. When a Class has this method it will execute the code from this method every time we create a new instance (object) from the Class. Usually we use the class Constructor (you can have several of them thanks to the OOP feature of Method Overloading) to define the initial state of the new instantiated object. In our case, we will use the Constructor to assign the initial state of the dictionary (the Collector property we’ve defined in a previous step) during the instantiation of the object.
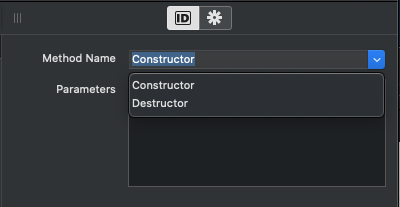
- Add a new method to the Class (Insert > Method). Next, select the ‘Constructor’ item from the ‘Method Name’ drop-down menu or type it.
- As we would do with a regular Method, we can modify the Constructor method signature to define, for example, the amount and type of the parameters. In fact, for our Constructor we will type ‘Value() As String’ for the Parameters field.
Add the following code to it:
Collector = Value
Subclassing: TextField Specialization
We have finished the auxiliary items needed for the project, so it is time to focus on the main point: create a TextField subclass to include the autocomplete feature on it.
- Add a new class to the project using Insert > Class. Type ‘TextFieldAutocomplete’ as the Class name in the Inspector, and type ‘TextField’ as its ‘Super’ class.
- Add a new property (Insert > Property). Type ‘Autocomplete’ as the property Name, ‘Boolean’ as the Type, and ‘True’ for the Default field. Finally, select the ‘Public’ option for the scope. This property will let us to use the objects from the class as regular TextField, without autocompletion, or with the Autocomplete functionality.
- Add another property, typing ‘AutocompleteSource’ for the property Name, setting the scope to ‘Public’ and its type to ‘TextAutocompleteSource’. That is the Data Type we have created as a Class Interface. This allows us to use any object that conforms to TextAutocompleteSource as the source for the Autocompletion Dictionary.
- Let’s add a third property. In this case, use ‘TabKeyAutcompletes’ as the property name, ‘Boolean’ for the Type, set the Scope to Public, and its default value to ‘True’. We will use this property to set the behaviour of the Tab key between autocomplete the suggested word, or change to its regular behaviour when used on a TextField control.
Shared Properties
All the properties created for the subclass are Instance Properties. That is, every new instance (object) from this class will have its own set of values for these properties. In some cases, however, we want to share the value of one or several properties for all the class instances…and this is what we can achieve using the Shared Properties.
We will use two of these shared properties for our TextFieldAutocomplete class to see them in action. One of these will let us use the Suggestions Dictionary globally for all the class instances, always the property is not set to Nil. The second one will be an Array of Strings that will contain all the characters that we want to exclude from the typed on the textfield.
- Add a new Shared Property to the Class, typing ‘globalAutocompleteSource’ for the Name field, setting the Scope to ‘Public’ and typing ‘TextAutocompleteSource’ as the Data Type for the Property.
- Add the second Shared Property typing ‘SpecialCharacters(-1)’ as its name, setting the Scope to ‘Protected’ and ‘String’ for the Data Type.
TextFieldAutocomplete: a Matter of Methods
The next step is to add a couple of method to our class: the public interface. With them, the user of the class can set the no allowed characters.
- Add a new method to the class typing ‘AddSpecialCharacters’ as the name, ‘Value() as String’ for the Parameters field, and setting the Scope to ‘Public’. Type this line of code in the associated Code Editor for the method:
SpecialCharacters = Value
- Add the second method, using ‘SpecialCharacter’ as the method name, ‘Value as String’ for the parameters field, ‘Boolean’ as returned Type and setting the Scope to ‘Protected’. Type this block of code for the method:
If SpecialCharacters.LastRowIndex > 0 Then
  For Each item As String In SpecialCharacters
    If item = Value then Return true
  Next
End If
Return False
Handling Events
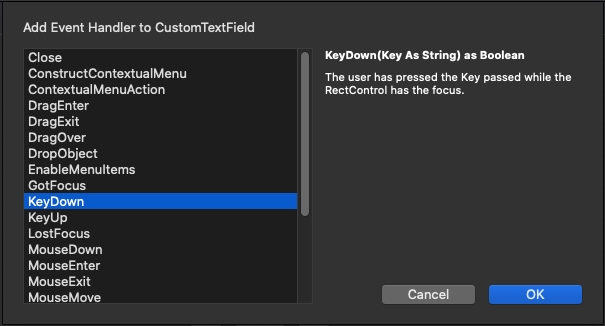
Our TextFieldAutocomplete class needs to be aware of every key down, so we are going to add the handler triggered in response of this event.
- Make sure that the ‘TextFieldAutocomplete’ item is selected on the Navigator and select Insert > Event Handler. This action will show a new window with all the available Events for the class. Select the KeyDown event and confirm clicking on the ‘OK’ button.
- Select the just added KeyDown event and type the following block of code. This is the place where we put the main logic for the class!
If Autocomplete = False Then Return RaiseEvent KeyDown(Key)

If SpecialCharacter(key) = True Then Return False

If Asc(key) = 9 And TabKeyAutocompletes = True And Me.SelectionLength > 0 Then
  Me.SelectionStart = Me.value.Length
  Me.SelectionLength = 0
  Return True
End If

Var tempText As String = Me.Value.Left(Me.SelectionStart) + key

Var matchingText As String

If AutocompleteSource <> Nil Then

  matchingText = AutocompleteSource.Match(tempText)

Elseif GlobalAutocompleteSource <> Nil Then

  matchingText = GlobalAutocompleteSource.Match(tempText)
End If

If matchingText <> "" Then
  Me.Value = matchingText
  Var startOffset As Integer = tempText.Length
  Me.SelectionStart = startOffset
  Me.SelectionLength = matchingText.Length-startOffset
  Return True
End If

Return false
Adding Class Events
Our class uses the KeyDown event, and that means that it will not be available for the new controls added to the project that would be based on this class. The solution? The Xojo language allows us to define new events for our classes, and we will use that feature in order to “duplicate” the signature of the used event on the class.
Make sure it is selected the ‘TextFieldAutocomplete’ item in the Navigator and then select Insert > Event Definition. The last action will bring us to the Inspector. Type ‘KeyDown’ as the Event Name, ‘Key as String’ as the Parameter, and ‘Boolean’ as Returned Type.
As you can see in the block of code of the previous section, we will call our defined event using the statement ‘RaiseEvent’, passing as parameter the same ‘Key’ String received in the original event.
Design the User Interface
Everything is now ready to test our Autocomplete TextField with Xojo! The first step is to choose the Window1 item in the Navigator, using the available UI Controls in the Library in order to design the interface as shown in this screenshot:
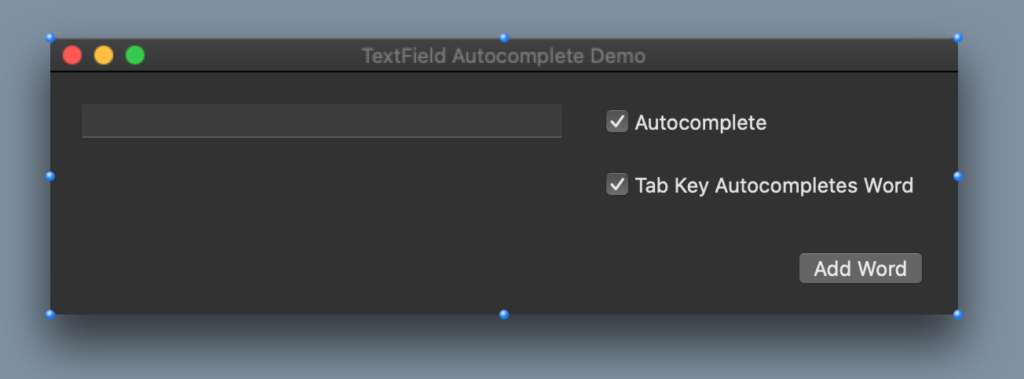
In fact, you have to use two CheckBox controls, one PushButton and one TextFieldAutocomplete, dragging the last one from the Navigator over the Window1 Layout Editor.

Double click the ‘CheckBox1’ labeled as ‘Autocomplete’ and add a new Event Handler. Choose ‘Action’ and click on ‘Ok’ to confirm the selection. Type the following line of code in the resulting Code Editor for the added ‘Action’ Event Handler:
TextField1.Autocomplete = me.Value
Repeat the same operation on the “CheckBox2”. In this case, type the following line of code on the ‘Action’ Event Handler:
TextField1.TabKeyAutocompletes = me.Value
Lastly, add the ‘Action’ Event Handler on the ‘PushButton1’ control, typing the following line of code:
Stack.AddWordToDictionary TextField1.Text
Start Your Engines!
Now we need to define the ‘Stack’ and the code responsible of putting our demo to work.
Make sure that the ‘Window1’ item is selected in the Navigator and add a new Property using ‘Stack’ as its name, set the Scope to ‘Public’ and the Type to ‘StringStack’. That is the base class previously defined and that conforms to the TextAutocompleteSource protocol.
Now, add the ‘Open’ Event Handler to ‘Window1’ and type the following block of code:
Stack = New StringStack(Array("object", "objection", "objective", "objector", _
  "desert", "deserve", "descend", "destroyer", "destruction", _
  "trail", "train", "trainer", "cup", "cure", "curiosity"))

TextField1.AddSpecialCharacters(array(chr(8)))
TextField1.AutocompleteSource = Stack
As you can see, when we instantiate a new object from the StringStack class, we use the Constructor to pass the Array of Strings. This way we have a simple dictionary whose contents allow us to test the Autocomplete TextField. Obviously, we can change the Dictionary used to any other object that conforms to the ‘TextAutocompleteSource’ protocol… even if it is a database!
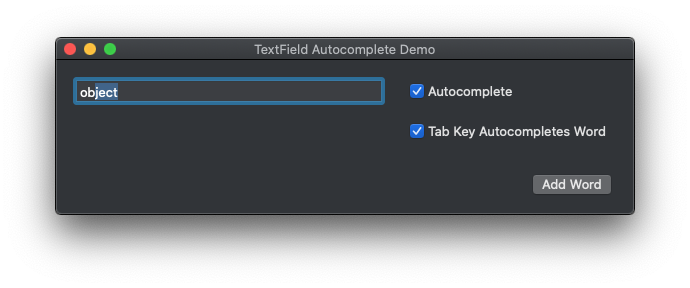
Run the project and start to type on the Autocomplete TextField. If you start typing the characters of any of the words in the “Dictionary”, you’ll see the TextField will show a suggestion for Autocompletion. Press the ‘Tab’ key… and done!
You can download the Example Project used in this tutorial from this link.
You can watch the video (in Spanish only) that talks you though this example.