
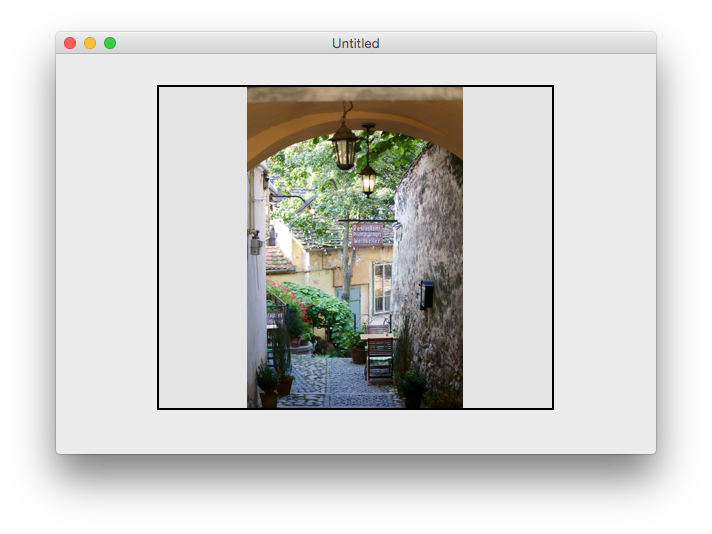
Whether you are using Xojo to create your very first application or if you are coming from other languages, like C# or VisualBasic, customized UI controls are probably one of those things you have in your to-do list. For multiplatform Desktop apps, you will find that the Canvas class offers everything you need. In order to show you how easy it can be, follow this tutorial to recreate the ImageWell UI class control, provided by default in the Xojo framework. Our customized ImageWell will be able to proportionally display any JPEG file dropped by the user on the control, centering it on the available surface.
Along the way, we also will see how the Xojo IDE simplifies making subclass properties available from the Inspector Panel, so when using their instances we can set some attributes as the background color, pen size or border color in a more convenient way.
 As usual, the first step to create a new subclass is adding a new class item to the Desktop project (Insert > Class). With the new class item selected, change its name to something descriptive. For this example we will use
 MyImageWell. The most important thing here is setting Canvas as its Super attribute. That means that the subclass will be based on the Canvas class, inheriting all its properties, Events and Methods so they will also be available for the subclass.
One of these inherited Events is Open, and we will implement it using the Event Handler option (click the + button in the toolbar to access the dropdown menu) in order to inform the class that we want to accept the dropped JPEG files. This is done with the following line of code in the Open Event Handler:
Me.AcceptFileDrop("img/jpeg")
Obviously, we can extend this support to accept other Xojo compatible graphical formats. For that, we would add a new File Type Set to the project, using it as the filter in the previous line of code.
Once we inform the class that we accept this feature, the next step is implementing the DropObject Event Handler that fires once this action is detected inside the limits of the control. The code we need to write for this Event Handler will test that the obj parameter passed along contains a valid FolderItem and, in that case, we will load such file as a new Picture object, assigning it to a property of the same Type. The code for the event is:
If obj.FolderItemAvailable Then
  image = Picture.Open(obj.FolderItem)
  Invalidate
End If
Don’t forget to add the Image computed property to the Class using Insert > Computed Property while the MyImageWell item is still selected, and using these values:
- Name: Image
- Type: Picture
- Scope: Public
As you can see, the amount of code we need to load the file as a Picture object and to assign it to the class property is minimal! Why do we use the Invalidate method call afterwards? Well, this is responsible for informing the operating system to redraw the instance when it has a chance. And when this happens it will fire the third and last Event we need to implement: Paint. Here is where we can instruct any Canvas based control how to draw itself through the graphical context represented by the g parameter passed along the Event.
Painting the control
Once we’ve added the Paint Event to the class and before writing the code responible of painting the dropped image inside its limits, we need to add three additional computed properties. We will use them to set some attributes like the color we want to use to paint the control background, the border color and even the width of the border:
BackGroundColor As Color = &cddddddBorderColor As Color = &c000000PenSize as Integer = 2
Add to the Setter method on every computed property the sentence me.invalidate; so every time we assign a new value to them… the control will be redrawn using the new value (background color, border color, pen size or even a new assigned picture).
The last step is writing the code responsible for drawing the control itself: filling the background with the set color, then drawing proportionally (and centered) the loaded picture pointed by the Image property, and finally drawing the border with the width and color specified. All of this is what we can do using the following snippet of code:
// We fill the control background using the set color
g.DrawingColor = BackgroundColor
g.FillRectangle(0,0,g.Width,g.Height)

// If we have a valid image object, then we draw it centered and scaled (if necessary)
If image <> Nil Then
  Var Height, Width As Integer
  Var sourcey, sourcex As Integer = 0
  If image.Height > image.Width Then
    Height = Me.Height
    Width = (Me.Height * image.Width) / image.Height
    sourcey = (Me.Width - Width) / 2
  Else
    Width = Me.Width
    Height = (Me.Width * image.Height) / image.Width
    sourcex = (Me.Height - Height) / 2
  End If

  // This is the line that actually draws a picture inside the graphic context of our instance
  g.DrawPicture(image,sourcey,sourcex,Width,Height,0,0,image.Width,image.Height)
End If

// We draw the control border
g.PenSize = me.PenSize
g.DrawingColor = BorderColor

g.DrawRectangle(0,0,Me.Width,Me.Height)
As you can see, the code needed for this is also very simple!
Make the properties visible from the Inspector Panel
While we are on it, we can use the Inspector Behavior feature to make our specific properties visible through the Inspector Panel. This way, when we add new instances from the subclass to the layout of any window, we will be able to easily set their values directly from the Inspector Panel. With the MyImageWell item still selected in the Project Browser, use the contextual menu to select the Inspector Behavior option to access the following Window:
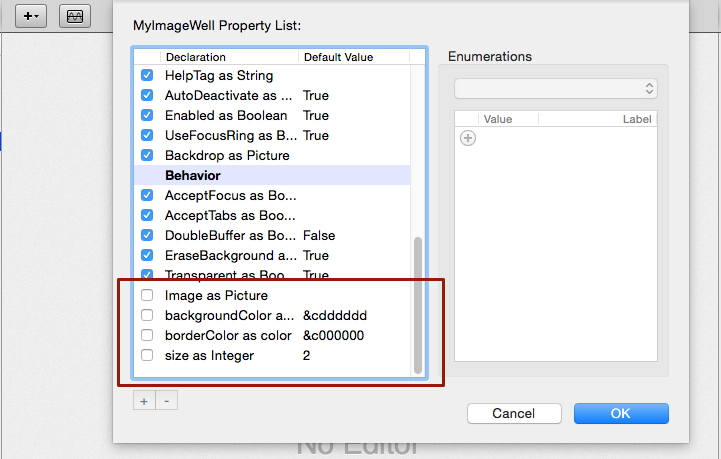
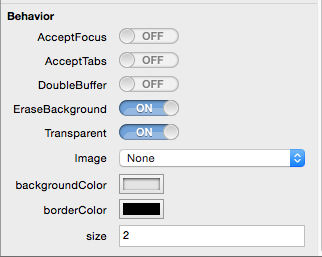
Here you will see all the Class properties, those common to all Canvas derived subclasses and also the ones added for us and that are specific to our class. You can find these properties listed under the Behavior section. To make them visible in the Inspector Panel we just need to check their associated checkboxes; and even modify their default values editing the associated cell if we want to.
Now, we just need to drag and drop the MyImageWell item from the Project Browser into any Window Design Layout in order to add new instances! Once we run the example project, we will see how the controls react to displaying any JPEG picture dropped on it.
If you want, you can investigate deeper into the methods provided by the Graphics class in order to make the control more glittery or more sophisticated.
You can watch this video (en español) to see this in action:
Javier Rodriguez has been the Xojo Spanish Evangelist since 2008, he’s also a Developer, Consultant and Trainer who has be using Xojo since 1998. He manages AprendeXojo.com and is the developer behind the GuancheMOS plug-in for Xojo Developers, Markdown Parser for Xojo, HTMLColorizer for Xojo and the Snippery app, among others