
More and more customers are using Xojo to create applications that may contain private end-user information. This means that it’s becoming increasingly important that your web applications be protected with an SSL certificate and some kind of authentication to make sure the user is who they claim to be.
Note: To follow along, you will need to build a CGI application and run it on a server that has an SSL certificate installed. Otherwise, you’ll get an error.
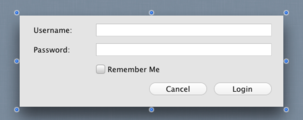
Traditionally, a login screen requests a UserID of some kind (whether an email address or other unique identifying identifier of some kind, like an account number) and a password (automatically generated or entered by the end-user).
A good method for creating login screens in Xojo is to use a Modal Dialog on an otherwise empty page, because there is no question about what you need the user to do next. It also allows you to deal with the complexities of the login process without any other code possibly getting in the way.
Something to remember: SSL connections are notably slower than non-SSL connections because no caching is allowed, so you might not want your whole web application to be secure (like if you were creating a publicly accessible site with special features for members-only). What you need to be able to do is to switch from non-SSL to SSL when a user gets to the login screen.
Making the Switch
In this example, the login screen is simply a blank web page that shows a web dialog in the Shown event. Before you get to that point, you need to check to see if the connection is secure. In the LoginPage.Open event:
// Make sure the user is connecting securely,
// If not have the browser load the application securely
If Not Session.Secure Then
  Dim host As String = Session.Header("Host")
  Dim url As String = "https://" + host
  ShowURL(url)
End If
If Self.Secure Then
  LoginPage.Show
End If
Remember Me
NOTE: It is best to not remember the user’s password because if this box gets checked on a public computer (like a Library or Internet Cafe) the user’s account could be compromised.
If Session.Cookies.Value("username") <> "" Then
  UserNameField.Text = Session.Cookies.Value("username")
  RememberMeCheck.Value = True
  PasswordField.SetFocus()
End If
DoLogin
If RememberMeCheck.Value Then
  Session.Cookies.Set("username", UserNameField.Text)
Else
  Session.Cookies.Remove("username")
End If

// Now validate the credentials and if they are OK,
// you can close the dialog and show the main page.
If ValidateCredentials Then
  Self.Close
  MainPage.Show
Else
  MsgBox("The username/password combination does not match.")
End If
You may be asking yourself why should you create a separate method for what would normally be in the Action event? The reason is because you may want to close this dialog from another location (see below), but first, when the user clicks the login button, you check the value of the RememberMe checkbox – If True, set the Username Cookie to the what was typed as the user name. If False, remove the cookie (otherwise users wouldn’t be able to remove the cookie by unchecking the box).
Capturing Returns
If Details.KeyCode = 13 Then
  LoginDialog1.DoLogin
End If