
In previous blog entries we saw how easy it is to implement the Design Pattern Singleton and how we can find the Observer Design Pattern already implemented on several Xojo features by default, greatly simplifying our code and interaction between the objects. Now, as promised, it is time to put it all in practice, creating our own Notification Center: a class that will allow us to share the same unique instance for the entire App (Singleton), and that can use any object in order to register itself for receiving notifications by the observed Control, for one or more message (the notifications themselves).
In addition, the designed Class will allow you to unsubscribe any of the previously registered objects, either to stop receiving notifications by the observed object at all, or just some of the previously registered notifications.
The Singleton and Observer Design Patterns have been described in previous blog entries and I highly recommend to read them now so you can get the flavor of the fundamentals behind them. I’ll wait here for you, I promise! Then we will deal with the code that varies to implement our NotificationCenter class, and to put it in practice with a Desktop example project.
Of course, before of continuing reading, you can download the example project, run it and review the code to get a first glance of what it does and how it works. Then, you can come back and continue reading if you want to better understand the NotificationCenter class inner, or how other objects can use this class.
The NotificationCenter Class
Execute the Xojo IDE and create a new Desktop project. Add a new class using Insert > Class. Go to the Inspector and change the Name attribute to “NotificationCenter”. This is the name of the new class we are designing (and, thus, a new Data Type).
With the new class still selected in the Navigator (the leftmost column on the Xojo IDE), add a new Shared Property (Insert > Shared Property). Use the Inspector again to change the Name attribute to “Instance”, the Type field to “NotificationCenter” and the Scope to “Private”. (You know, a Shared Property or Shared Method are those that you can access from the class itself, without needing to create previously a new instance from the class.)
Add a second Property to the class, this time via Insert > Property (this is, an instance property). Use this values on the associated Inspector:
- Name: Objects
- Type: Xojo.Core.Dictionary
- Scope: Private
Next, add a new Method (Insert > Method). Use the Inspector to choose the Constructor option from the “Method Name” dropdown menu, and set the method Scope to Private.
Write the following code on the associated Code Editor for the method:
Objects = new xojo.core.Dictionary
Defining the Constructor method with a Private scope prohibits the creation of several instances from the class. Instead of that, the class consumers will have to use the convenience method defined by us in order to retrieve the same —and unique— instance for all the cases.
So, now we will add a new Shared Method using Insert > Shared Method. Use the Inspector to put the following values on the created method:
- Name: SharedInstance
- Return Type: NotificationCenter
And write the following code in the associated Code Editor for the method:
if instance = nil then instance = new NotificationCenter
Return instance
These are the wires to write our Singleton class and to define our Data Model: the “Objects” property of data type Xojo.Core.Dictionary. This property will be responsible for storing the registered objects as observers of the desired Control(s), as well as the messages for whom it is interested in receiving notifications for the observed object(s). Probably this is better understood in the following figure:
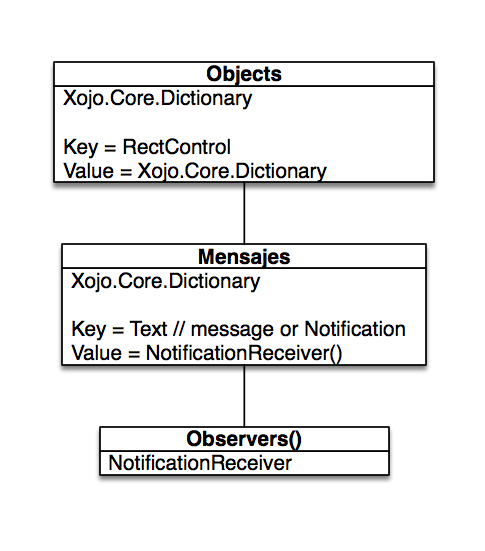 That is, the “Observers” Xojo.Core.Dictionary Property uses as Key any object of RectControl data type (the observed object). The associated value for that key is a new Xojo.Core.Dictionary, whose entries will use as Key the Notification (message as Text data type) for what an object wants to register as observer for such Control.
This way, one same object can be registered to several controls and also to several messages (Notifications) on one or several controls.
Finally, the associated value for every Key on this second Xojo.Core.Dictionary is an Array data type whose items are instances of the NotificationReceiver data type.
I know, I know… Stop. Breathe. Execute again the example project. Review the code on the “Register” method to get a better grasp… and back to follow!
Registering Observers
With the class still selected on the Navigator, add a new method (Insert > Method) using the following values. This is the method responsible for registering the new observers on the shared Notification Center instance:
- Name: Register
- Parameters: sourceControl as NotificationReceiver, observedObject as RectControl, message as Text
- Scope: Public
As you can see in “Parameters”, the first parameter is the Observer object (this is the interesed object in receiving the notifications); the second parameter is the observed object (that is from which we want to receive notifications); and the third parameter is the message from which we are interested in receiving the notifications by the observed object.
Write the following code on the Code Editor associated for this method:
dim observedObjects as xojo.Core.Dictionary = Objects.Lookup( observedObject, new xojo.core.Dictionary )
dim messages() as NotificationReceiver
if observedObjects.HasKey( message ) then messages = observedObjects.Value( message )
messages.Append sourceControl
observedObjects.Value( message) = messages
objects.Value( observedObject ) = observedObjects
Sending Notifications
Now is time to add to the class the method responsible to send the notifications to those objects interested in receiving them from any previously registered object. Insert a new method for the NotificationCenter class and use the following values in the associated Inspector:
- Name: sendNotification
- Parameters: sourceObject as RectControl, message as text, value as Auto
- Scope: Public
And the following code in the Code Editor associated with the method:
dim observedObjects as xojo.Core.Dictionary = objects.Lookup(sourceObject, nil)
if observedObjects <> nil then
  dim sourceObjects() as NotificationReceiver
  if observedObjects.haskey(message) then sourceObjects = observedObjects.Value( message )
  for n as integer = 0 to sourceObjects.Ubound
    dim target as NotificationReceiver = sourceObjects(n)
    target.valueReceived( value, message )
  next
end if
As you can see, the first parameter of the method is the control that wants to send a notification (second parameter) to all the possible registered objects, passing the value that such objects can be interested to receive for processing it (third parameter).
Stop receiving Notifications
However, it is probable that one object wants to stop receiving notifications from any previously registered control. For that, we need to add a new method to the NotificationCenter class using this values:
- Name: RemoveObserver
- Parameters: sourceControl as NotificationReceiver
And the following code on the associated Code Editor:
for each observedObjects as xojo.Core.DictionaryEntry in objects
  dim d as xojo.Core.Dictionary = objects.Value(observedObjects.Key)
  for each messagesForObject as xojo.Core.DictionaryEntry in d
    dim sourceObjects() as NotificationReceiver = d.Value(messagesForObject.Key)
    for n as integer = sourceObjects.Ubound DownTo 0
      if sourceObjects(n) = sourceControl then sourceObjects.Remove(n)
    next
  next
next
Stop receiving some Notifications
It may also be the case that one object wants to unsuscribe from the Notification Center to stop receiving just one particular notification. For that, add a new method and use the following values on the Inspector:
- Name: removeObserverForMessage
- Parameters: sourceControl as NotificationReceiver, message as text
And write the following code in the associated Code Editor:
for each observedObjects as xojo.Core.DictionaryEntry in objects
  dim d as xojo.Core.Dictionary = objects.Value(observedObjects.Key)
  for each messagesForObject as xojo.Core.DictionaryEntry in d
    if messagesForObject.Key = message then
      dim sourceObjects() as NotificationReceiver = d.Value(messagesForObject.Key)
      for n as integer = sourceObjects.Ubound DownTo 0
        if sourceObjects(n) = sourceControl then sourceObjects.Remove(n)
      next
    end if
  next
next
One Class Interface that runs them all: NotificationReceiver
Along the implementation of our Notification Center class we have seen several times the reference to the NotificationReceiver data type. This is what we are going to get our hands on next.
In fact this is a Class Interface; what means that it works as a “glue” in order that any object can implement their defined methods. This way the objects can be seen as their native class and also as an instance from NotificationReceiver, so they can be registered as observers on the Notification Center independently the native class they are based on.
Use Insert > Class Interface to add a new Class Interface to the project. Next, write the following values in the associated Inspector:
- Name: NotificationReceiver
With the Class Interface still selected in the Navigator, add a new method using the following signature in the Inspector:
- Method Name: valueReceived
- Parameters: value as Auto, message as Text
Done! Depending on your own needs, you can add more methods for the interface class in combination with the Notification Center class itself.
Testing the Notification Center
Now it is time to design the user interface in order to test the Notification Center class. The changes made on a TextField control will automatically update the contents of a Label control, a Slider control, a ListBox control and a Canvas control. Moreover, the Label instance will subscribe in the Notification Center to receive two types of notifications, changing his behaviour (the text shown) based on the received notification.
We will also add a couple of CheckBox controls to test the functionality to unsuscribe the Label control from all or just some notifications.
But before we start with that, and as we have seen in the previous step, we need that all the objects that want to be able to register on the Notification Center be of the NotificationReceiver data type. That means that we need to create our own subclases for the Label, Slider, ListBox and Canvas controles. Let’s start with the Label!
Label Subclass
Create a new sublcass for the Label Class. You can do that selecting the Label control from the Library and choosing the “New Subclass” option from the contextual menu; or you can drag and drop the control from the Library to the Navigator. Anyway, the result will be the same: you will have created a new subclass with the name “CustomLabel” (it can vary, depending the Xojo release you use). By the way, you also can use Insert > Class in order to create a new subclass.
Regardless of the method used to create the new subclass, choose it in the Navigator and use this values in the associated Inspector:
- Name: MyLabel
- Super: Label // This way, our sublcass will inherit all the methods, events and properties from the base class.
- Interfaces: Click on the button and choose “NotificationReceived” from the resulting panel/Window. Confirm the selection clicking on the “OK” button.
As result of the last action, Xojo will automatically added the ValueReceived method to the class. Write the following code in the associated Code Editor:
RaiseEvent newValueReceived value, message
Here we raise a new event (not defined yet), so every instance from the class can be in charge of implement the real behavior in base of the parameters received.
So, with the “MyLabel” class still selected, use Insert > Event Definition to add the event definition we need. Use the following values in the associated Inspector:
- Event Name: newValueReceived
- Parameters: value as auto, message as Text
Slider Subclass
Add a new subclass and use these values in the associated Inspector:
- Name: MySlider
- Super: Slider
- Interfaces: Add the NotificationReceiver Class Interface as seen in the previous step.
Write the following code for the ValueReceived method:
RaiseEvent newValueReceived val(value)
And add the event definition using Insert > Event Definition, as we have seen in the previous step. Use this signature in the Inspector:
- Event Name: newValueReceived
- Parameters: value as integer
ListBox Subclass
Let’s create now the subclass for the ListBox, following basically the same steps already done with the previous subclasses. Use the following values:
- Name: MyListBox
- Super: ListBox
- Interfaces: NotificationReceiver
Write the following code in the Code Editor associated with the ValueReceived method added by the Class Interface:
RaiseEvent newValueReceived val(value)
And add the corresponding Event Definition using this signature:
- Event Name: newValueReceived
- Parameters: value as integer
Canvas Subclass
We have arrived to the last subclass definition for our example project. Add a new subclass to the project and use this values in the associated Inspector:
- Name: MyCanvas
- Super: Canvas
- Interfaces: NotificationReceiver
Write the following code for the ValueReceived method:
dim s as string = value
newValue = s.ToText
me.Refresh
Next, use Insert > Event Handler to add the Paint event to the subclass. Write this code in the associated Code Editor:
dim size as integer = val(newValue)
g.TextSize = size
dim centerx as integer = g.Width/2 - g.StringWidth(newValue)/2
dim centery as integer = g.Height/2+g.StringHeight(newValue,g.Width)/2
g.ForeColor = rgb(size, size, size)
g.FillRect(0,0,g.Width,g.Height)
g.ForeColor = if(size <= 50, rgb(255,255,255), rgb(0,0,0))
g.DrawString(newValue,centerx,centery)
Lastly, add a new property to the subclass using Insert > Property, and using this values:
- Name: newValue
- Type: Text
- Scope: Private
Designing the User Interface
Once we have created the subclasses for the Controls we will use as observers in our example app, it is time to design the user interface. For that, choose the window by default for the project (Window1).
Xojo will show the Layout Designer for the selected Window. Drag the subclass controls from the Navigator (or from the Library) so they are arranged as shown in this picture. In addition, drag a couple of CheckBox controls and one TextField too from the Library to the layout.

Choose the label instance (with the name “Label2” in the example project) and use Insert > Event Handler to add the “newValueReceived” event handler previously defined in our class. Write the following code in the associated Code Editor:
dim s as string = value
Select case message
  case "valueChanged"
    me.Text = "Value on source Control: "+ s
  case "charValue"
    me.Text = "ASCII Code for last keystroke: "+ str(asc(s))
End Select
As you can see, the event uses the received message to decide how to work with the value sent by the observed object. In one case it will show the value as is, and for the other it will show the ASCII code for the value received as Text.
Select now the Slider instance (with the name “Slider1” in the example project), and repeat the action to add the Event Handler “newValueReceived” to the control. Write the following code in the associated Code Editor:
me.Value = value
In this case, the control will simply assign to his “value” property the value received.
Select now the ListBox instance (“ListBox1” in the example project). Add the Event Handler “newValueReceived” and write this line of code:
me.ListIndex = value
We will also add the “Open” Event Handler, so we can populate some default values to use in the example. Once we’ve added this event, write the following code in the associated Code Editor:
for n as integer = 0 to 99
  me.AddRow str(n)
next
Lastly, select the TextField instance (“TextField1” in the example project), and add the “Keydown” and “Lost Focus” Event Handlers. Once added, select the KeyDown event handler and write the following code:
dim myNotificationCenter as NotificationCenter = NotificationCenter.sharedInstance
myNotificationCenter.sendNotification(me,"charValue",key)
Next, select the LostFocus event and writhe the following code:
dim myNotificationCenter as NotificationCenter = NotificationCenter.sharedInstance
mynotificationcenter.sendNotification(me,"valueChanged",me.Text)
For both cases, we retrieve the shared instance from the Notification Center class and publish a new notification, passing along the own control as first argument (acting as originator), the message or published notification as second argument, and the value sent as the third argument. From this point on, the Notification Center will be in charge of propagate the received notification to all the interested objects.
Subscribing and Unsubscribing to Notifications
Let’s get in charge of the user interface controls whose function is to enable and disable the notifications for our MyLabel instance (Label1).
Select the CheckBox1 control, add the Action event handler and write the following code in the associated Code Editor:
dim miNotificationCenter as NotificationCenter = NotificationCenter.sharedInstance
select case me.Value
  case true
    miNotificationCenter.register(Label2,TextField1, "valueChanged")
    miNotificationCenter.register(Label2, TextField1, "charValue")
  case False
    miNotificationCenter.removeObserver(Label2)
    CheckBox2.value = false
end select
Select now the CheckBox2 control, add the Action event handler and write the following code:
dim miNotificationCenter as NotificationCenter = NotificationCenter.sharedInstance
select case me.Value
  case true
    miNotificationCenter.register(Label2,TextField1, "valueChanged")
  case False
    miNotificationCenter.removeObserverForMessage(Label2,"valueChanged")
end select
As you can see, in the first block of code we register the “Label2” control so it can receive both notifications when the checkbox value is True, and unsubscribe the control from receiving any notification when the checkbox is False. For the second block of code, the “Label2” control just subscribe or unsubscribe for one of the two notifications, respectively.
Starting engines!
What we need to put all to work? Add the Open event handler to “Window1” and write the following code.
dim miNotificationCenter as NotificationCenter = NotificationCenter.sharedInstance
miNotificationCenter.register(Label2,TextField1, "valueChanged")
miNotificationCenter.register(Label2, TextField1, "charValue")
miNotificationCenter.register(Listbox1,TextField1, "valueChanged")
miNotificationCenter.register(Slider1,TextField1, "valueChanged")
miNotificationCenter.register(canvas1,TextField1, "valueChanged")
This code will register the interested controls (observers) to the Notification Center for those Notifications they are interested in. Of course, this can also be done inside the Open event handler for every interested control!
In brief
As we have seen, with the combination of the Observer and Singleton Design Patterns, and the help of one Class Interface definition, we have created our own Notification Center from scratch to greatly automatice and simplify the communication between the objects, their processes and easying also the maintenance and extension of the app functionallity.
You can watch the video (in Spanish only) that talks you though this example.
Javier Rodriguez has been the Xojo Spanish Evangelist since 2008, he’s also a Developer, Consultant and Trainer who has used Xojo since 1998. He is in charge of AprendeXojo.com and the developer behind the GuancheMOS plug-in for Xojo Developers and the Snippery app, among others.