

One of the many new features included in 2020 Release 2 is the Worker class. A Worker provides a way for you to have code that runs on multiple CPU cores.
A Worker achieves this by running its code in a Console app. One or more of these console apps are started based on your Worker settings. Since these run as Console apps, the OS treats them as separate processes and spreads them out amongst available CPU cores.
Note: For now, Worker can be used with Desktop projects, but we plan to make it available for Web projects in the future.
When run in Debug mode, Workers use Threads to simulate separate Console apps to make debugging easier. This means that when debugging everything still runs on a single CPU core. Build your project to allow your Workers to run on multiple CPU cores.
Worker Overview
Add a Worker to your projects using the Insert toolbar or menu. This creates a special Worker object in your project which provides properties and events for controlling how it operates.
There are three properties you can adjust in the Inspector for a Worker.
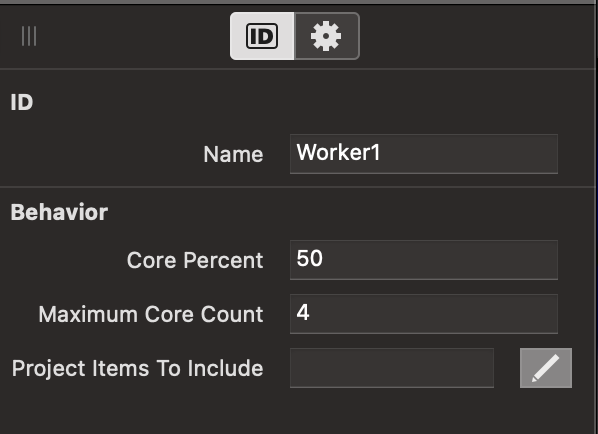
- Core Percent: This indicates the percentage of CPU cores that should be used. For example, if you have an 8-core CPU, enter 50 here to limit the Worker to 4 (50% of 8) CPU cores.
- Maximum Core Count: This indicates the most cores you want the Worker to use. This works in conjunction with Core Percent. For example, if you have a 12-core CPU with Core Percent set to 50 then that would mean use up to 6 CPU cores. If you then set Maximum Core Count to 4, then the Worker will use no more than 4 (rather than 6).
- Project Items to Include: When this is blank all classes and modules in your project are included in the Worker Console project for use. However you may not need everything, so you can choose to be specific about which supporting classes and modules you want to include (one project item per line).
The Worker object itself has five events you use to project jobs for the Worker to do.
JobRequested: When a Worker is first started, it requests a job which calls this method in your app. Here you can return a String containing details about the Job that the Worker will run. You can return information here such as a path to a file, a key to a database table, a URL, or whatever else makes sense. However, you should avoid passing round large amounts of data as that is slower and will use more memory. Instead, allow the Worker to get what it needs based on the information you return here. When there are no more jobs, return an empty string to tell the Worker it can quit.
JobRun: The code in this event runs in the Worker Console app where it can make use of multiple CPU cores. The parameter contains a String with the information that was returned from JobRequested. Remember that this code is independent and should not refer to any values that were set in your app as they won’t be available in the Worker. The only data the Worker gets is what is passed in, which it can then use to look up additional data elsewhere. You can return a String from this event to provide information about the job that just finished running. In addition, when a job is finished a new job is requested by calling JobRequested.
JobCompleted: When JobRun finishes, the JobCompleted event is called and the value that was returned from JobRun is provided here. You can use this method to update your job list or do other housekeeping.
JobProgressed: You can call the SendProgress() method to send progress information back to your app, which you can process in this event.
Error: The error event is called if there was an error running a job. You will be provided with the details of the job that caused the error so you can log it or add it back to a queue so that it can attempt to run again.
Once you have implemented the events (at a minimum JobRequested and JobRun), you start a Worker by calling its Start method.
Workers automatically stop when they have no more jobs to do or if they lose communication with your app.
Word Counter Example
There are a couple Worker example projects that are included with Xojo: PictureResizer and WordCounter (Examples/Worker). In particular, the Word Counter example shows how Worker can be used to improve performance by using multiple CPU cores. Without Worker, counting the words in 4 text files takes about 12 seconds. With Worker using 4 CPU cores, it takes about 4 seconds.
The WordCounter example has a simple class (called WordCounter) that counts words (intentionally) slowly.
There is a Jobs() array on the WordCountWorker that contains the paths to the text files to word count. In the JobRequested event, the first item in the array is removed from the array and returned so that JobRun can work on it.
JobRun uses the WordCounter class to load the text file and count its words, returning the word count and the path of the file it counted.
JobCompleted updates the main window with the word count.
For more information about Worker, refer to the Worker topic in the User Guide.