
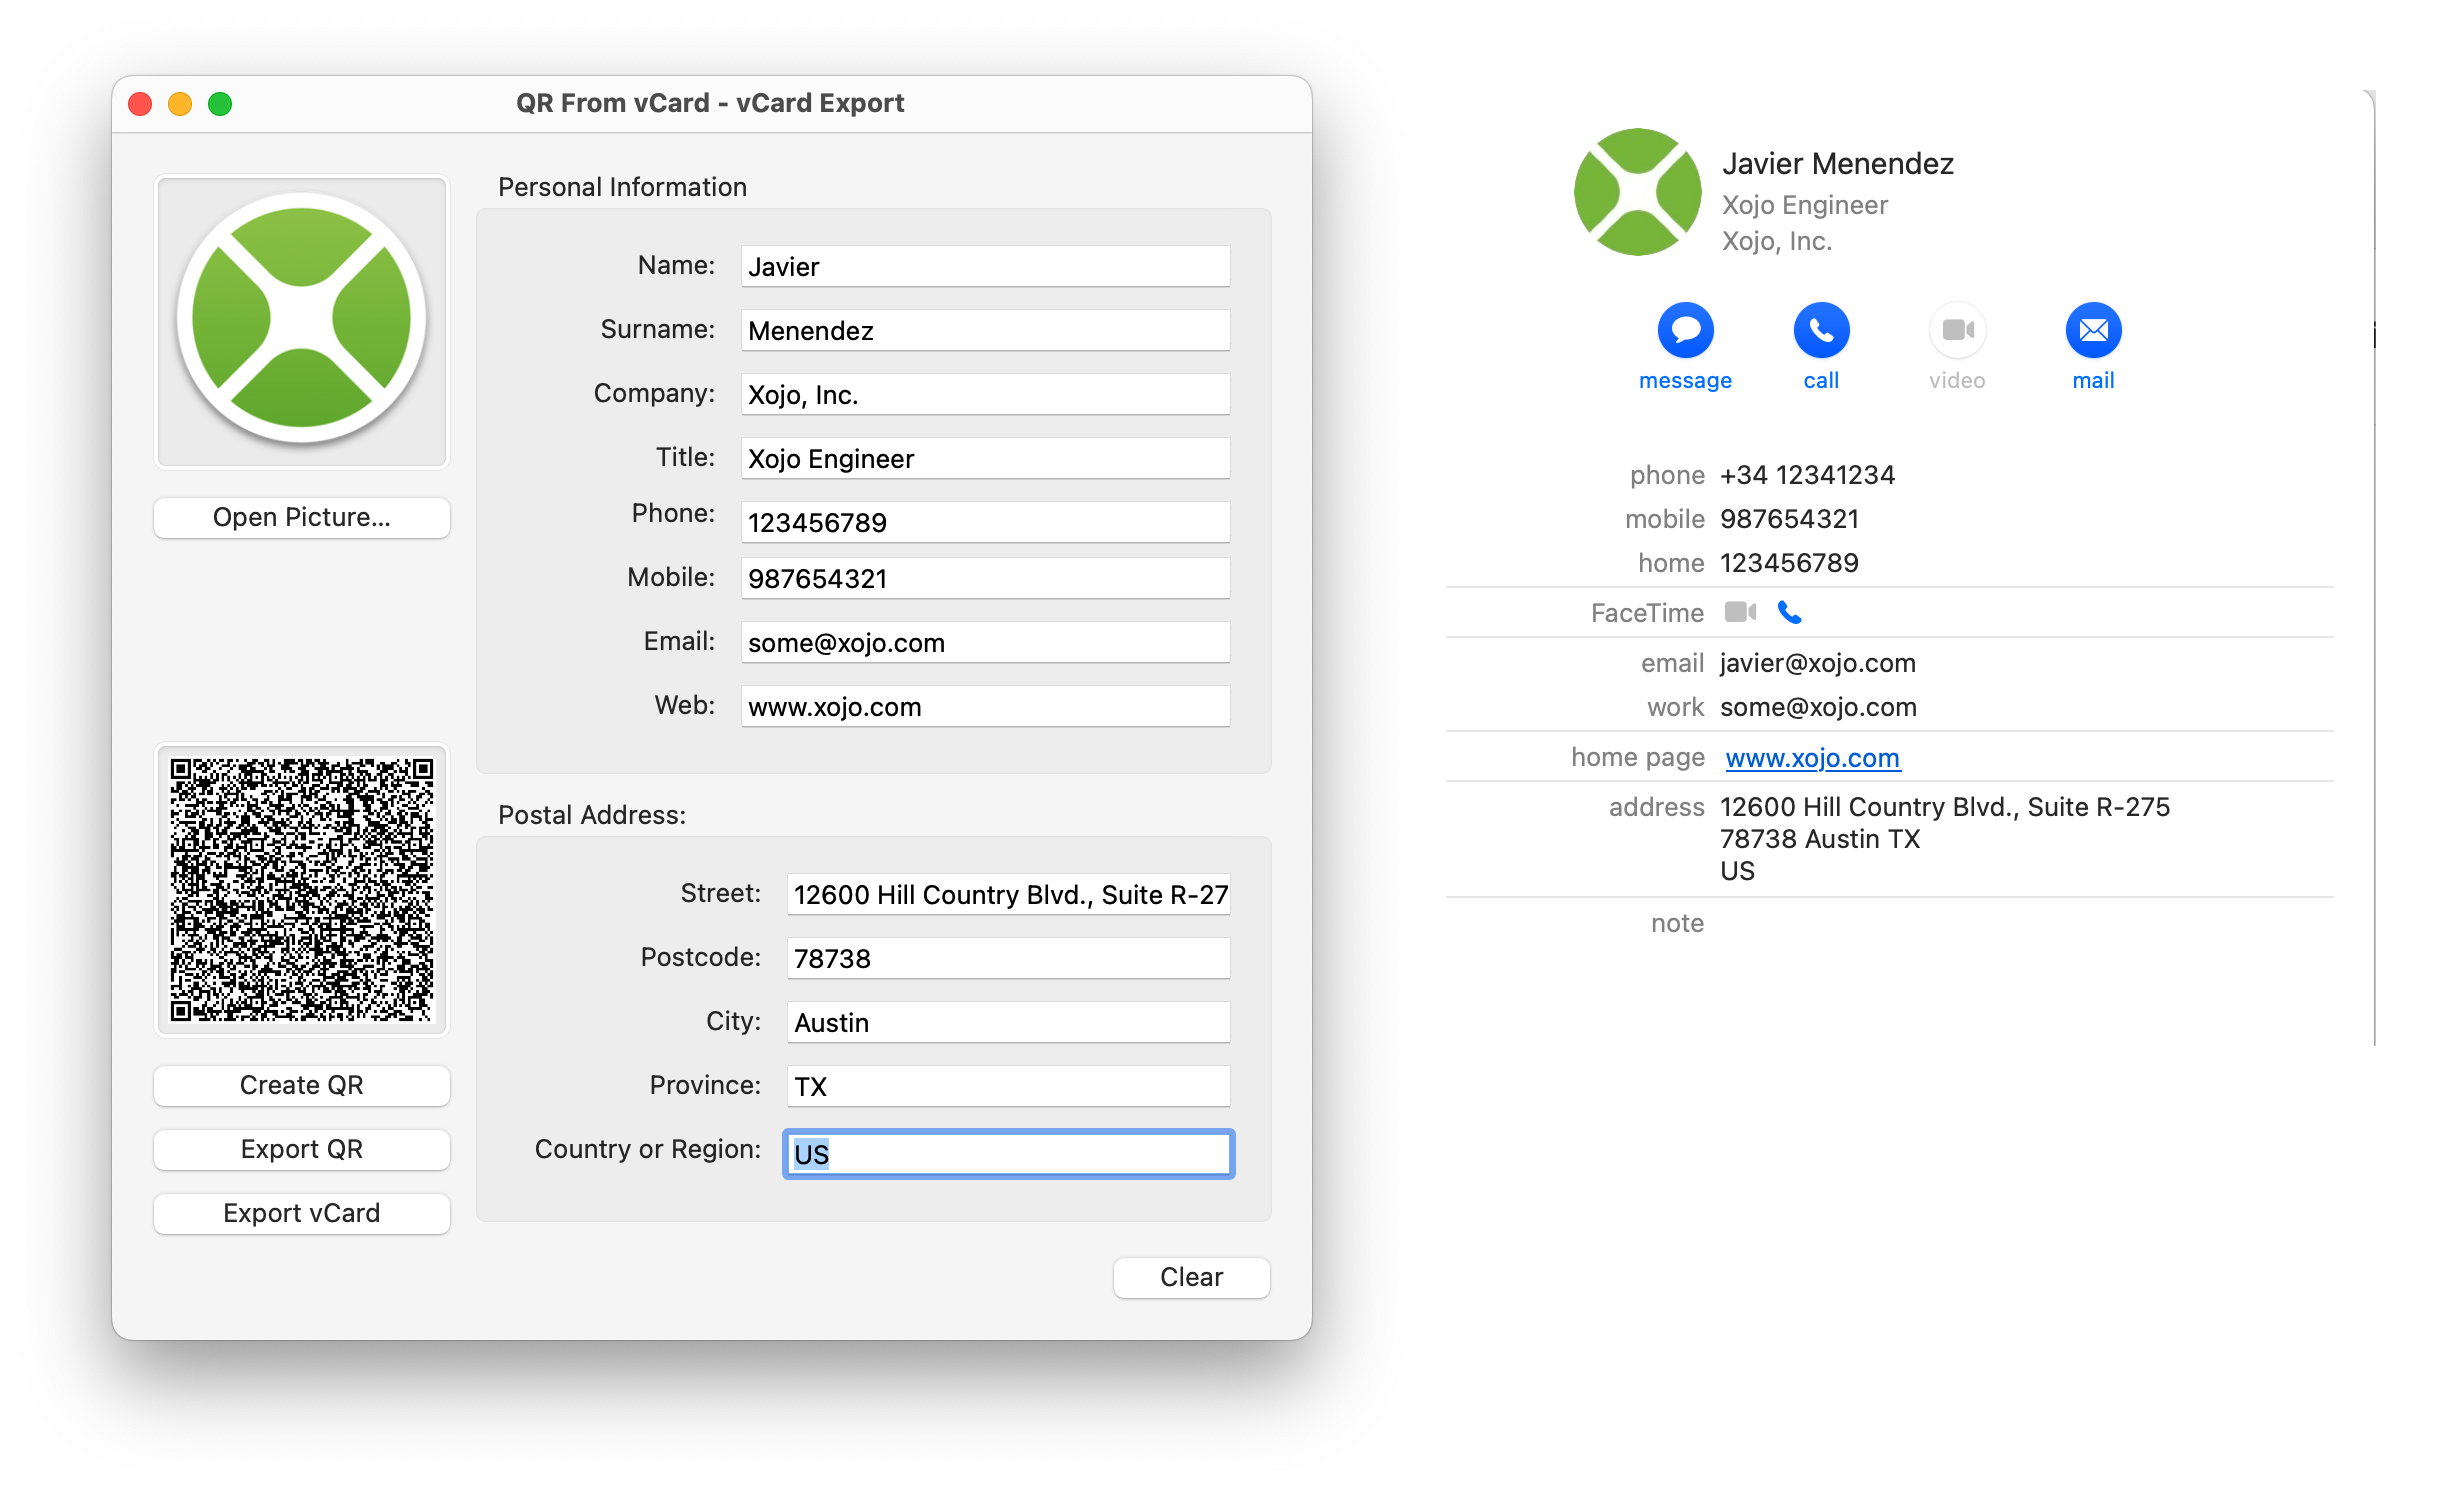
It’s the 21st Century and it’s possible to share contacts with other people directly from your mobile phone, but let’s face it, business cards are still a very common way to share personal contact information.
For some years now, it has been common for cards to include a QR code that corresponds to the contact details so that, when scanned, they can be added directly to the Address Book on a device or computer.
This tutorial creates an app that generates QR codes with the embedded information in vCard format. Additionally, learn how to to export that file in vCard format and, if you want, include an image like a contact photograph or logo.
Download Xojo and install it on your computer just as you would do with any other application on your operating system of choice (macOS, Windows or Linux).
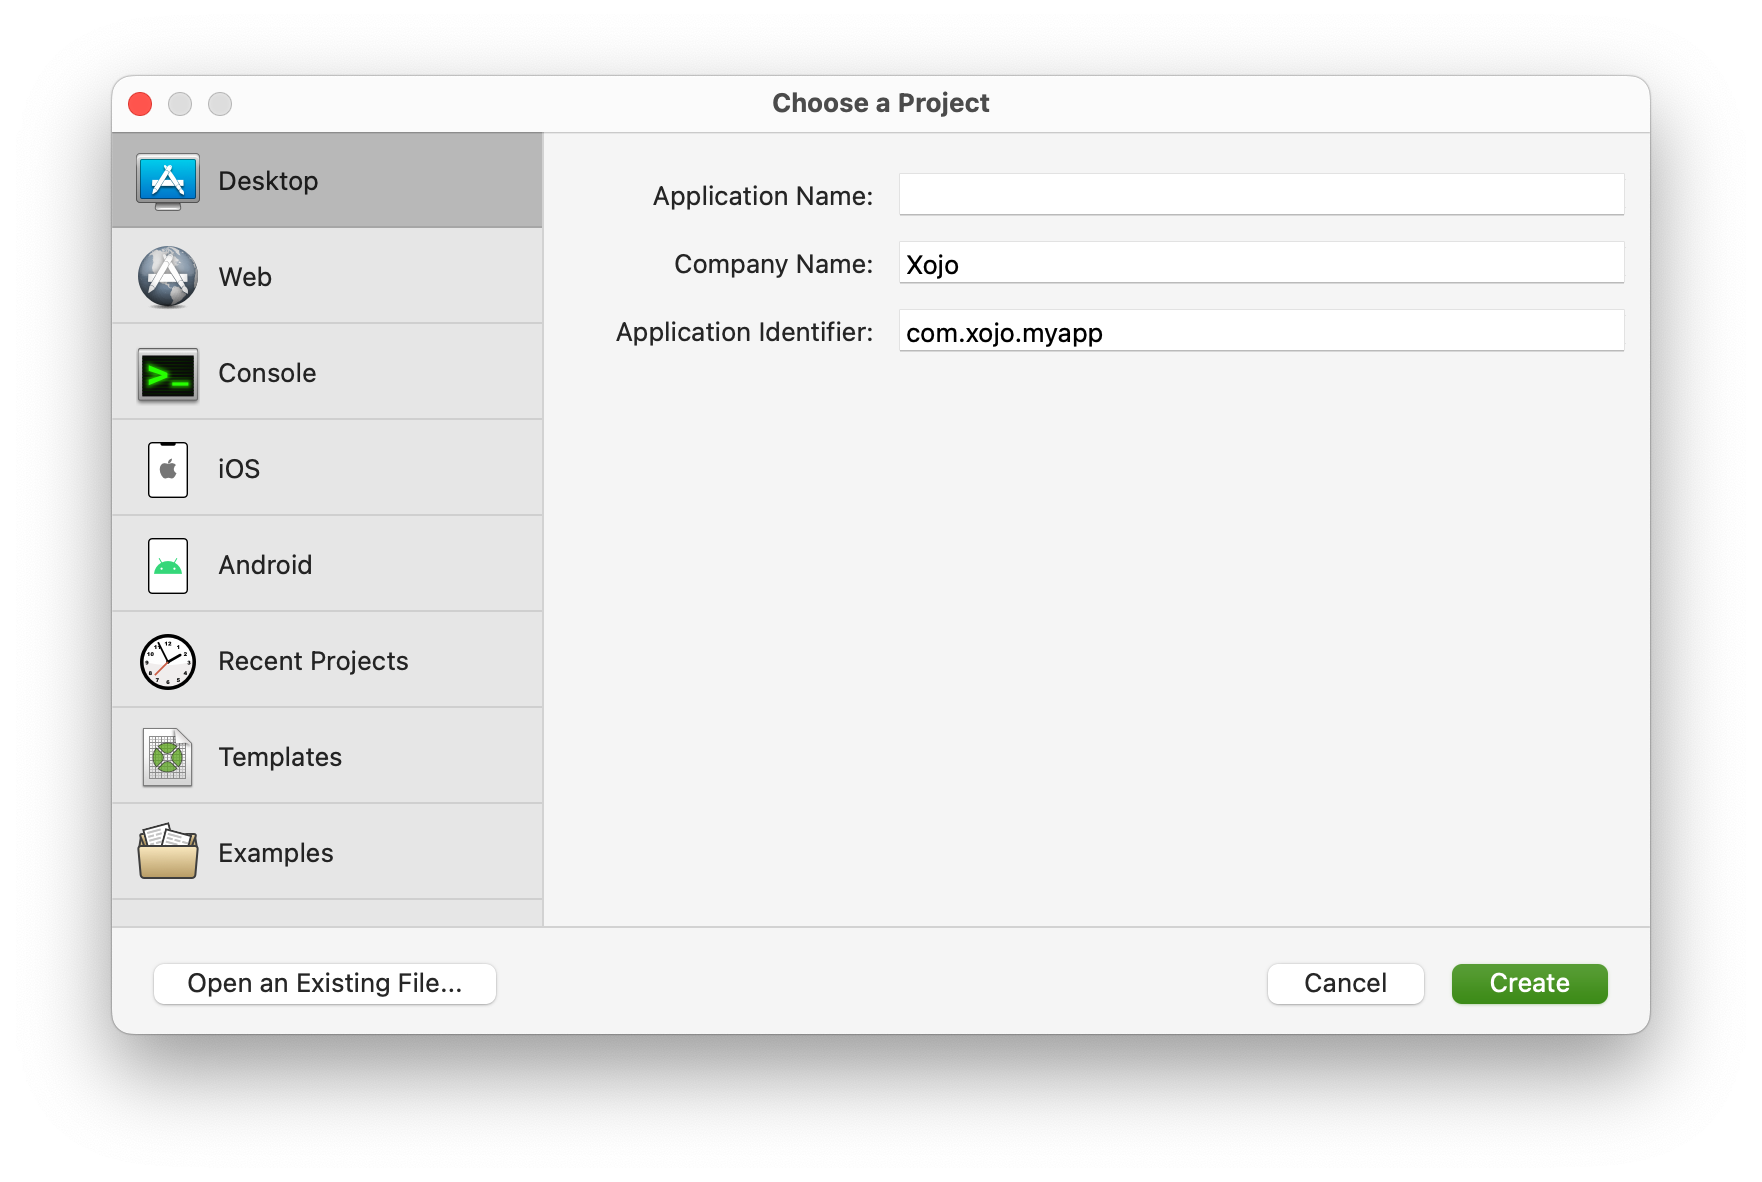
Once Xojo is installed, launch it and select Desktop in the Choose a Project window. Enter the desired name for this application, as well as the name of the company, etc. You can leave the values presented as default or change them to those of your choice.
Designing the User Interface
This is the process that will likely take us the longest (with the most steps required). Through this process we will see how to use the Container control to our advantage to compartmentalize different aspects of the UI and also the logic associated with each of these components. Let’s get started!
Personal Data Container
Click the Library button to access the library that displays all of the user interface controls included by default in Xojo for Desktop projects.
Locate the Container control and drag it onto the Project Navigator. This is the vertical area on the left side of the IDE window where all the elements added to the project are displayed.
When you release the control over the Project Navigator you will see that it is added as a new component and the associated Inspector Panel will appear in the right area of the IDE window. Change the following values using the Inspector Panel:
- Name: PersonalInfoContainer
- Width: 374
- Height: 302
With the PersonalInfoContainer control still selected in the Navigator, access the Layout Editor for that control by clicking on the Library icon again. Locate the GroupBox control and double-click on it so it is automatically added to the Layout Editor for the container. Use the following values in the associated Inspector Panel:
- Left: 0
- Top: 0
- Width: 374
- Height: 302
- Locking: Close the four locks
- Caption: Personal Information
Next we will add both the labels and the text fields on the GroupBox1 control so the user can enter the data from which both the vCard and the QR will be created with said information.
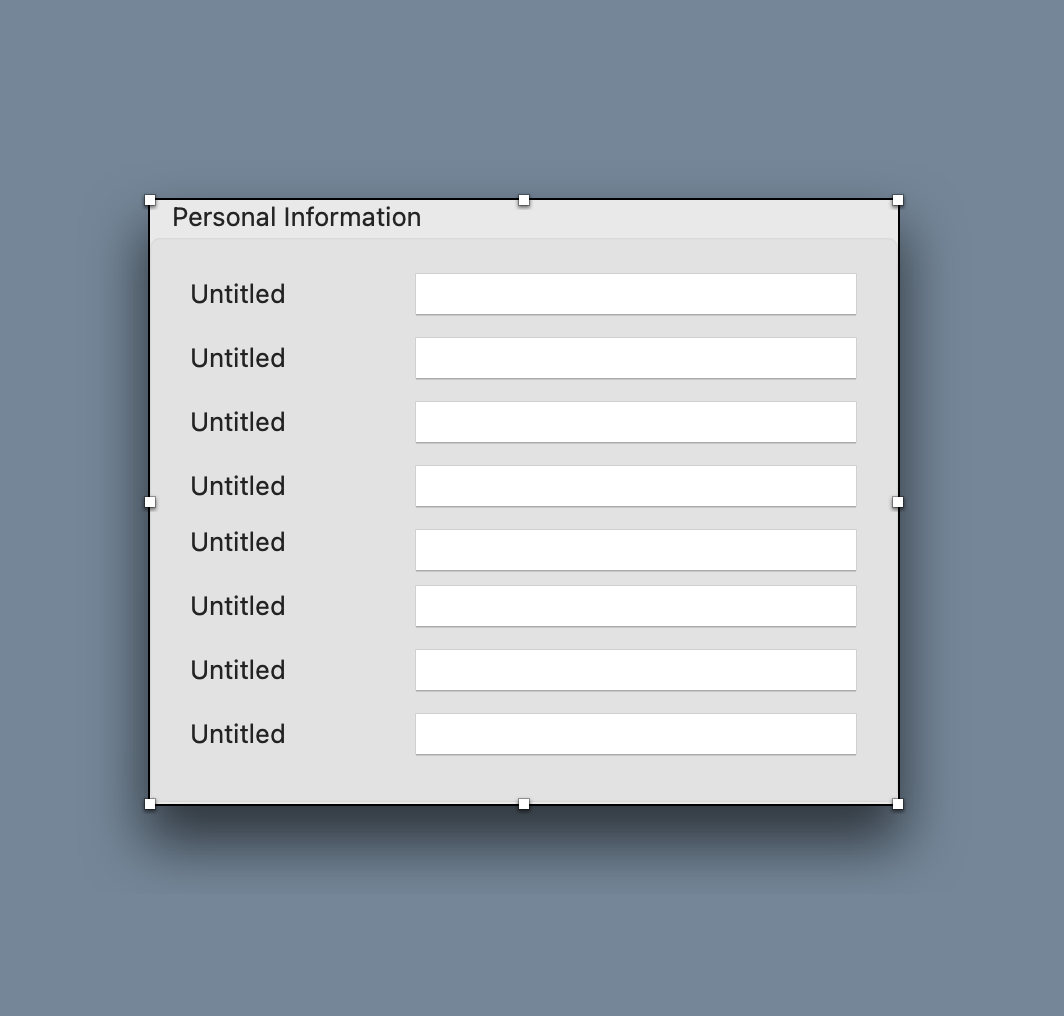
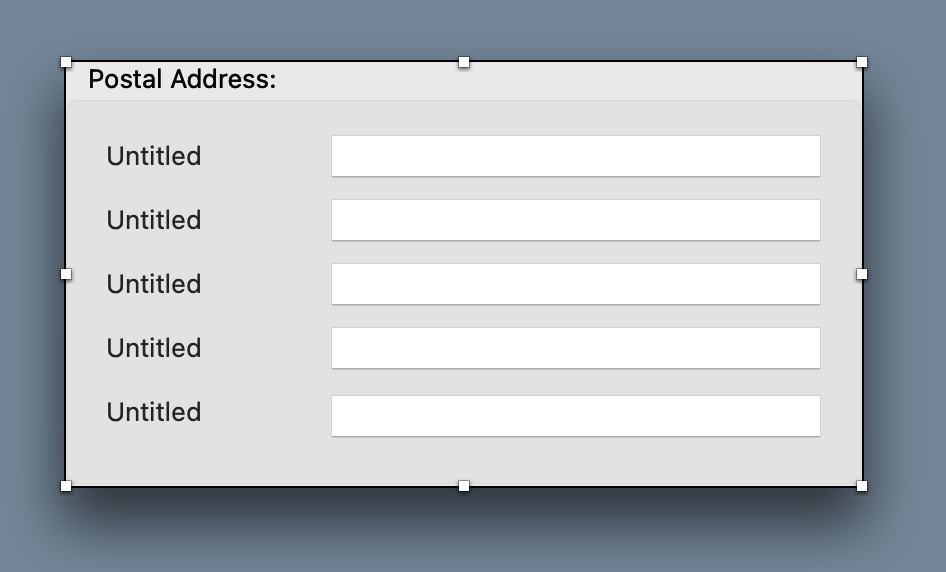
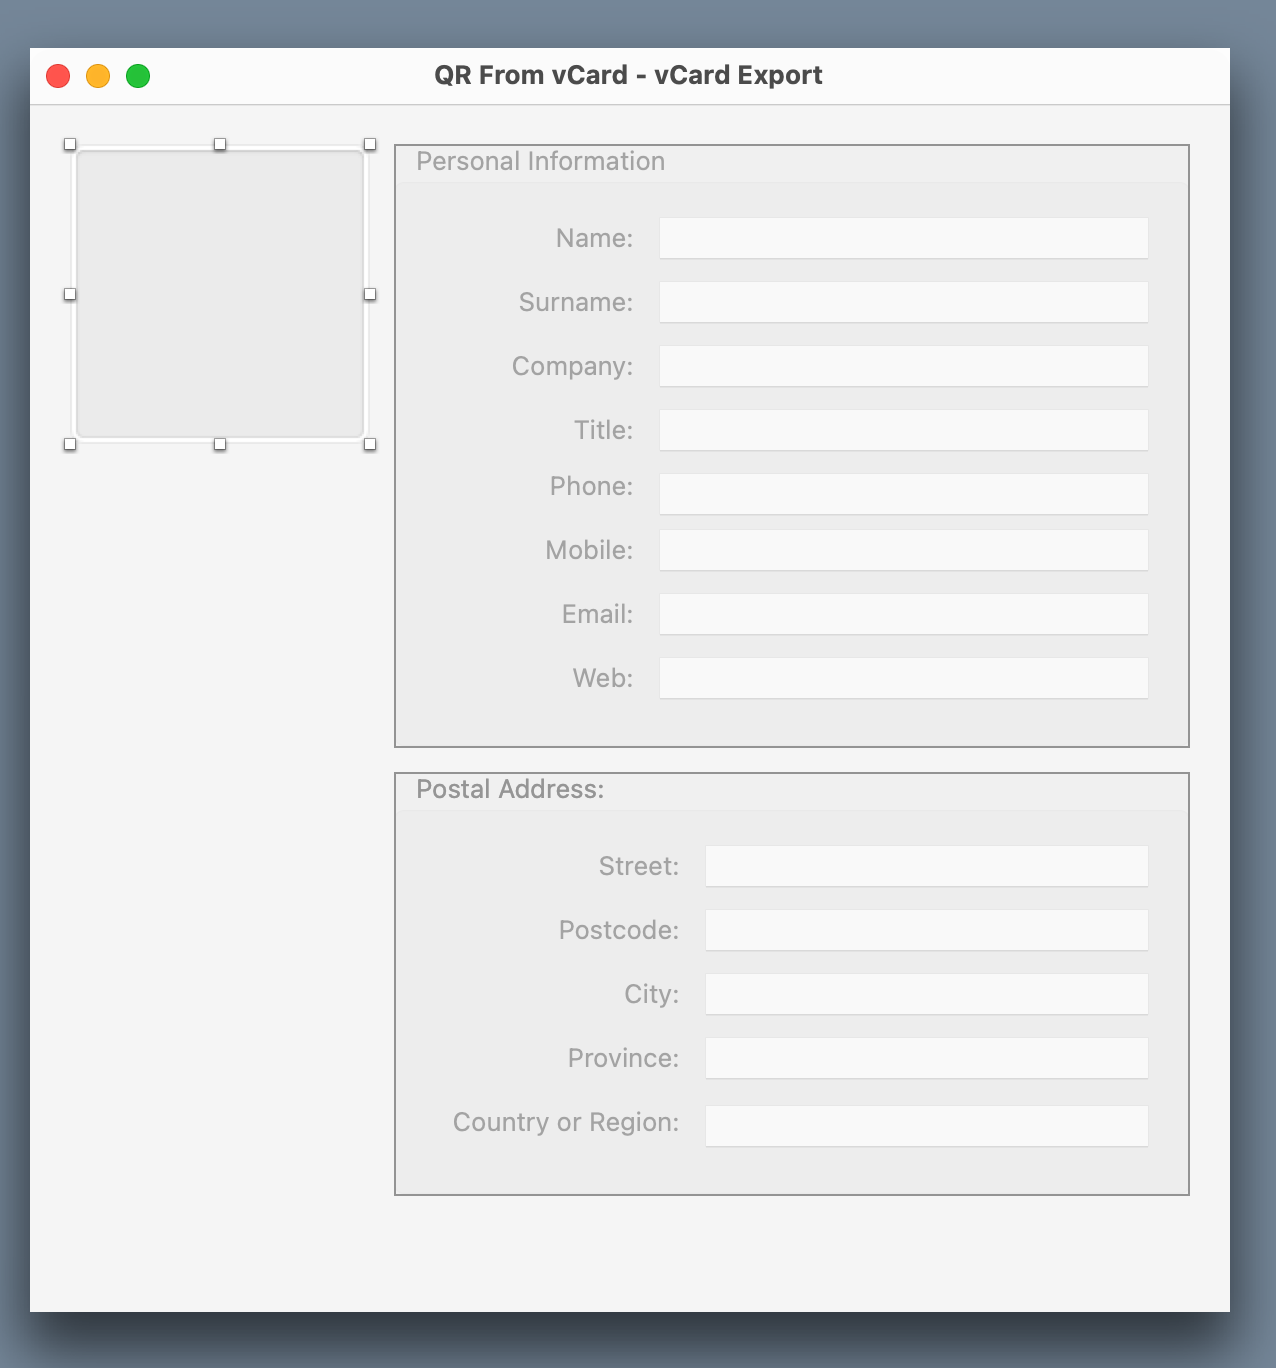
Add Label and TextField controls from the library so the user interface looks like this:
Select all the Label items and change the following attribute in the Inspector panel (the change will be applied to all the selection):
- Text Alignment: Right
Next, enter the following values for each of the Labels, selecting them one by one from the top to the bottom:
Label1
- Name: NameLB
- Text: Name:
Label2
- Name: SurnameLB
- Text: Surname:
Label3
- Name: CompanyLB
- Text: Company:
Label4
- Name: TitleLB
- Text: Title:
Label5
- Name: PhoneLB
- Text: Phone:
Label6
- Name: MobileLB
- Text: Mobile:
Label7
- Name: EmailLB
- Text: Email:
Label8
- Name: WebLB
- Text: Web:
Next, select each of the Textfields, starting from the top, and enter the following values in the inspector panel associated with each of them:
TextField1
- Name: NameTF
- Locking: Close the left, top and right locks.
TextField2
- Name: SurnameTF
- Locking: Close the left, top and right locks.
TextField3
- Name: CompanyTF
- Locking: Close the left, top and right locks.
TextField4
- Name: TitleTF
- Locking: Close the left, top and right locks.
TextField5
- Name: PhoneTF
- Locking: Close the left, top and right locks.
TextField6
- Name: MobileTF
- Locking: Close the left, top and right locks.
TextField7
- Name: EmailTF
- Locking: Close the left, top and right locks.
TextField8
- Name: WebTF
- Locking: Close the left, top and right locks.
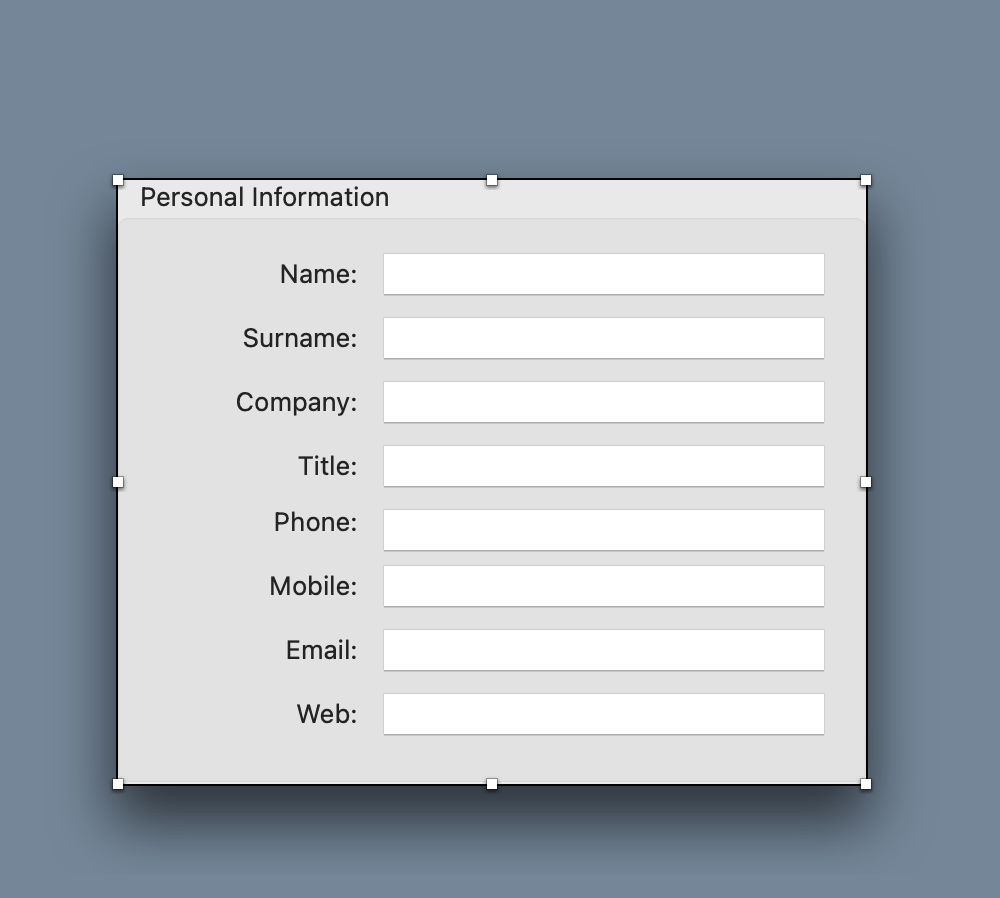
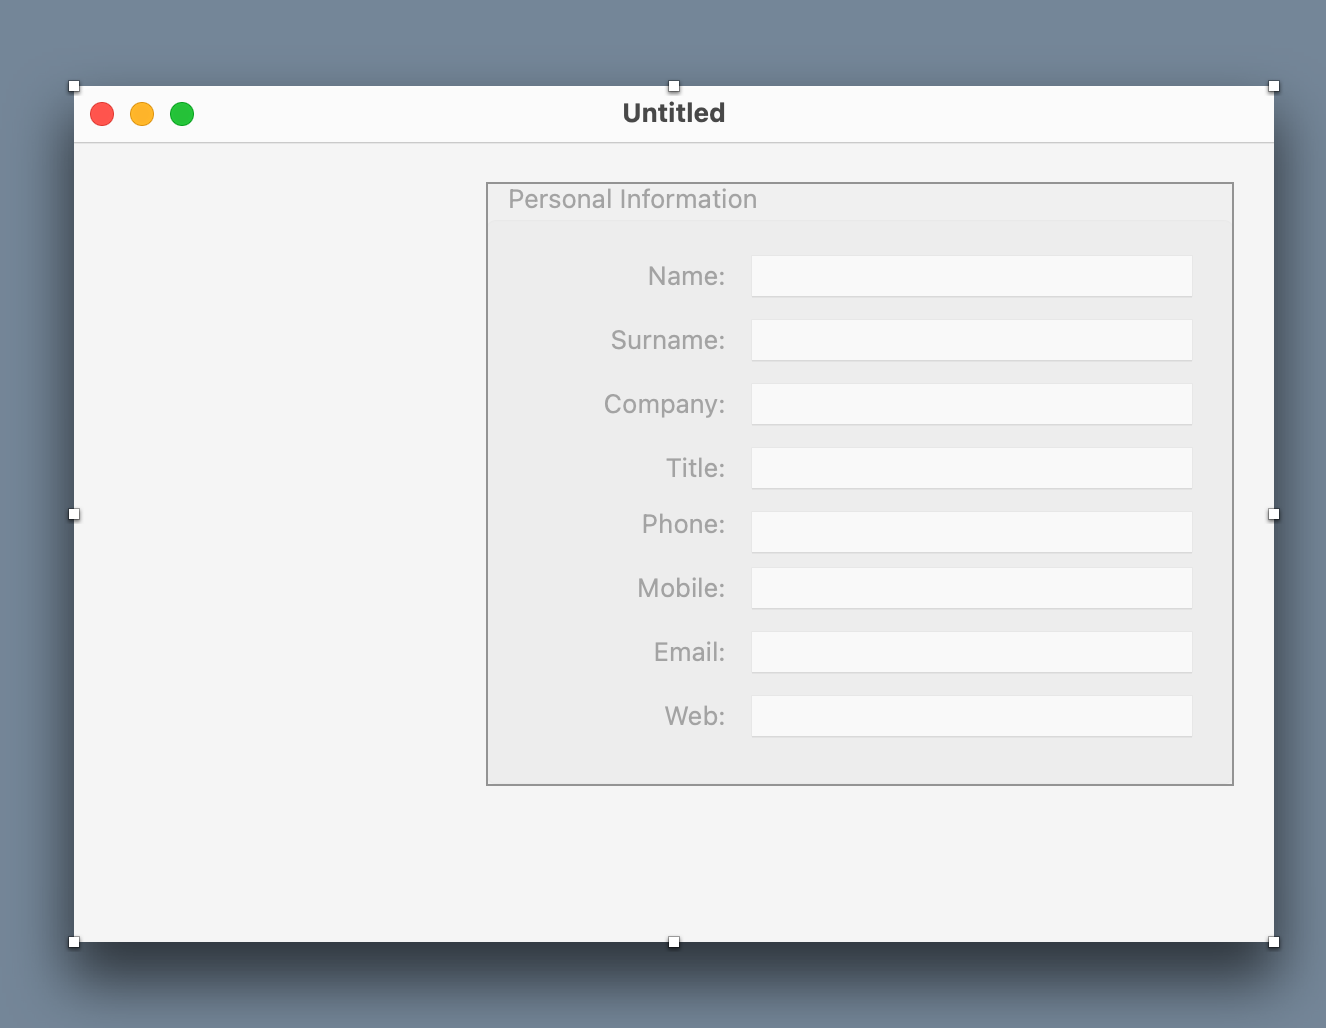
When you’re done, the PersonalInfoContainer’s user interface will look like this:
Postal Address Container
We’re done with the design of the container that will be used to enter the personal information data. Now, add a new Container to the Project Navigator and select it to access the associated Layout Editor.
Use the Inspector Panel to change the following values:
- Name: PostalContainer
- Width: 398
- Height: 212
Next, double-click the GroupBox control in the Library to add it to the new container, and change the following values using the associated inspector panel:
- Left: 0
- Top: 0
- Width: 398
- Height: 212
- Locking: Close the four locks.
- Caption: Postal Address:
Like we did in the previous container, this time add a total of five labels and as many text fields. The result should be similar to this:
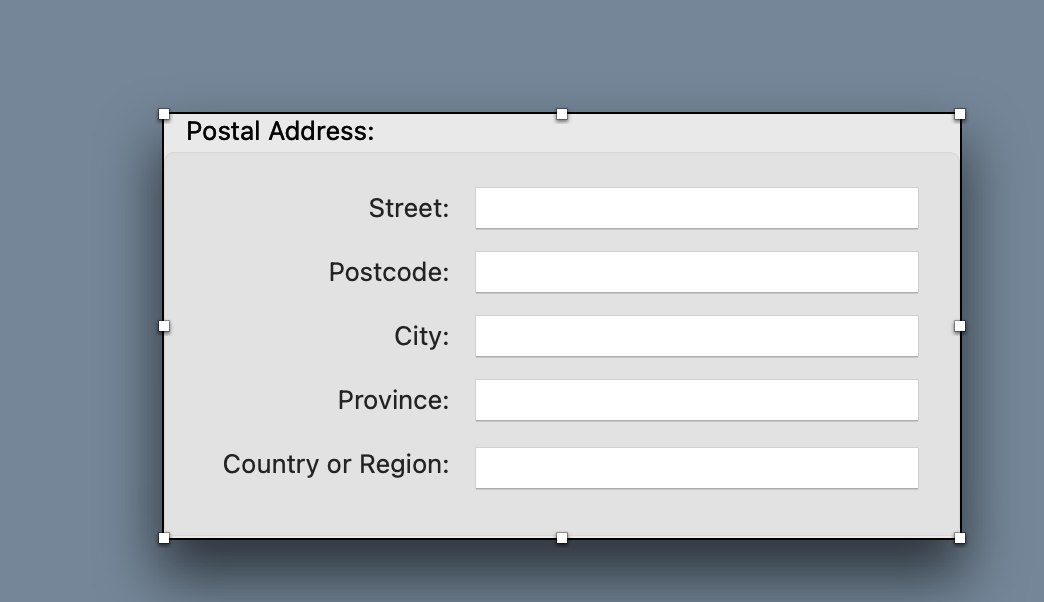
Align all labels to the right, just like we did with the previous Container. Then, from top to bottom, modify the following properties for each of them:
Label1
- Name: StreetLB
- Text: Street:
Label2
- Name: PostcodeLB
- Text: Postcode:
Label3
- Name: CityLB
- Text: City:
Label4
- Name: ProvinceLB
- Text: Province:
Label5
- Name: CountryLB
- Text: Country or Region:
And change the following values in the inspector panel for each of the TextFields, also from top to bottom
TextField1
- Name: StreetTF
- Locking: Close the left, top and right locks.
TextField2
- Name: PostalCodeTF
- Locking: Close the left, top and right locks.
TextField3
- Name: CityTF
- Locking: Close the left, top and right locks.
TextField4
- Name: ProvinceTF
- Locking: Close the left, top and right locks.
TextField5
- Name: CountryTF
- Locking: Close the left, top and right locks.
Once completed, the layout for the PostalContainer container will look similar to this:
Completing the UI Design
With the design of the two containers completed, it is time to add them to the main window of the project (Window1), as well as some remaining controls.
Start by selecting the Window1 item in the Navigator to display it in the Layout Editor. Next, drag the PersonalInfoContainer container and drop it onto the top of the right side of the window in the Layout Editor. It should look like this:
With the Window1 item still selected in the Navigator, it is a good time to change some of its properties in the associated Inspector:
- Width: 600
- Height: 604
- Minimum Width: 600
- Minimum Height: 604
- Maximum Width: 600
- Maximum Height: 604
- Title: QR From vCard – vCard Export
Now, select the PostalContainer container and drop it just below the PersonalInfoContainer container in the Layout Editor for Window1. The result should look like this:
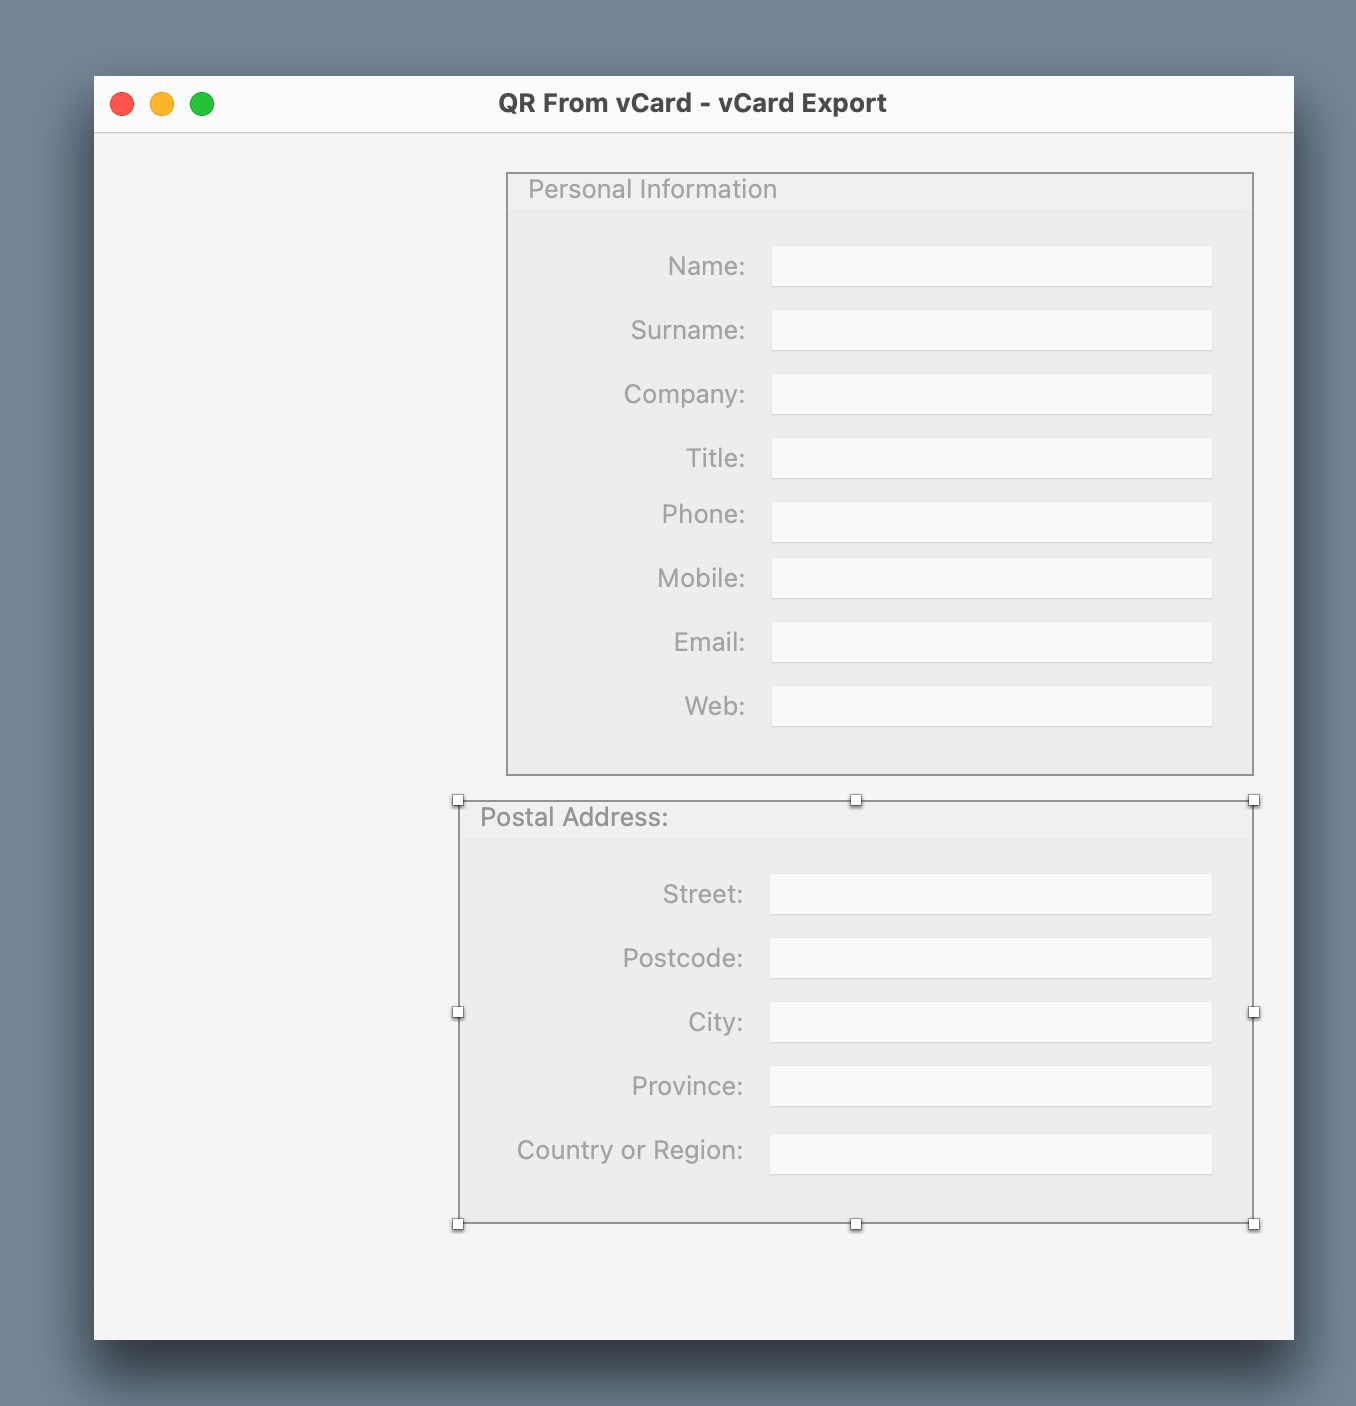
As you can see, the PostalContainer1 container is slightly wider than the PersonalInfoContainer1 item. Select the latter in the Window1 layout editor and use the left middle handle to drag it to the left until the alignment guide appears. This will mean that both containers are aligned.
Now, continue adding the necessary controls to finish the UI:
- An ImageWell control to display the image selected by the user for the vCard.
- A button that, when pressed, allows the user to select the image to use in the vCard.
- An ImageWell control that displays the preview of the QR generated from the vCard.
- A button that, when pressed, allows you to create the QR from the vCard as well as assign the resulting image to the preview control.
- A button that, when activated, allows the QR to be exported as an image file in PNG format.
- A button that, when pressed, generates the vCard as a file with the selected name and location.
- A last button that, when pressed, resets the UI to its default values.
Selecting the Contact Image
The contact image selected by the user will be added as part of the vCard generated as a file but not to the QR code because it does not have enough room to accommodate such a large amount of information.
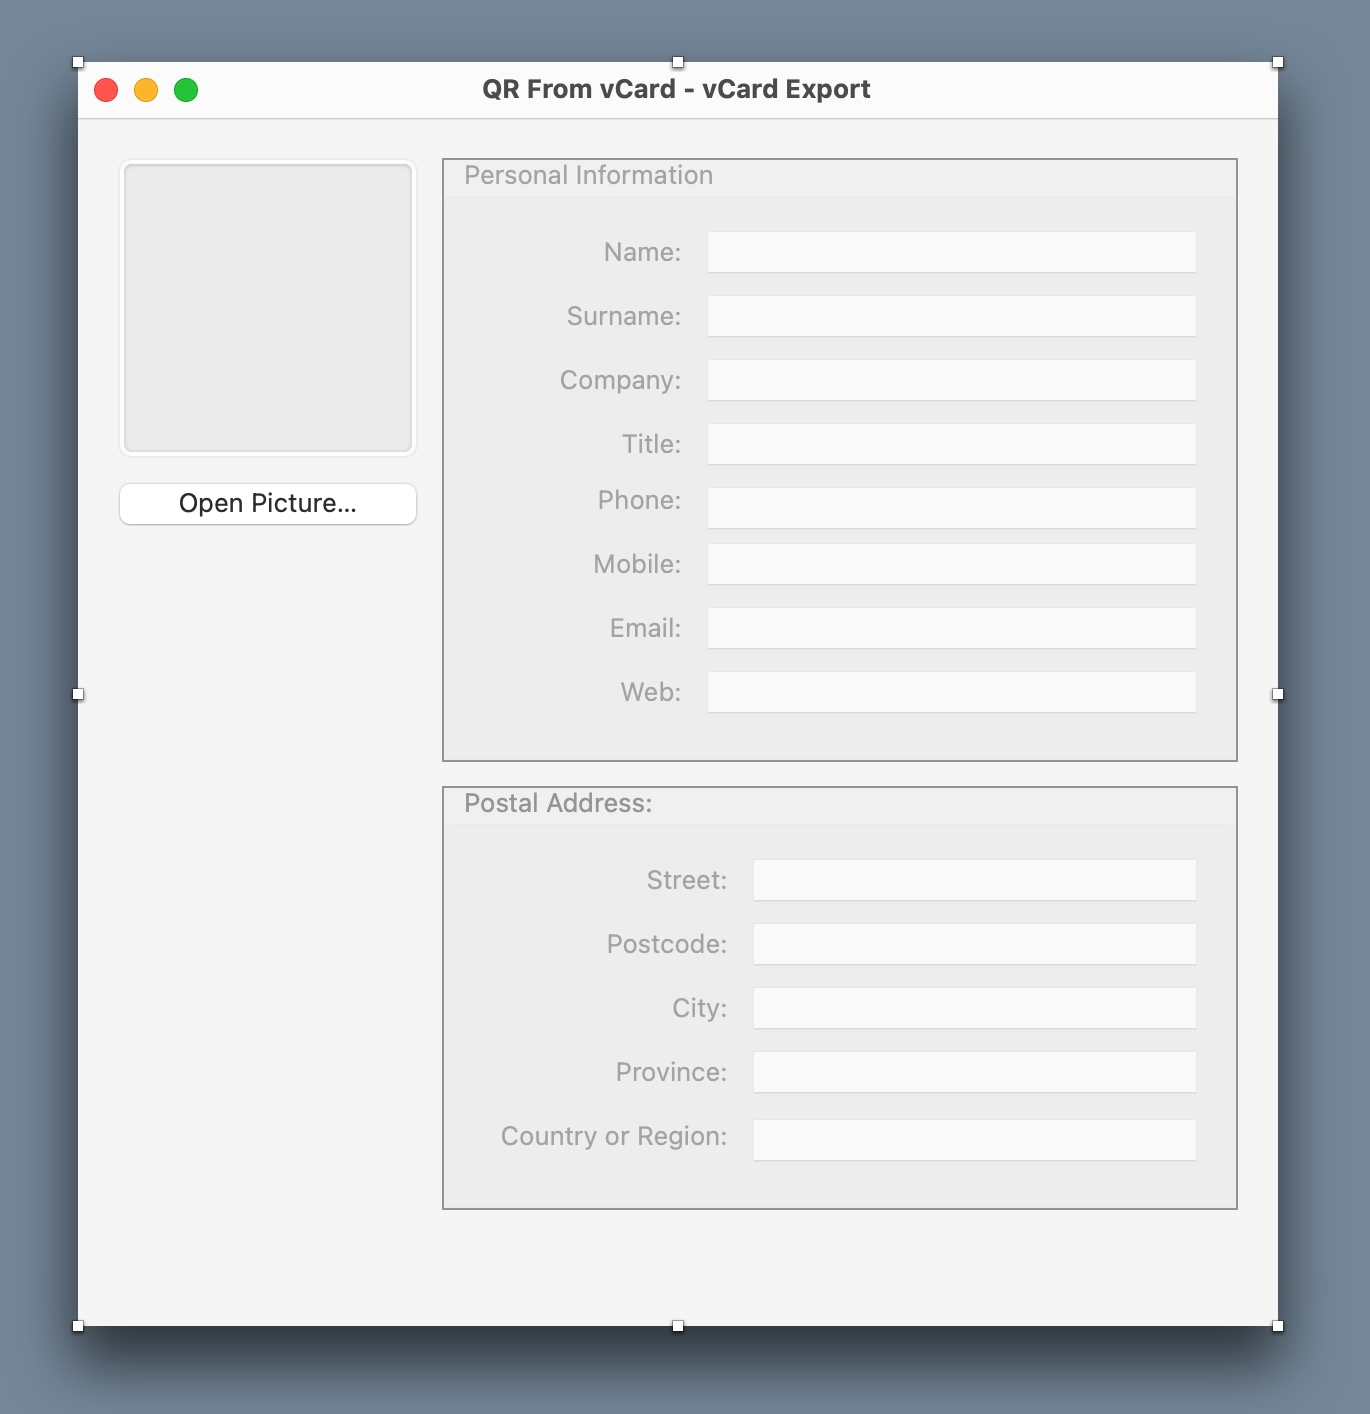
To do this we need to add two controls to Window1: an ImageWell and a Button. Start by adding an ImageWell control to the top left area of the Window1 window in the Layout Editor:
Use the inspector panel associated with that control to change the following values:
- Name: PersonPreview
- Left: 20
- Top: 20
- Width: 150
- Height: 150
Next, drop a Button control just below the PersonPreview and use the associated inspector panel to modify the following values:
- Name: OpenPictureBT
- Left: 20
- Top: 182
- Width: 150
- Height: 20
- Caption: Open Picture…
The result should look something like this:
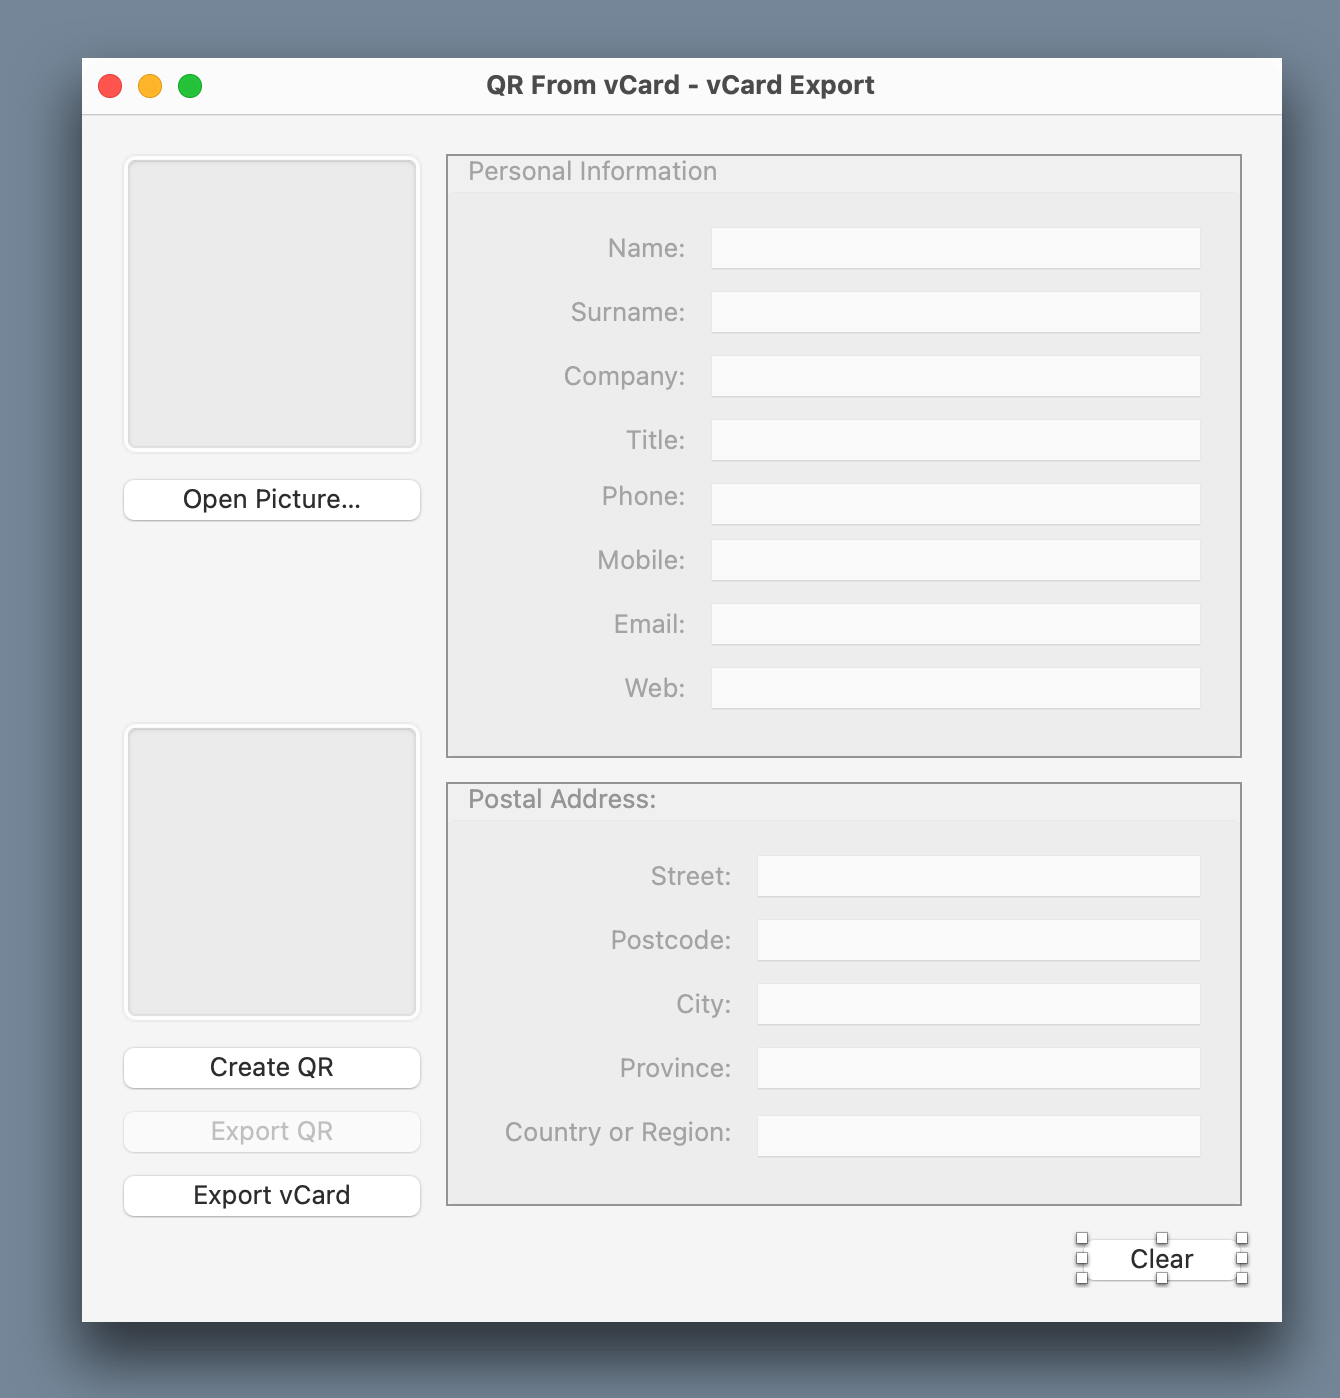
QR Preview and Export
Now, continue with the UI items corresponding to the QR code preview and the buttons to create it, export the QR or export the vCard.
Drop a new ImageWell control from the library onto Window1 in the Layout Editor and modify the following attributes in the associated inspector panel:
- Name: QRPreview
- Left: 20
- Top: 304
- Width: 150
- Height: 150
Add a button just below QRPreview and use the following values in the associated Inspector Panel:
- Name: CreateQRBT
- Left: 20
- Top: 466
- Width: 150
- Height: 20
- Caption: Create QR
Add a new button under CreateQRBT and modify the following values in the inspector panel:
- Name: ExportQRBT
- Left: 20
- Top: 498
- Width: 150
- Height: 20
- Caption: Export QR
- Enabled: Desactivado
Add a new button just below ExportQRBT and modify the following values in the inspector panel:
- Name: ExportVCardBT
- Left: 20
- Top: 530
- Width: 150
- Height: 20
- Caption: Export vCard
Add the last of the required buttons, just below the PostalContainer1 container and use the following values in the inspector panel:
- Name: ClearBT
- Left: 500
- Top: 562
- Width: 80
- Height: 20
- Locking: Close the bottom and right locks.
- Caption: Clear
We have completed the UI design! This is how it should look:
Adding Functionality to the PersonalInfoContainer
It’s time to add the code (functionality) to each of the components that need it. Start with PersonalInfoContainer, select it in the Navigator. With PersonalInfoContainer1 selected, choose the Insert > Method menu option and use the following values in the associated inspector panel:
- Method Name: GetPersonalInformation
- Return Type: String
- Scope: Public
Adding the following code in the Code Editor associated with the newly added method:
Var fullName As String = Nametf.Text + " " + SurnameTF.Text

Var returnedValues() As String

If fullname.ReplaceAll(" ", "") <> "" Then returnedValues.Add("FN:" + fullName)
If SurnameTF.Text <> "" Or nametf.Text <> "" Then returnedValues.Add("N:" + SurnameTF.Text + ";" + NameTF.Text + ";;;")
If CompanyTF.Text <> "" Then returnedValues.Add("ORG:" + CompanyTF.Text + ";")
If TitleTF.Text <> "" Then returnedValues.Add("TITLE:" + TitleTF.Text)
If PhoneTF.Text <> "" Then returnedValues.Add("TEL;Type=HOME:" + PhoneTF.Text)
If MobileTF.Text <> "" Then returnedValues.Add("TEL;Type=CELL:" + MobileTF.Text)
If EmailTF.Text <> "" Then returnedValues.Add("EMAIL;Type=INTERNET;type=WORK;type=pref:" + EmailTF.Text)
If WebTF.Text <> "" Then returnedValues.Add("URL:" + WebTF.Text)

Return String.FromArray(returnedValues, EndOfLine)
As you can see, the code for this method is pretty easy to follow. Basically, only the fields in the vCard whose TextField contains values (i.e. are not empty) will be added to the ReturnedValues array. Similarly, and to keep the code as short as possible, this tutorial does not perform any kind of validation on the entered data.
Add a new method to PersonalInfoContainer that will be responsible for cleaning up the UI of that container; use the following values using the Inspector associated with the new method:
- Method Name: Clear
- Scope: Public
And type the following code in the associated Code Editor for the Clear method:
For Each ctl As DesktopUIControl In Self.Controls
  If ctl IsA DesktopTextField Then
    DesktopTextField(ctl).Text = ""
  End If
Next
As you can see, this code loops through all the controls in the PersonalInfoContainer and uses the IsA keyword to check if the iterated control is a DesktopTextField. If it is, it then casts the iterated control to the DesktopTextField class to access its Text property and assign to it the empty string value (“”).
Add Functionality to the PostalContainer
Select the PostalContainer container in the Project Navigator. You will see that the functionality is very similar to that added in the previous one.
Create a new method and use the associated panel to change the following values:
- Method Name: GetPostalInformation
- Return Type: String
- Scope: Public
And type the following code in the Code Editor associated with the method:
Var returnedValue As String
Var inputValues() As String

inputValues.Add(StreetTF.Text)
inputValues.Add(CityTF.Text)
inputValues.Add(ProvinceTF.Text)
inputValues.Add(PostalCodeTF.Text)
inputValues.Add(CountryTF.Text)

Var address As String = String.FromArray(inputValues, ";")

If address.ReplaceAll(";","") <> "" Then returnedValue = "ADR;type=WORK:;;" + address

Return returnedValue
As you can see, it is very similar to the one above. The result will be the one corresponding to the “ADR” field of a vCard.
Add a second method with the following values in the inspector panel:
- Method Name: Clear
- Scope: Public
And write the following code in the associated editor:
For Each ctl As DesktopUIControl In Self.Controls
  If ctl IsA DesktopTextField Then
    DesktopTextField(ctl).Text = ""
  End If
Next
In this case, the code is the same as the one used in the previous container when “resetting” its UI to the initial values.
Add General Functionality to the Window
Select Window1 in the Project Navigator and add a method using the following values using the Inspector Panel:
- Method Name: GenerateVCARD
- Parameters: forVCardExport as Boolean = False
- Return Type: String
And type the following code in the associated Code Editor:
Var vCard() As String
vCard.Add("BEGIN:VCARD")
vCard.Add("VERSION:3.0")
vCard.Add(PersonalInfoContainer1.GetPersonalInformation)
vCard.Add(PostalContainer1.GetPostalInformation)
If PersonPreview.Image <> Nil And forVCardExport Then
  vCard.Add("PHOTO;ENCODING=BASE64;TYPE=JPEG:" + getPersonImage)
End If
vCard.Add("REV:" + GetRevisionTime)
vCard.Add("END:VCARD")

Return String.FromArray(vCard, EndOfLine)
Add a second method with the following values:
- Method Name: GetRevisionTime
- Return Type: String
And type the following lines of code in the associated code editor:
Var current As DateTime = DateTime.Now
Var currentToUTC As DateTime = New DateTime(current.SecondsFrom1970 - current.Timezone.SecondsFromGMT)

Return currentToUTC.Year.ToString + currentToUTC.Month.ToString + currentToUTC.Day.ToString + "T" + currentToUTC.Hour.ToString + currentToUTC.Minute.ToString + currentToUTC.Second.ToString + "Z"
Add the last of the general methods and use the following values in the Inspector:
- Method Name: GetPersonImage
- Return Type: String
Next, enter the following code into the associated editor:
Var returnedValue As String

Const kWidth as Double = 120
var pHeight as Double

If PersonPreview.Image <> Nil Then

  pHeight = (kWidth * PersonPreview.Image.Height) / PersonPreview.Image.Width

  Var tempPic As New Picture(kWidth, pHeight)
  tempPic.Graphics.DrawPicture(PersonPreview.Image, 0, 0, kWidth, pHeight, 0, 0, PersonPreview.Image.Width, PersonPreview.Image.Height)

  Var mb As MemoryBlock = TempPic.ToData(Picture.Formats.JPEG)

  returnedValue = EncodeBase64(mb)
  returnedValue = returnedValue.ReplaceLineEndings("")
End If

Return returnedValue
Adding Specific Functionality to Controls
We just need to add the functionality that will be executed when the different buttons are pressed. Start by selecting ClearBT in the Project Navigator then select the “Add to ‘ClearBT’ > Event Handler…” option in the context menu. Choose the Pressed event in the resulting window and confirm the selection so that this event is added to the control.
Now, enter the following code in the code editor associated with the Pressed event of the ClearBT control:
PersonPreview.Image = Nil
QRPreview.Image = Nil
ExportQRBT.Enabled = False

PersonalInfoContainer1.Clear
PostalContainer1.Clear
Add the Pressed event to the CreateQRBT control and type the following code in the associated code editor:
QRPreview.Image = Nil

Var theCard As String = GenerateVCARD

Try
  Var p As Picture = Barcode.Image(theCard, 600, 600)

  If p <> Nil Then
    QRPreview.Image = p
    ExportQRBT.Enabled = True
  Else
    ExportQRBT.Enabled = False
  End If

Catch e As UnsupportedOperationException

  MessageBox("Unable to Create QR" + EndOfLine + EndOfLine + "Probably the provided data exceeds the available room for a QR.")

End Try
Add the Pressed event to the ExportQRBT control and enter the following code in the associated code editor:
If QRPreview.Image <> Nil Then

  Var f As FolderItem = FolderItem.ShowSaveFileDialog("", "ExportedQR.PNG")

  If f <> Nil Then

    QRPreview.Image.Save(f, Picture.Formats.PNG)

  End If

End If
Add the Pressed event to the ExportVCardBT control and enter the following code in the associated Code Editor:
Var theCard As String = GenerateVCARD(True)

Var f As FolderItem = FolderItem.ShowSaveFileDialog("", "Exported.vCard")

If f <> Nil Then
  Var tos As TextOutputStream = TextOutputStream.Create(f)

  tos.Write(theCard)
  tos.Flush
  tos.Close
End If
Add the Pressed event to the OpenPictureBT control and type the following code using the associated Code Editor:
PersonPreview.Image = Nil

Var f As FolderItem = FolderItem.ShowOpenFileDialog(SupportedImageFormats.All)

If f <> Nil Then
  PersonPreview.Image = Picture.Open(f)
End If
Files Filtering
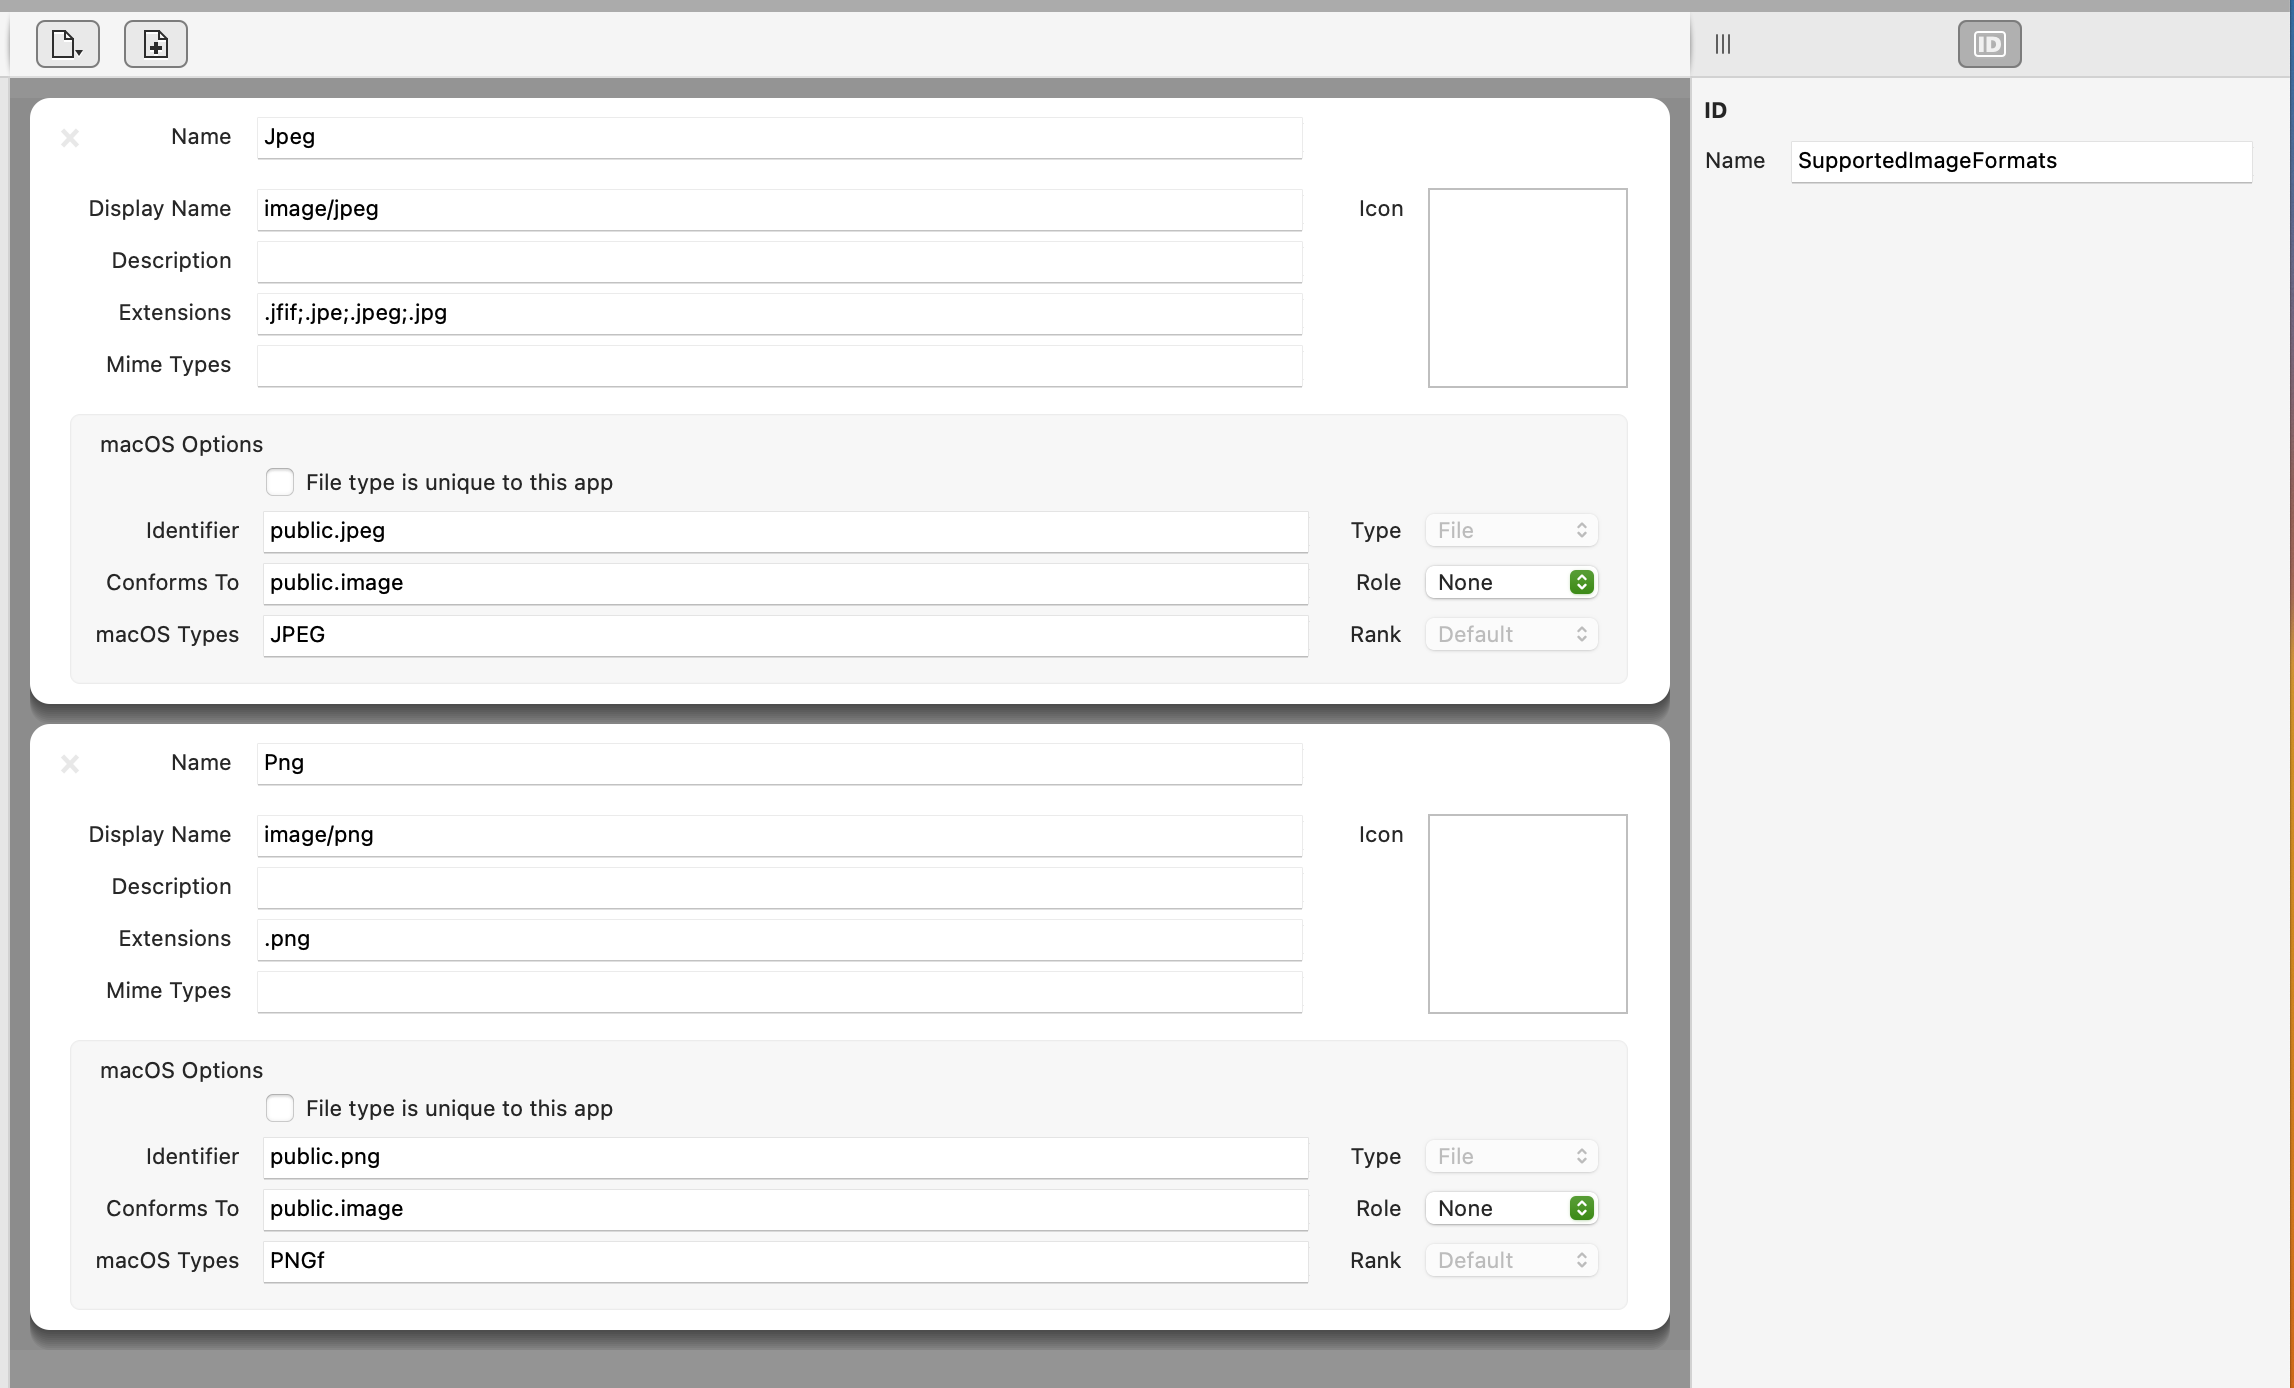
As you can see, in the second line of the above code we reference the SupportedImageFormats.All object as a parameter to filter the type of files that the user can select.
To do this, add a new File Type Group from Insert > File Type Group. With the newly added item in the Project Navigator selected, click the leftmost button in the toolbar to add the “image/jpeg” entry. Repeat this to add “image/png” as well.
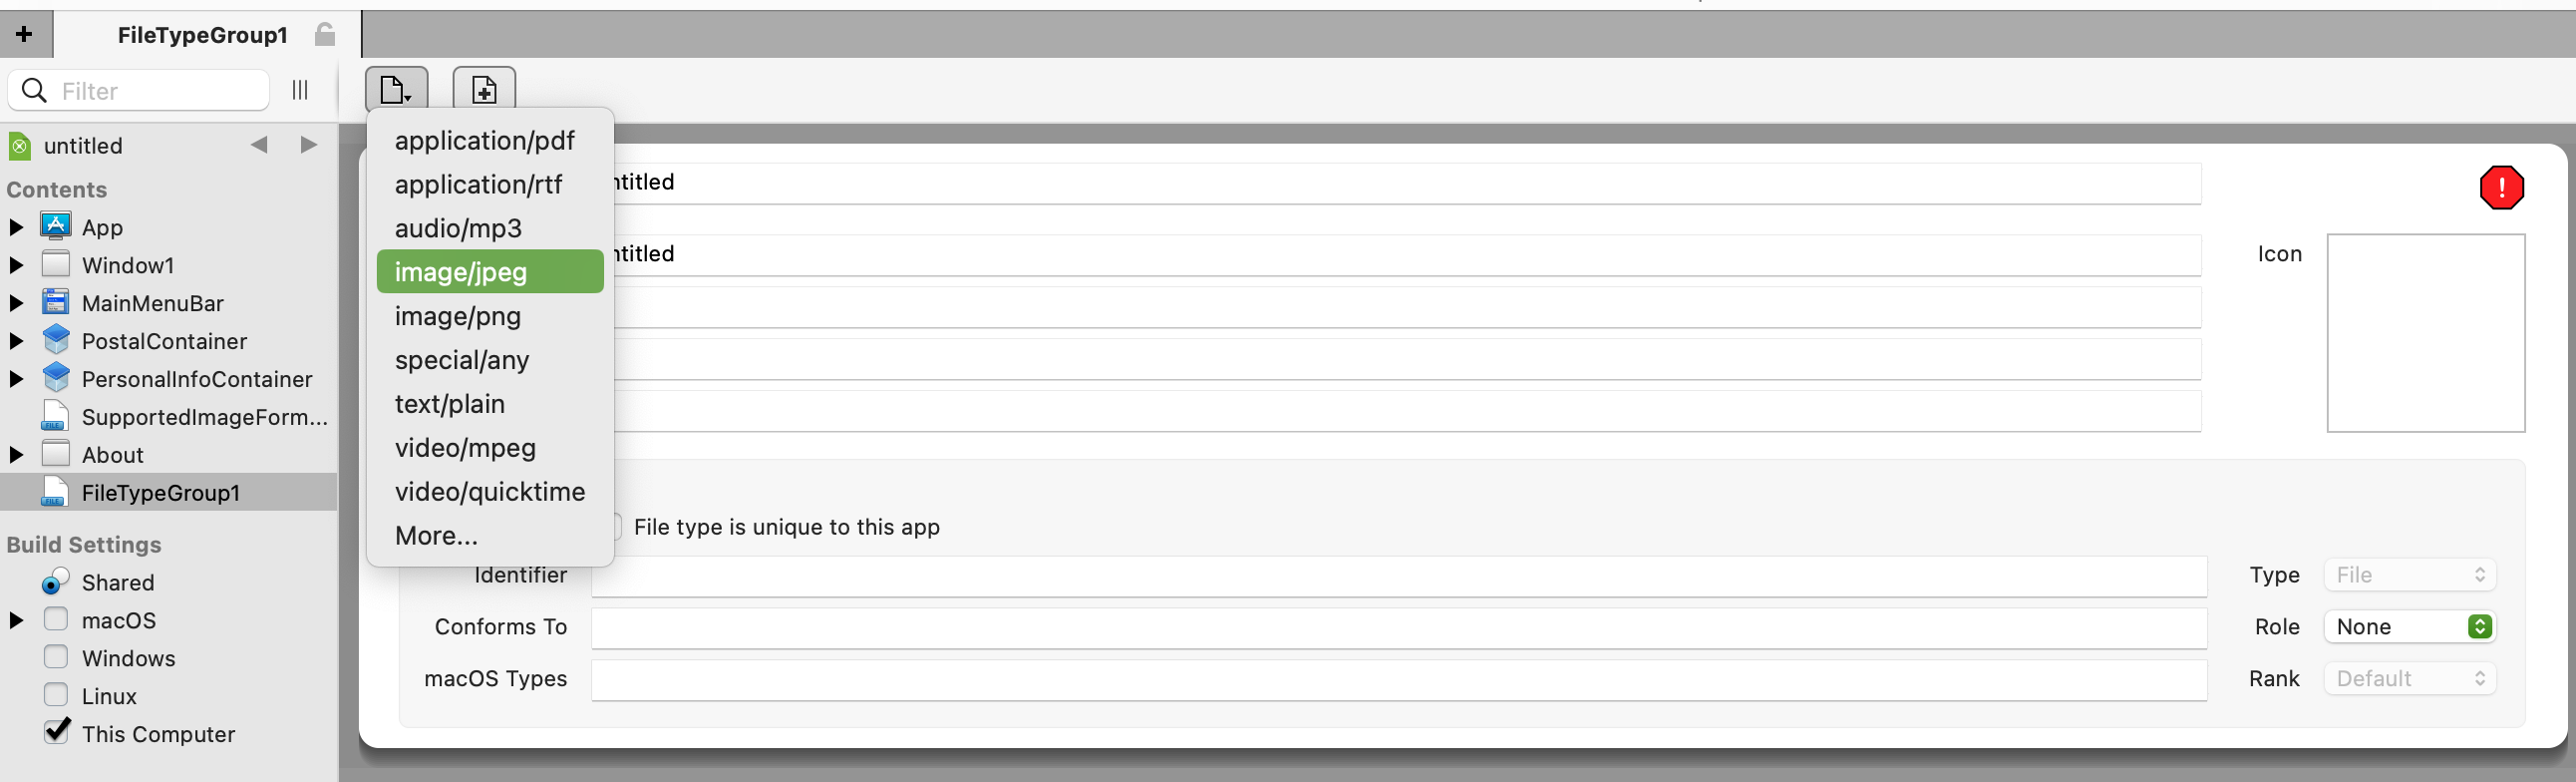
Finally, in the inspector panel change the name of the item to SupportedImageFormats. Once finished, it should look like this:
Let’s Go!
Now the design and the functionality of our app are both completed! Let’s run it and do some tests. Try selecting a contact image (or not), filling in any of the fields, generating the associated QR and exporting it … or exporting the vCard file directly so that you can import it from any compatible application (for example, Contacts on macOS).
Of course, you can expand and complete this small example: from introducing validations for the fields that require it, increasing the number of fields so that the vCard also includes any other fields supported by the standard, etc.
Conclusion
As you have seen, generating both the vCard and the QR that contains contact information does not require a large amount of code. Best of all, with Xojo, you can check a box and cross-compile your app for macOS, Windows and Linux.
Happy Xojo Coding!
Javier Menendez is an engineer at Xojo and has been using Xojo since 1998. He lives in Castellón, Spain and hosts regular Xojo hangouts en español. Ask Javier questions on Twitter at @XojoES or on the Xojo Forum.