Ever wondered how to create those sleek, professional-looking loading animations you see in modern apps?
In this blog post, we’re going to unlock the power of Xojo’s DesktopCanvas and its Graphics capabilities to recreate one of the popular SpinKit loading animations originally created by Tobias Ahlin. We’ll be implementing the “Three Bounce” animation, transforming this beloved CSS animation into native Xojo code!
Not only will you learn how to create this specific animation, but you’ll also gain valuable insights into animation principles in Xojo that you can use to create your own custom animations. By the end of this tutorial, you’ll understand how to:
- Harness the power of DesktopCanvas for custom graphics
- Create smooth animations using Timers
- Implement phase-based animations
- Use Graphics methods to draw dynamic shapes
- Manage animation lifecycles properly
Why This Matters
Loading animations are more than just eye candy – they’re essential UI elements that keep users engaged while your app processes data. Instead of using static images or third-party libraries, creating your own animations gives you complete control over the look and feel of your application while keeping your dependencies minimal.
What We’re Building
We’ll create a smooth, professional-looking three-dot loading animation where dots gracefully scale up and down in sequence. The result is a lightweight, customizable loading indicator that you can drop into any Xojo project. Here’s what makes this implementation special:
- Pure Xojo code – no external dependencies
- Smooth, fluid animation
- Easily customizable colors and timing
- Efficient resource usage
- Clean, object-oriented design
Ok, let’s start building our awesome animation class.
Step 1: Setting Up the Base Class
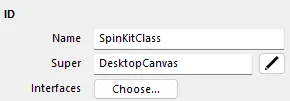
First, create a new class (Insert > Class) that inherits from DesktopCanvas:

Protected Class SpinKitClass Inherits DesktopCanvasStep 2: Defining Core Properties
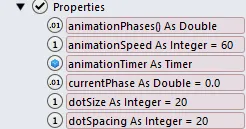
Add these essential properties to control the animation:

Private animationPhases() As Double      // Stores phase offsets for each dot
Private animationSpeed As Integer = 60   // Animation refresh rate in milliseconds
Private animationTimer As Timer         // Timer to drive the animation
Private currentPhase As Double = 0.0    // Current animation phase
Private dotSize As Integer = 20         // Size of each dot
Private dotSpacing As Integer = 20      // Space between dots
Step 3: Setting Up Constants
Define the constants that control the animation behavior:

Private Const kDefaultColor As Color = &c333333    // Dot color
Private Const kPhaseIncrement As Double = 0.05    // Animation speed
Step 4: Implementing Animation Control Methods
Add methods to start and stop the animation:
Public Sub StartAnimation()
  /// Initializes and starts the animation
  /// Sets up initial phase offsets for the dots
  /// Creates and configures the animation timer

  If animationTimer = Nil Then
    animationPhases = Array(0.0, 0.16, 0.32)

    animationTimer = New Timer
    AddHandler animationTimer.Action, AddressOf UpdateAnimation
    animationTimer.Period = animationSpeed
    animationTimer.RunMode = Timer.RunModes.Multiple
  End If
End Sub
Public Sub StopAnimation()
/// Stops the running animation
/// Removes the timer handler and cleans up
/// Refreshes the canvas to clear the animation
If animationTimer <> Nil Then
RemoveHandler animationTimer.Action, AddressOf UpdateAnimation
animationTimer = Nil
Refresh
End If
End SubStep 5: Creating the Animation Update Logic
Implement the timer callback that drives the animation:
Private Sub updateAnimation(sender As Timer)
  /// Timer callback that updates the animation state
  /// Increments the phase and triggers a redraw
  /// @param sender The Timer that triggered this callback

  #Pragma Unused sender

  // Increment the current phase (spin08)
  currentPhase = currentPhase + kPhaseIncrement
  // Reset currentPhase if it exceeds 1.0
  If currentPhase > 1.0 Then currentPhase = 0

  // Invalidate the canvas to trigger a repaint
  Refresh()
End Sub
Step 6: Implementing the Drawing Logic
Add the core animation rendering code:
Private Sub animation08(g As Graphics)
  /// Renders a single frame of the three-dot loading animation
  /// Draws 3 dots that scale up and down in sequence
  /// @param g The graphics context to draw into

  Var centerX As Integer = Me.Width / 2
  Var centerY As Integer = Me.Height / 2

  For i As Integer = 0 To 2
    Var phase As Double = currentPhase + animationPhases(i)

    // Ensure phase is within 0 to 1
    If phase > 1.0 Then phase = phase - 1.0

    Var scale As Double
    If phase < 0.4 Then
      scale = phase / 0.4
    Else
      scale = (1.0 - phase) / 0.6
    End If

    Var size As Integer = dotSize * scale
    Var x As Integer = centerX + (i - 1) * dotSpacing - size / 2
    Var y As Integer = centerY - size / 2

    g.DrawingColor = kDefaultColor
    g.FillOval(x, y, size, size)
  Next
End Sub
Step 7: Handling the Paint Event
Implement the Paint event to trigger the animation rendering:
Sub Paint(g As Graphics, areas() As Rect) Handles Paint
  /// Paint event handler that renders the animation
  /// Called automatically when the canvas needs to be redrawn
  /// If animation is running, calls animation08, otherwise clears the canvas

  If animationTimer <> Nil Then
    animation08(g)
  Else
    g.ClearRectangle(0, 0, Width, Height)
  End If
End Sub
How It Works
- The animation uses a phase-based system where each dot is offset in its animation cycle.
- The dots scale up and down based on their current phase.
- A timer drives the animation by incrementing the phase and triggering redraws.
- The dots are positioned horizontally with equal spacing around the center.
- Each dot’s size is calculated based on its current phase in the animation.
Using the Animation
To use this animation in your project, all you have to do is simply drag and drop the class on a DesktopWindow and then start or stop the animation when needed.
// Start the animation
SpinKit1.StartAnimation()

// Stop the animation when done
SpinKit1.StopAnimation()
Customization
You can customize the animation by adjusting:
dotSizefor larger or smaller dotsdotSpacingto change the spread of the dotsanimationSpeedto make it faster or slowerkDefaultColorto change the dot colorkPhaseIncrementto adjust the animation speed
Taking It Further
The “Three Bounce” animation we’ve created is just one of many amazing animations in the SpinKit collection. Now that you understand the fundamentals, why not try recreating other SpinKit animations? Here are some exciting challenges to tackle:
- Modify the current animation to use different shapes (squares, rectangles).
- Experiment with different timing functions for varied animation effects.
- Try implementing the “Rotating Plane” or “Chasing Dots” animations from SpinKit.
- Create your own unique variations by combining what you’ve learned.
- Optimize the class further.
Share Your Creations!
Have you created an awesome variation or implemented another SpinKit animation in Xojo? Share it with the community! The Xojo Forums and social media are great places to showcase your work and inspire others.
Resources for Further Exploration
- Original SpinKit animations by Tobias Ahlin: https://tobiasahlin.com/spinkit/
- Xojo Graphics documentation: https://documentation.xojo.com/api/graphics/graphics.html
- Xojo DesktopCanvas documentation: https://documentation.xojo.com/api/user_interface/desktop/desktopcanvas.html
Remember: Every great application deserves great animations and now you have the tools to create them! Keep experimenting, keep creating, and most importantly, keep animating!
Gabriel is a digital marketing enthusiast who loves coding with Xojo to create cool software tools for any platform. He is always eager to learn and share new ideas!
