
The ContainerControl is one of the most versatile control classes included in the Xojo framework both for Desktop and Web apps. In fact, it paves the way to complex UI controls creation with the same simplicity you are used to while designing your window layouts. Even better, once you create your complex UI controls using the ContainerControl, you will be able to add them to your Window layouts as if they were regular controls. Plus, you will enjoy the fruits of better OOP encapsulation and the fact that you can create and use the controls dynamically at run time. Want to see this in action? Follow this tutorial and video to create the basis of a multiplatform search field based on the ContainerControl class.
The following tutorial is based on the Desktop Xojo project that you can download from this link. In fact, this project was the foundation to the search filed control implemented in the Snippery app. Thus, you can envision in more detail the kind of functionality you can achieve when used in a real app. Ok, maybe you are thinking “this is not the native control a user expects when using a true native app under certain OS”. That’s true; anyway there are a lot of apps around (some of them from the big players) that use non-native controls in favour of providing a unified UI between all supported platforms. This is the case of the final class exposed here, offering the same aspect and behaviour when running under macOS, Windows and Linux.
Preparing the Ingredients
In order to create our multiplatform search control we need to use a series of components (classes) that will cooperate with each other: a TextField that will receive the user keyboard input (that is, where the user inputs the text to search); a Canvas subclass to display the typical magnifying glass icon and other decoration for the control (that also extends further to add more functionality); and a second Canvas subclass that will offer the classic “search text clean” widget functionality normally presented at the right of a search field.
Of course, you can create a search field using these classes as individual items on a Window layout, but in that case all the resizing operations and cooperation between the controls will be more messy — losing the encapsulation that a ContainerControl provides to the other components of the application as if it was a unique, simple control.
Dealing with the Graphics
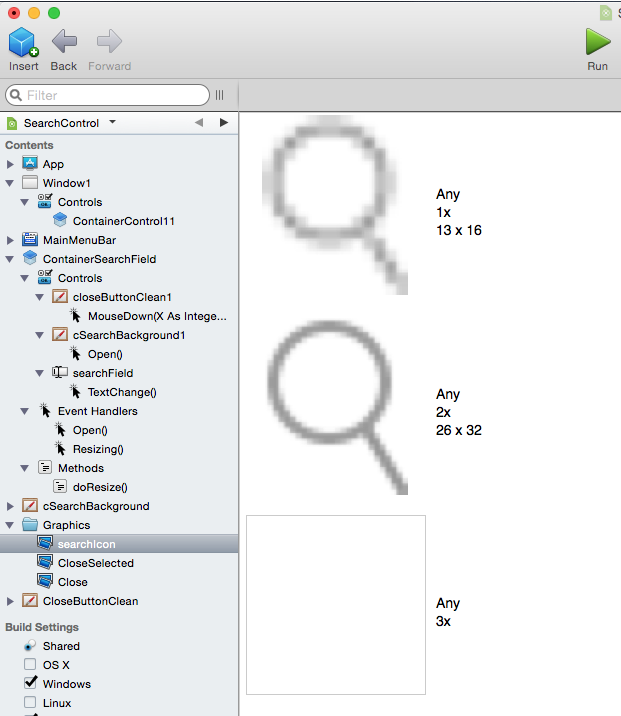
The resulting control uses three pictures for a total of two functions: one for the magnifying glass and two for the “text cleaning” widget that will be displayed only when the TextField has text on it. The widget has to change its image when the pointer is on it so the user can see that this is an active “clickable” control.
Fortunately Xojo eases the management of multiresolution pictures in our apps, changing on the fly between the existing regular/normal resolution and the HiDPI/Retina versions for the same given picture. Thus, we only need to use our favourite graphics editor app to draw and export the pictures with the required quality as PNG files (personally I use the Sketch on macOS).
In order for Xojo to be able to do its magic, you shouldn’t import the pictures to the app by dragging them from disk and dropping them on the Project Browser or Xojo will import the pictures as an alias. Instead, use the Insert > Image option to add an Image instance to the project, showing the associated Editor where you’ll be able to assign every picture file for the supported resolutions of a same graphic. Of course the label you use as the Image name on the Inspector Panel will be the name you use to reference the Image from code or when assigned to other controls properties. If you explore the example project for this tutorial, you can see the three Images used: searchIcon, CloseSelected and Close in regular and HiDPI/Retina resolutions.
Creating the Text Cleaning Widget
We have already seen in a previous tutorial (in Spanish) how easy it is to create custom graphic controls in Xojo based on the Canvas Class. In order to create the widget providing the search text cleaning feature, we will follow that same principle here:
- Add a Canvas subclass and name it CloseButtonClean.
- Add the Open, MouseEnter and MouseExit events to the subclass
- Type the following code into the Open event, basically to assign the picture showing its initial state and making it invisible:
me.Backdrop = close
me.Visible = false
- We will use the MouseEnter and MouseExit events to change the displayed picture in response to the pointer cursor being inside or outside the limits of the control; showing that this is an active/clickable control. Put the following line of code in the MouseEnter event:
me.Backdrop = CloseSelected
- And the following one in the MouseExit event of the control:
me.Backdrop = close
We have completed the decoration of our little class, but it is also desirable to provide an external interface so other controls can easily change the state of the widget. We will do that by adding two methods to the class.
With the widget class still selected on the Project Browser, select the Insert > Method option twice to add two Methods and using the Inspector Panel to change the Method names to “Activate” and “Deactivate”, respectively. Leave the Scope as Public for both methods, so they are reachable by other objects and not only those created from the class.
The select method simply changes the control visibility to True:
me.Visible = true
While the Deactivate method will do the opposite action:
me.Visible = false
me.Backdrop = Close
Drawing the Search Control
The second of the required classes based on the Canvas class is no more complex. In this case we will not assign a picture to the Backdrop property of the Canvas, instead we will use the Paint event to directly draw the decoration, including the magnifying glass picture at the appropriate coordinates of the control.
So, after adding a second Canvas subclass to the project —named cSearchBackground in our Example project—, we just need to add the Paint event to it, writing the following lines of code on the associated Code Editor:
g.PenWidth = 1
g.PenWidth = 1
g.ForeColor = &caaaaaa
g.DrawRoundRect(0,0,g.Width,g.Height,5,5)
g.ForeColor = &cffffff
g.FillRoundRect(1,1,g.Width-2, g.Height-2,5,5)
dim midY as integer = (g.Height/2) - (searchIcon.Graphics.Height/2)
g.DrawPicture(searchIcon,5,midy)
In essence, we are drawing the control border using the provided foreground color (&caaaaaa, in hex notation), and filling the control background with the white color. After that, we will paint the magnifying glass icon using the DrawPicture method of the Graphic class provided as the drawing context for the Paint event.
Container Control: Putting it all Together
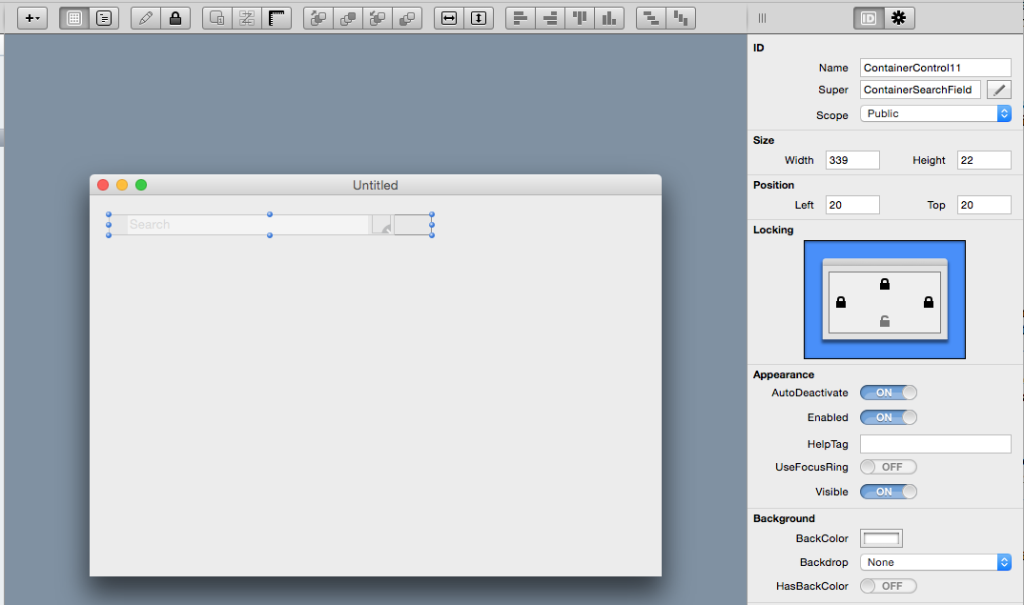
Once we have all the required items for our “complex” UI control, it’s time to add a ContainerControl to the project using the Insert > ContainerControl option. The first thing you probably notice is that the Layout Editor is very similar to the one used for designing the windows of the app. After all, the ContainerControl is about adding, resizing and aligning several UI controls on it, as you do when designing a window.
With the added ContainerControl still selected, change the attribute Name to ContainerSearchField on the associated Inspector Panel.
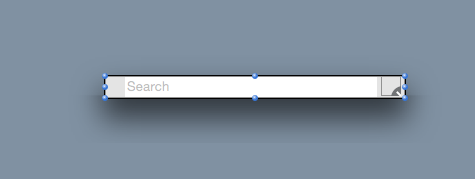
Now we just need to add an instance of our cSearchBackground class to the ContainerControl, a TextField control from the Xojo Library Panel and our search text cancelation widget class to the right of the just added TextField. The final layout of the control should be something similar to this (after adjusting the own Container Control height and width):
In order to correctly draw the control background when resizing the ContainerControl, select the cSearchBackground instance and add the Open event with the following line of code:
me.Width = self.Width
In addition, we also want that the TextField to show our search text cancellation widget only if the TextField has text on it. Select the TextField instance on the ContainerControl (searchField in the example project), and add the TextChange event with the following code in the associated Code Editor:
if me.Text <> "" then
  CloseButtonClean1.activate
else
  CloseButtonClean1.deactivate
end if
With the TextField still selected, set the CueText property under the Initial State section of the Inspector Panel to “Search”. This will be the text shown by default when the TextField is empty.
Of course we want to add functionality to the instance of our search text cancelation widget —named CloseButtonClean1 in the example project—. Add the MouseDown event and write the following line of code on the associated Code Editor:
searchField.Text = ""
When using a ContainerControl you will want to provide a way to resize every control inside of it in response to the resizing of the ContainerControl itself. We resolve this by adding the doResize method to our Container Control with the following code:
closeButtonClean1.Left = me.Width - 24

searchField.Width = (Me.Width - 27) - searchField.Left

cSearchBackground1.Width = me.Width

cSearchBackground1.Invalidate
As you can see this method simply does some calculations to reposition the controls based on their relative coordinates, updating also the width of the background control to reflect the same width of the ContainerControl itself. Finally it calls the invalidate method on the background instance class so the control can update the drawing.
In order to finish our ContainerControl subclass, we just need to add a couple of events: Open and Resizing. The first will be in charge of setting the initial state for the control, while the second will call the doResize method every time the ContainerControl is resized.
Once you’ve added these events, select them and simply write the call to the doResize method in both cases.
Using the SearchField ContainerControl
That’s all! You can start using the control by dragging it from the project browser to the Window Layout in order to create a new instance. Of course, we have not implemented the search functionality itself in this example project, mainly because it depends of the purpose of the final application itself. In addition, it would be easy for you to add extra functionality as text autocompletion as we have seen in a previous tutorial.
Javier Rodriguez has been the Xojo Spanish Evangelist since 2008, he’s also a Developer, Consultant and Trainer who has be using Xojo since 1998. He manages AprendeXojo.com and is the developer behind the GuancheMOS plug-in for Xojo Developers and the Snippery app, among others.