
Delegates are one of those advanced features you can find in the Xojo programming language, and it’s a really powerful one! Once you discover and comprehend all the flexibility you can get from Delegtes, I’m pretty sure you’ll start to start using them!
But what is a Delegate? We can define it as a data type definition for a method (or function) signature. That is: when you define a new delegate type you need to provide it with a concrete method or function signature. And here is where everything begins.
Once you’ve defined the new Delegate type, you can use it in your code as you would with any other data type. So, for example, you can add a property to any object (Windows, WebPage, iOSView, Class, subclass…) and define its type as the just-created Delegate type.
That means that during your app’s code execution, you can change, for example, the Delegate property value so it stores ANY method or function matching the Delegate signature and then, you can invoke it! The main point here is that, through the use of Delegates, you can dynamically change the code to execute.
Let’s see how it works through a simple example, randomly drawing to a Graphic class instance using that code will work with any graphic instance you pass along as parameter.
Delegate Creation
Of course, the first step is defining our Delegate data type. In a new Desktop project, select Insert > Delegate, and use the Inspector Panel to change its values to:
- Delegate Name: FigureDelegate
- Parameters: g as Graphics
Voilà! We have created a new data type that can point to any method matching that signature.
Using the Delegate Type
As you do with any of the standard data types or your created classes, you can create new variables or properties whose data type is our delegate type. For example, add a new property to the Window1 item and change its definition in the Panel Inspector so it reads:
- Name: Delegates()
- Type: FigureDelegate
Our Delegate property will be an Array storing FigureDelegates values.
Creating Matching Methods
Now let’s add a few methods matching our Delegate signature, so we can add them as values to our Delegates() Array.
The first one will randomly draw a line in the received Graphics context, as parameter. So, add a new method to Window1 and use the Inspector panel to change its values to:
- MethodName: DrawLine
- Parameters: g as Graphics
And write the following code in the associated Code Editor:
g.ClearRectangle(0,0,g.Width,g.Height)

Var rd As New random
Var x, y, w, h As Double

g.PenSize = 2
g.DrawingColor = RGB(rd.InRange(0,255), rd.InRange(0,255), rd.InRange(0,255))

x = rd.InRange(0, g.Width)
y = rd.InRange(0, g.Height)
w = rd.InRange(0, g.Width)
h = rd.InRange(0, g.Height)

g.drawline(x,y,w,h)
Our second method will draw Ovals; so, add a new method to the Window1 item and change its values to read:
- Method Name: DrawOval
- Parameters: g as Graphics
And write the following code in the associated Code Editor:
g.ClearRectangle(0,0,g.Width,g.Height)

Var rd As New random
Var x, y, w, h As Double

g.PenSize = 2
g.DrawingColor = rgb(rd.InRange(0,255), rd.InRange(0,255), rd.InRange(0,255))

Var widthAvail As Integer
Var heightAvail As Integer

x = rd.InRange(0, g.Width)
y = rd.InRange(0, g.Height)
widthAvail = g.Width - x
heightAvail = g.Height - y
w = rd.InRange(0, widthAvail)
h = rd.InRange(0, heightAvail)
g.DrawOval(x,y,w,h)
Next, add a third method. This one will draw a string. Once added to the Window1 item, use the Inspector Panel to change its values to:
- Method Name: DrawText
- Parameters: g as Graphics
And put the following snippet of code in the associated Code Editor:
g.ClearRectangle(0,0,g.Width,g.Height)

Static t As Text = "Hello World!"
Var tc As Double = g.TextWidth(t)/2

g.DrawText(t, g.Width/2-tc, g.Height/2-g.TextHeight/2)
Adding Methods to the Delegates() type
We told that a Delegate data type points to a Method or Function; but, how can we get that value? Really simple! Xojo provides the AddressOf operator that gives us the memory address where the method “lives”.
Add the Open Event Handler to the Window1 item and add the following code to the associated Code Editor:
Image = New Picture(ImageWell1.Width, ImageWell1.Height, 32)
Delegates.AddRow(AddressOf DrawLine)
Delegates.AddRow(AddressOf DrawOval)
Delegates.AddRow(AddressOf DrawText)
Adding a Picture Instance
We will need a Graphic context to paint in. For that we will add a new Property to our Window1 item, using the Inspector Panel to change its values to:
- Name: Image
- Type: Picture
Layout the User Interface
Now let’s take care of the user interface, so we can see how everything works.
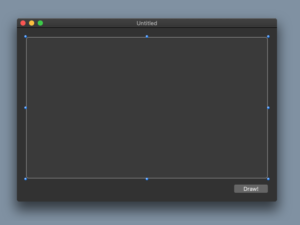
Select Window1 to bring in the Layout Editor for the default application window. Then, add an ImageWell and a PushButton control from the Library to the Layout Editor. Change their positions and the ImageWell size so they matche the following screenshot:
Finally, add the Action Event Handler to the just added PushButton and write the following snippet of code in the associated Code Editor:
Var rd As New Random
Var d As FigureDelegate

d = Delegates( rd.InRange(0, Delegates.LastRowIndex) )

d.Invoke( image.Graphics )

ImageWell1.Image = Image
As you can see, we defined a new FigureDelegate variable and assigned it a random value from our Delegates Array. Then, we only need to call the method (or function) pointed by a Delegate data type using the Invoke method on it. Run the example app and see how it behaves.
As you can see, using this technique you could use the same methods on, for example, any picture instance.