
The Xojo ComboBox desktop control is a powerful one. It combines the capabilities of a TextField with the PopupMenu. That means that you can choose any of the available options from the associated menu (for example those assigned using the Appearance > Initial value option in the Inspector Panel) or simply type another value in the ComboBox text field.
What about getting the ComboBox to do things not included in the class? In this tutorial you will learn how to add the text typed by the user as an option in the associated ComboBox menu. We’ll make sure entries are not duplicated and that they are sorted alphabetically. We’ll use the AddAllRows method to add a strings array to those already available in the ComboBox menu. In addition, we will add a new method to the ComboBox so you can retrieve all the menu entries as an Array of Strings.
You’ll find it very convenient that Xojo is an Object-Oriented Programming language as you create any subclass from any existing one. Creating your own specialized subclasses adds tons of extra functionality to any of your projects since they can be used in your other desktop projects. Keep reading to create your own subclasses! Download this Xojo project
1. Adding a Class to the Project
Start a new Xojo Desktop project and select the Insert > class option from the menu in order to add a new class to the Navigator.
With the new Class1 item selected in the Navigator, change the following values in the associated Inspector Panel:
- Name: MyComboBox (you may use any other class name you want).
- Super: ComboBox
Confirm the changes. You’ll see how the new class item is now named MyComboBox in the Navigator, while its icon has changed to the one for the ComboBox control.
2. Adding Event Handlers to the Class
Keep MyComboBox selected in the Navigator and then select the Insert > Event Handler option from the menu. That action will open a new window listing all the available Event Handlers for the ComboBox class and, thus, also for all the subclasses created from it – like our new class.
Select the Change, KeyDown, Open and LostFocus entries from the list and confirm the changes by clicking on the “OK” button. The “Add Event Handler” window will close and the selected entries will be added to the MyComboBox item in the Navigator.
Use the KeyDown and LostFocus event handlers to add the text typed by the user as new entries in the ComboBox menu.
Select the KeyDown event under the MyComboBox item in the Navigator and type the following code in the associated Code Editor:
AddNewEntry(key)
Return RaiseEvent KeyDown(Key)
The AddNewEntry method will add the new entry to our ComboBox menu. Notice the RaiseEvent KeyDown(Key) line of code. Because our subclass makes use of this event handler, that means that it will not be available to any instances (objects) created from the class, as for example those created when adding the class to a Window in the Layout Editor.
3. Adding Event Definitions
With MyComboBox still selected in the Navigator, choose the Insert > Event Definition menu option and add the following values in the associated Inspector Panel:
- Event Name: KeyDown
- Parameters: Key As String
- Return Type: Boolean
This creates the same Event Handler for the class so it can be implemented by any of the instances created from the class, while the RaiseEvent KeyDown(Key) line of code will make sure that this event will also be called for its instances.
Now select the LostFocus event handler from the MyComboBox item in the Navigator and type the following code in the associated Code Editor:
Me.AddRow(Me.Text)
RaiseEvent LostFocus
Once again, because we are implementing this event handler, we need to make it available for our class instances. With MyComboBox selected, choose the Insert > Event Definition menu option adding the following value in the associated Inspector Panel:
- Event Name: LostFocus
Now select the Open event handler under MyComboBox, typing the following code in the associated Code Editor:
Var selectedIndex As Integer = Me.mSelectedRowIndex

Var s() As String = Me.Rows
s.Sort
Me.RemoveAllRows
Me.AddAllRows(s)

If selectedIndex = -1 Then
  Me.mSelectedRowIndex = -1
  Me.Text = ""
End If

RaiseEvent Open
Once again, we need to create a new Event Definition for the class using the values:
- Event Name: Open
And repeat the last operation to add the last Event Definition with the following:
- Event Name: Change
Type this snippet of code in the associated Code Editor for the Change Event Handler:
Var s() As String = Me.rows
Var n As Integer = s.LastRowIndex

For i As Integer = 0 To n
  If s(i) = Me.Text Then
    Me.mSelectedRowIndex = i
    Exit For
  End If
Next

RaiseEvent Change
4. Adding Methods to the Class
While MyComboBox is still selected in the Navigator, select the Insert > Method option from the menu, using the following values in the associated Inspector Panel:
- Method Name: AddNewEntry
- Parameters: Key As String
- Scope: Protected
And type the following snippet of code in the Code Editor associated with the new method:
// If return key or tab key is pressed then we add the current text to the menu options

If (key.Asc = 13 Or key.Asc = 9) And Me.Text <> "" Then

  Me.AddRow(Me.Text)

End If
Now add a second method to the class, using the following values:
- Method Name: Rows
- Return Type: String()
- Scope: Public
And type the following code in the method’s Code Editor:
Var r() As String
Var i As Integer = Me.RowCount - 1

For n As Integer = 0 To i
  r.Add(Me.RowValueAt(n))
Next

Return r
5. Overriding existing Methods
You always want your ComboBox menu items to be sorted alphabetically. And that means taking care of the default functionality of the AddRow and AddAllRows methods. At the same time, we don’t want the AddRowAt ComboBox method to be available for our subclass (it wouldn’t make much sense to add a new entry at a particular spot in the menu if it wouldn’t stay at that position afterwards).
Add a couple of new methods to MyComboBox using the following values:
- Method Name: AddAllRows
- Parameters: Items() As String
- Scope: Public
- Method Name: AddRow
- Parameters: Item As String
- Scope: Public
Select the AddAllRows method and type the following code in the associated Code Editor:
Var selectedItem As String = Me.SelectedRow
Var lastAddedItem As String = items(items.LastIndex).Trim.Titlecase

Var d As New Dictionary

Var s() As String = Me.Rows

For n As Integer = 0 To s.LastIndex

  d.Value(s(n)) = Me.RowTagAt(n)

Next

For Each item As String In items
  If Not d.HasKey(item) And item <> "" Then s.Add(item.Trim.Titlecase)
Next

s.Sort
Me.RemoveAllRows

// Calling the overridden superclass method.
Super.AddAllRows(s)

For n As Integer = 0 To s.LastIndex

  If d.HasKey(s(n)) Then
    Me.RowTagAt(n) = d.Value(s(n))
  End If

  If s(n) = selectedItem Then
    Me.mSelectedRowIndex = n
  End If

  If s(n) = lastAddedItem Then
    Me.mLastAddedRowIndex = n
  End If

Next
Select next the AddRow method and type the following code in the associated Code Editor:
If item = "" Then Return

item = item.Trim.Titlecase

If Not Me.HasMember(item) Then

  Var selectedItem As String = Me.SelectedRow

  Var d As New Dictionary

  Var s() As String = Me.rows

  For n As Integer = 0 To s.LastIndex

    d.Value(s(n)) = Me.RowTagAt(n)

  Next

  s.Add(item)
  s.Sort

  Me.RemoveAllRows
  Super.AddAllRows(s)

  // Let's restore the original rowtags to their new spot in the menu

  For n As Integer = 0 To s.LastIndex

    If d.HasKey(s(n)) Then
      Me.RowTagAt(n) = d.Value(s(n))
    End If

    If s(n) = selectedItem Then
      Me.mSelectedRowIndex = n
    End If

    If s(n) = item Then
      Me.mLastAddedRowIndex = n
    End If

  Next
End If
We still need a last method to our class that will check if an item is already among the current entries for the menu. So, add it using the following values:
- Method Name: HasMember
- Parameters: Item As String
- Return Type: Boolean
- Scope: Protected
Type the following code in the associated Code Editor:
Var b As Boolean

For Each s As String In Me.Rows
  If s = item Then
    b = True
    Exit For
  End If
Next

Return b
6. Overriding Existing Properties
Because we are sorting the entries in the menu, we also need to make sure that the LastAddedRowIndex and SelectedRowIndex properties are pointing to the right item and selected row index. That means that we need to override the current functionality of the base class.
In order to do that, select the Insert > Property option from the menu with the following values in the associated Inspector Panel:
- Name: LastAddedRowIndex
- Type: Integer
- Scope: Public
With the new property still selected in the MyComboBox class, access the contextual menu and choose the Convert to Computed Property option. That action will add a Get and Set method under the property item, in addition of adding a new mLastAddedRowIndex property whose scope will be Private.
Let’s add the second Property using these values:
- Name: SelectedRowIndex
- Type: Integer
- Scope: Public
Once again, with the just added property still selected under the MyComboBox class in the Navigator, select the Convert to Computed Property option from the contextual menu. Then select the Set method under SelectedRowIndex and type the following code in the associated Code Editor:
Var r() As String = Me.Rows

If value > r.LastIndex Then Raise New OutOfBoundsException

If value > 0 Then
  Me.Text = r(value)
Else
  value = -1
  Me.Text = ""
End If

mSelectedRowIndex = value
RaiseEvent Change
This is the code that will be executed every time our code sets a new value to the property, so we need to make sure it is between the allowed range, raising a new OutBoundsException exception if it is beyond the limits of the available entries in the menu.
At the same time, if it is not a positive number that would mean that the we don’t want to select any entry, so we can set the text property of the ComboBox to an empty string and the inner mSelectedRowIndex value to -1.
7. Putting it to Work
Now that you have the ComboBox subclass ready to work, choose the Window1 item in the Navigator in order to access its Layout Editor. Next, drag the MyComboBox item from the Navigator and drop it over the Window1 in the Layout Editor. You can use the layout guides in order to keep it aligned with the window margins.
With the MyCombobox1 item still selected in the Layout Editor, access its Panel Inspector in order to assign some initial values for its menu from the Appearance > Initial Value section. For our example, you could enter "One", "Two" and "Three" as the values in the associated editor. And you can also enable the autocomplete option for the control under Behavior > Allow Auto Complete.
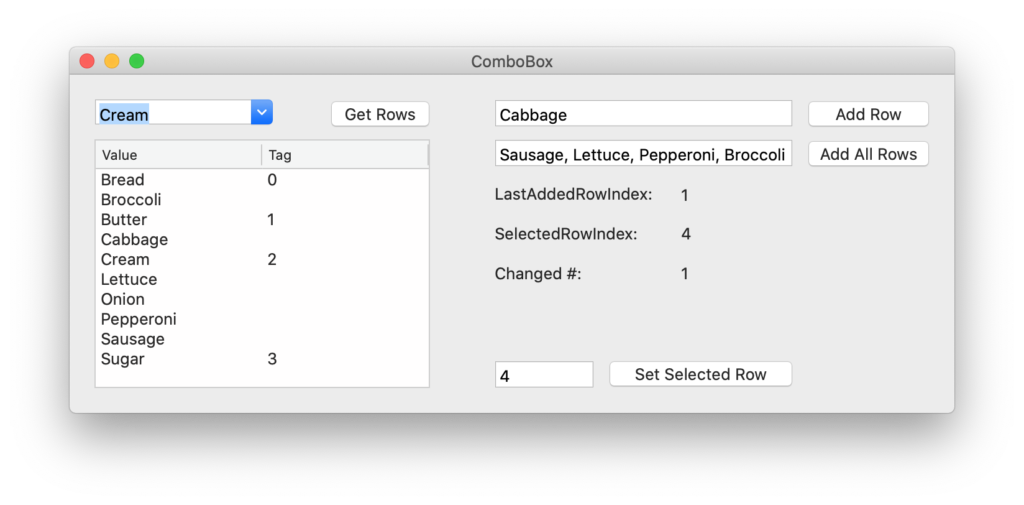
Run the example app and observe how every new entry made by the user is added to those already available in the ComboBox menu, while keeping them sorted.
You can add more UI controls to Window1 in order to use the other methods and properties, or just download the example project and run it from the Xojo IDE. I hope you have found this tutorial helpful and that you can learn from it and adapt it to your needs. If you have questions about this post or the Xojo programming language you can find me at the Xojo Forums and on Twitter @xojoES.