
Are you working on a solution consisting of several projects? Are you working in a team or as a single developer and want to share code between different projects? If so, then a MonoRepo could be something to think about.
Other IDE’s have a concept of a solution or workspace consisting of several projects, and you can leverage packages in order to share code between projects. That’s not as simple as one might think with Xojo. The Xojo Documentation «Sharing Code» explains three different ways: Copy & Paste between projects, Export/Import Items and as a last option there are External Items.
Copy & Paste is the simplest way. The downside is that after making a fix in a shared code item, it needs to be copied and pasted again and again to all projects that are using it.
Export/Import Items as well as External Items allows to save project items such as Modules or Classes in Binary or XML Format. With a Version Control System such as SVN or Git one should obviously go for XML. However, many don’t quite like the XML project format. It is readable in plain text, but not as clean and easy compared to Xojo’s Text format.
Which one would you prefer to read when looking at changes, diffs, conflicts?
- On the left: «Xojo XML project format» (*.xojo_xml_project)
- On the right: «Xojo Text project format» (*.xojo_project)

I’d definitely want to use the Xojo Text project format. And I want multiple projects that share code such as Modules with Extension Methods and various helper Methods I’ve written over the years. Business Logic Classes can be used in console, desktop and web applications – again, there’s the need to share code.
So let’s see how this can be done with MonoRepo. But what is a MonoRepo?
MonoRepo
The name consists of two parts: «Mono» (meaning: single) and «Repo» (short for: Repository). What it means: it’s a software development strategy where code for multiple projects is stored in the same repository (and therefore in the same main folder).
Advantages:
- Reuse Code: Functionality can be abstracted into shared Modules or Classes, and be included in multiple projects without the need of a package management system.
- Atomic Commits: When several projects work together, releases need to sync which versions work with each other. In a MonoRepo it’s all in one place. Once the projects are ready for an update, you can tag the current state. This will include the state of all dependent projects needed for that release. So no need to know which project in which version or state has been used in version X.
- Collaboration: Several developers can work on different projects. Shared code can be improved by all developers with the others (or other projects) benefitting, too.
Disadvantages:
- Access Control: With split repositories for each project, access to a project can be granted based upon need. A MonoRepo however allows read access to all software in the repository.
- Storage: A developer needs to check out the whole MonoRepo, even if one is working just on a single project included in the MonoRepo. Depending on the software being developed, this can be a significant amount of “not needed” storage space.
Personal Thoughts:
I like the MonoRepo setup because of Xojo’s support for cross-platform development. Everything is contained in a single repository/folder, all files are located relatively. So you cannot only move the MonoRepo folder to any location on your machine, but also to other machines – running the same or a different Operating System. Check out the Version Control Repository on your Windows working machine and start coding. Commit/Push the changes, switch to a Mac and check-out/pull the current branch you’re working on in order to do some platform specific tests. To me that’s much more convenient and efficient than Remote Debugging.
Xojo Projects Setup
Let’s see how we can set up a MonoRepo using Xojo. In this example we’re going to create two projects that share a Class and a Module. There are a few gotchas.
Setup a New MonoRepo
All we’re doing is creating a folder: «xojo-projects-monorepo». In a real world situation you’d sooner or later make a Repository out of this folder in the Version Control System of your choice.
Project One
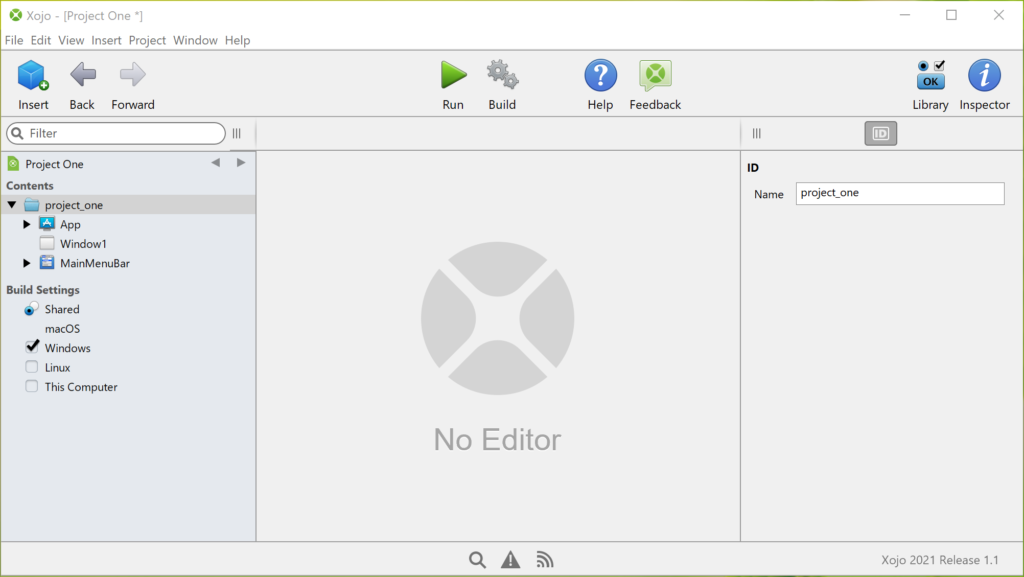
Once I have created a new Project named «Project One» the first thing to be done in the Xojo IDE is:
- Add a new project item: Folder
- Name the folder according to the project, but in a way that is best represented on disk as a folder: «project_one»
- Move all project items (App, Window1, MainMenuBar) in this folder
That should look like this:
Then let’s save this project as a «Xojo Project» (*.xojo_project) to the «MonoRepo folder»:
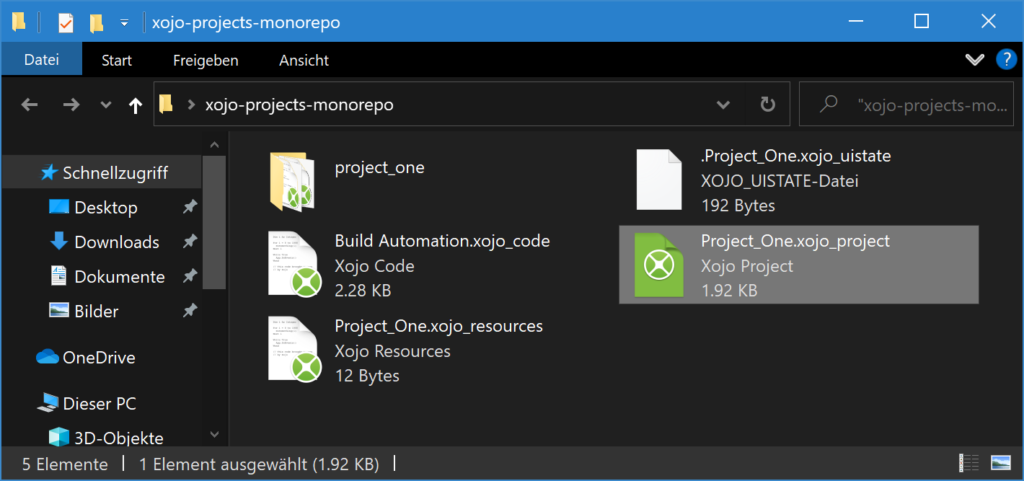
What do we get to see?
- Project_One.xojo_uistate: That’s the state configuration of the IDE when this project has been saved. In a VCS you can ignore the files «*.xojo_uistate» safely.
- Build Automation.xojo_code: we’ll come back to that later.
- Project_One.xojo_project: The main project file, containing the references to all included project items, which are stored as individual files.
- Project_One.xojo_resources: This is a binary file containing the AppIcon, and similar resources.
- Folder «project_one»: The folder we’ve just created. In there you’ll find the files of the project items you’ve moved in there: App.xojo_code, MainMenuBar.xojo_menu and Window1.xojo_window
Project Two
Let’s make this short. We’re doing the very same steps again, just for a «Project Two», with all project items in a folder «project_two».
Our MonoRepo now looks like this:
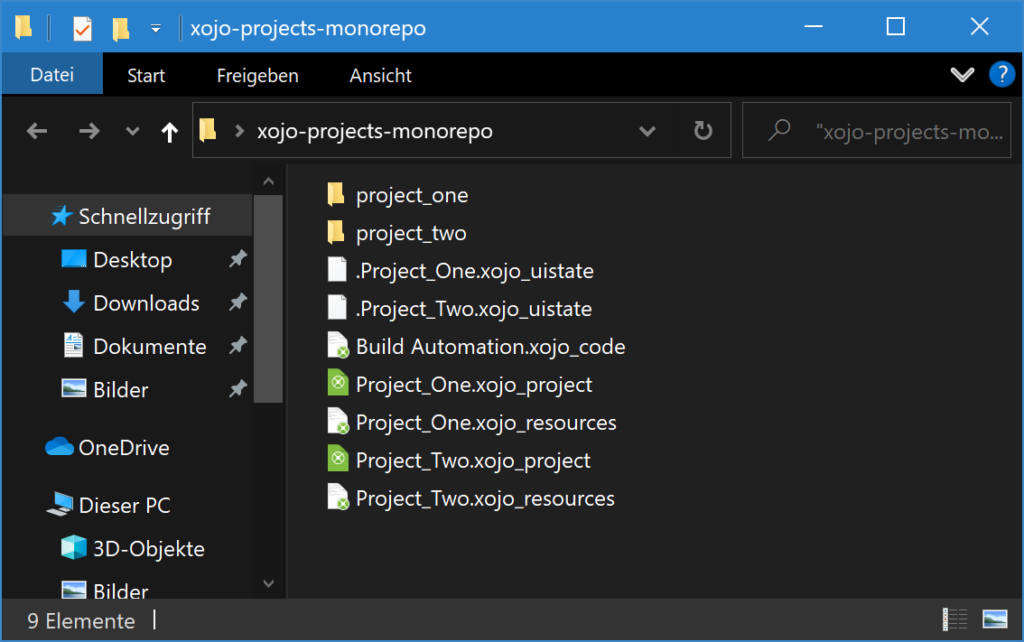
So far, this is simple and clean. The main project files are in the root folder, all project related items are in their own project folder.
But hey – just one «Build Automation»? Yup… That’s a bit unfortunate. We’ll come back to that later.
Shared Code
Now for the more interesting part. Let’s create a Class and a Module that we want to share in both Projects.
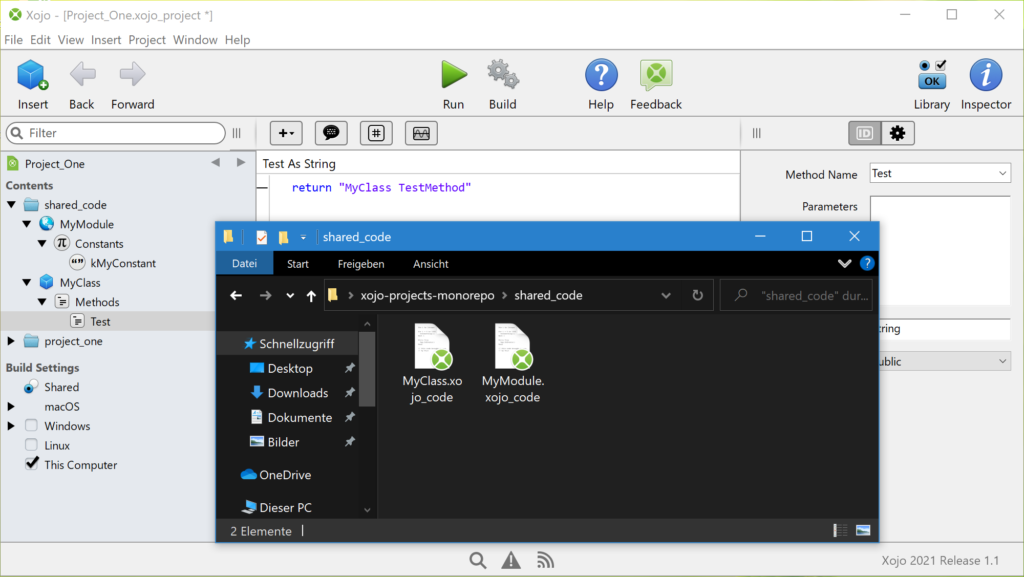
In Project One
- add a new folder: «shared_code»
- add a Module containing a Constant to the shared code folder: «MyModule»
- add a Class containing a Method to the shared code folder: «MyClass»
- Save the Xojo Project.
The shared code folder and the to-be-shared project items are now saved as individual files/folders to disk:
Add Shared Code to Project Two
We now want to add this shared code to «Project Two».
On Windows you can do this using drag and drop: Drag the folder «shared_code» from Windows Explorer into the Navigator (left pane) of the Xojo IDE in «Project Two».
On macOS however, this will not work as expected. Due to a bug the project file will be corrupted since it’s saving wrong locations. To show you: I’ve done this and opened the «Project_Two.xojo_project» in a Text Editor:
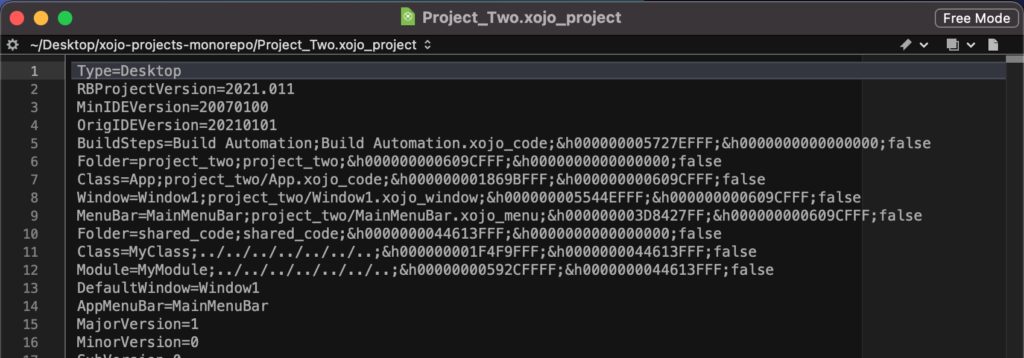
Oops… MyClass and MyModule have a weird location: ../../../
As a result, the project won’t load correctly.
That’s why I recommend the following steps:
- Add any new folders manually in the Xojo IDE: In «Project Two»: Insert Folder «project_two» (name it exactly the same as already existing on disk!).
- Open «Project One», select and right-click to copy the project items «MyClass» and «MyModule»
- Back in «Project Two»: paste the project items in the previously created folder “shared_code”
- Close «Project One» again, to have only a single project opened
That’s what it should look like – the shared project items are being referenced properly, relative to the root folder of the MonoRepo:
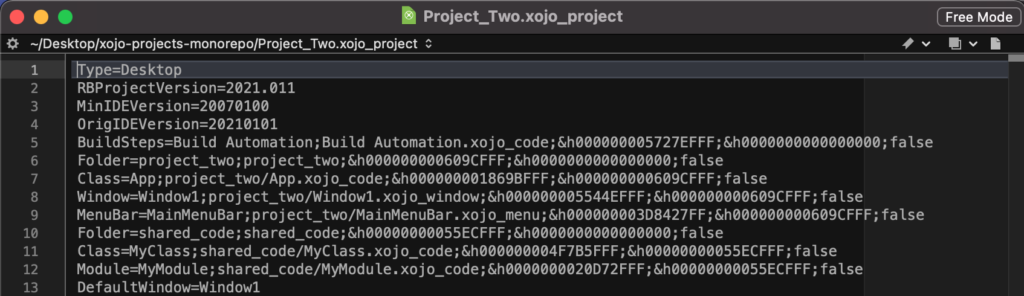
So that’s it. We now have «MyClass» and «MyModule» available in both Projects. And since they are effectively the same files on disk, they’re shared between them. So from now on any code change will be reflected and used by both projects.
You’ll only need to do these steps once for a new project item that you’re going to share between projects. Once they are referenced in the project files, they’ll point to the same file for all projects. That’s possible because the project file is in the root of the MonoRepo, and all project items added are being referenced relative to that root folder.
So it doesn’t matter where the main folder is located – and the structure works fine for all Operating Systems you can use to code with the Xojo IDE.
Let’s Code
Finally make use of this and use the shared code in the projects:
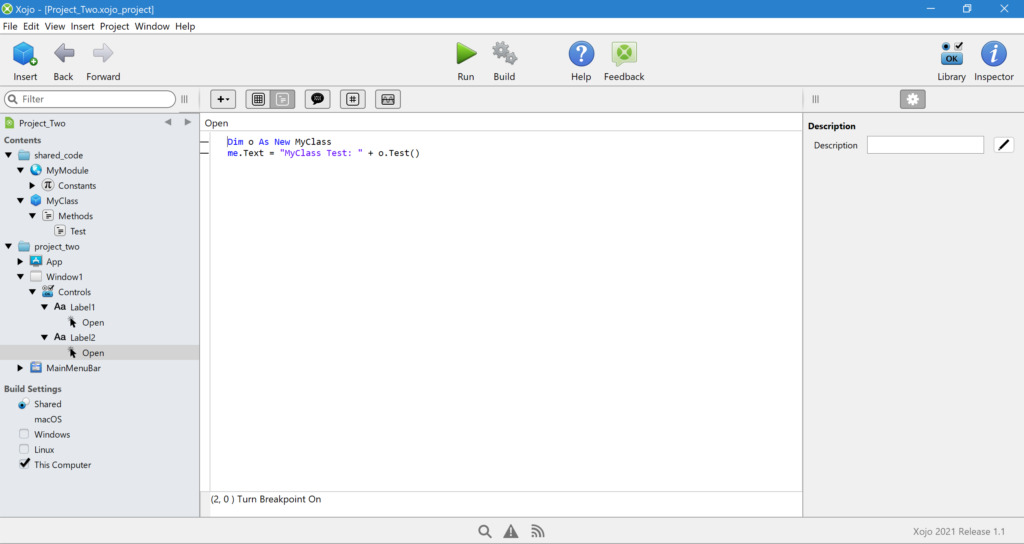
While your projects are evolving you can add more shared Classes, Modules, Methods, Constants, Images, and add them to the other projects in the MonoRepo as explained above.
Enjoy the benefits of your MonoRepo and reusable code!
Watch Out
Be aware that the Xojo IDE isn’t designed for shared code. It doesn’t look at your MonoRepo as a «solution of several projects». It’s not aware of changes happening outside of an already loaded/opened Project.
That’s why I recommend to only have one project open at a time, and only open a second project to copy and paste new project items to the other project.
Why? Well, let’s assume you have both projects opened. You’re making a change to «MyClass» in «Project One» and save. Since the Xojo IDE with the opened «Project Two» is not aware of this change you still have the previous state loaded in Memory. And chances are that once you’re saving «Project Two» you’re going to overwrite the file with the state that «Project Two» currently has, therefore loosing the changes made to «MyClass» in «Project One».
One workaround might be: Frequently save the project after each change. Never switch to another project if not saved. If a second opened project needs that change, switch to it and «Revert to saved». You can do this by simply (un)checking a Build Target to make the project «dirty», so that this Menu Item gets enabled. Then «revert to saved» (without saving changes).
But honestly, it’s too risky in my opinion. That’s why I try to only work on a single project at any given time. As always … the exception proves the rule 🙂
File Type Groups
If your application uses files with app specific icons, you’re going to create a File Type Group. In a MonoRepo you need to be aware of how Xojo is saving this. Let’s have a look at an example:
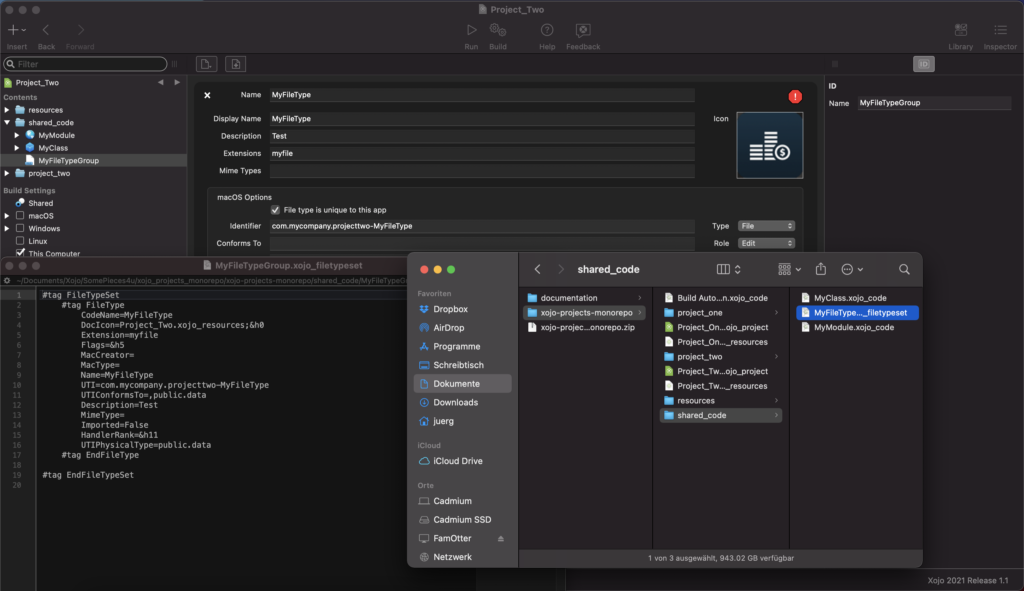
I have created a «File Type Group» named MyFileTypeGroup and saved it to the shared_code folder. Has this been a good idea?
- MyFileTypeGroup.xojo_filetypeset: This is a text file containing information about the custom file type. So far so good, but… where is the assigned Icon?
If you have a close look at the contents of this file you’ll notice that it references: Project_Two.xojo_resources - Do you remember… we’ve noticed this file and described it like this: Project_Two.xojo_resources: This is a binary file containing the AppIcon, and similar resources.
So it contains binary information for both AppIcon’s, as well as FileType Icons.
Back to the question – has it been a good idea to save it to a shared code folder?
I don’t think so… Well, it works – even if you add it to a second project. However, when saving the project it will always reference the currently opened project, and save the binary representation of the Icon again to another .xojo_resources file. This leads to unwanted changes to both files.
So don’t do that… Always and only save a «File Type Group» per project. Even if this means an unwanted duplication of a project item that you need in several projects.
I just accept that inconvenience – knowing I’m using Xojo and the «Text Project format» in a way that it has not been designed for. All the other benefits are worth it.
Build Automation
Do you remember that we wanted to have a look at that later, when we’ve noticed that there is only a single «Build Automation.xojo_code» file in our MonoRepo?
Build Automation will be shared between all projects since you can’t move that to another place. It’ll always be next to the project file. For our MonoRepo this means: it will be the very same for all projects since we have all projects files in the root repository folder.
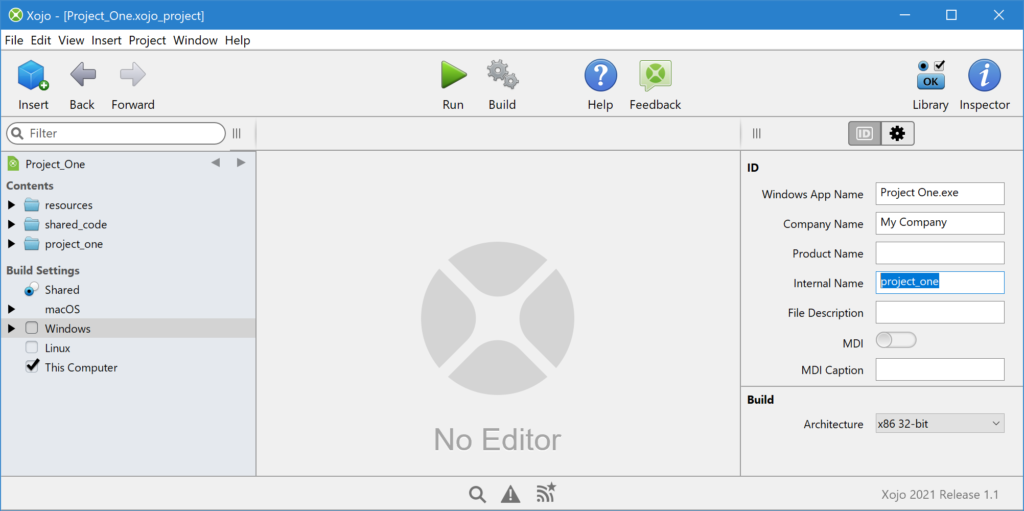
What can we do to still have Build Automation «per project»? We need a way to distinguish the projects in IDE- and Build Scripts. What has worked fine for us is to use the «Build Setting: Windows – Internal Name» and set it to an (internal) project name:
Pre/Post Build Scripts
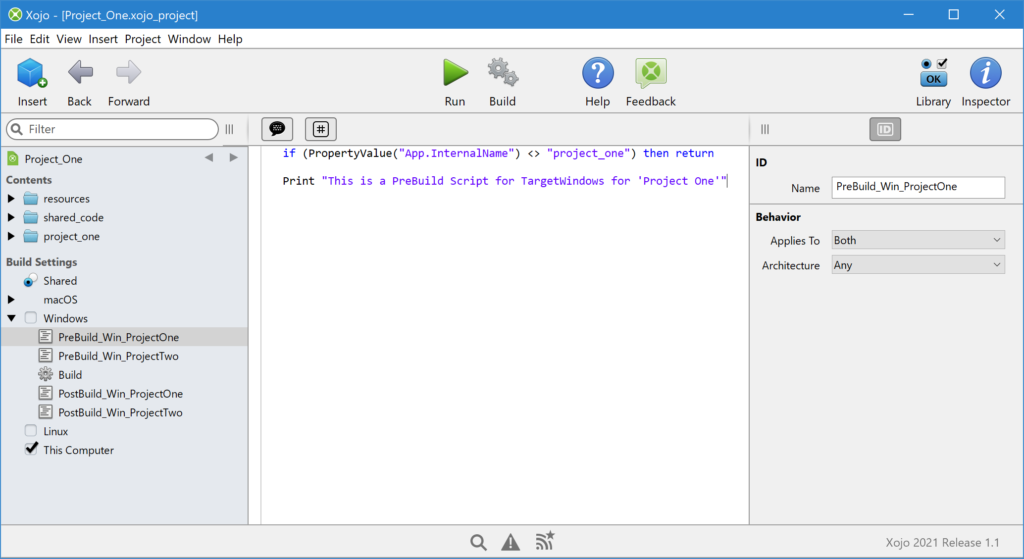
For the Build Steps «Scripts» and «External Scripts» we then need to first add check if we want to run it for the currently to-be-built project:
if (PropertyValue("App.InternalName") <> "project_one") then return
This is the workaround for this limitation of the Xojo IDE to not have Build Automation «per project» if there are several projects in the same folder (which happens to be the case in our «MonoRepo»). You’ll see all Scripts in all projects. And since the Xojo IDE will run them all we need to make sure to bail out if it’s a script for another project.
Having said that, it’s also a good thing! This obviously also allows you to share Build Scripts between some or even all your projects.
This ScreenShot shows an example of a Script that’s intended to run only for «Project One»:
Copy Files Steps
No good news here… there are currently no options to check a «per project» value if a Copy File step should be executed or not. It’s a «for all projects» or nothing.
The workaround is to copy additional files using a Post Build Script. And if you’re using the Xojo IDE on all supported OS (Windows, macOS, Linux), then you can leverage conditionals depending on the OS the XOJO IDE is currently running and building in the Scripts, too!
The files to be copied can be stored in a String Array. To know where to copy from (relative to the MonoRepo’s location, so it doesn’t matter to where a Developers checks out the repository):
if TargetWindows then
  sFolderResources = "%PROJECT_PATH%\resources"
elseif TargetMacOS or TargetLinux then
  sFolderResources = "$PROJECT_PATH/resources"
end if
Where to copy the files to?
Dim sAppBuildPath As String
if TargetWindows then
  sAppBuildPath = CurrentBuildLocation
elseif TargetMacOS or TargetLinux then
  sAppBuildPath = ReplaceAll(CurrentBuildLocation, "\", "") 'don't escape Path
end if
This example will use the proper Shell Commands on both Windows or macOS/Linux to copy the list of files:
Dim i As Integer = sCopyFiles.Ubound
while (i > -1)
  if TargetWindows then
    call DoShellCommand("copy """ + sCopyFiles(i) + """ """ + sCopyToFolder + """ /y /v", 0)
  elseif TargetMacOS or TargetLinux then
    call DoShellCommand("cp -f """ + sCopyFiles(i) + """ """ + sCopyToFolder + """", 0)
  end if
  i = i - 1
wend
Adding a Third Project
Before you’re going to add a new project: Make sure you have committed all changes of the MonoRepo in your Version Control System.
If you then create a new project, and do the same steps as described above (move all project items into a new folder «project_three») and save the project to the root folder of the MonoRepo – what do you guess will happen?
The new project related files are there in the root and in the created folder «project_three». That’s expected. However, you’ll notice that the Build Automation files have been overwritten. That’s unfortunate – but expected, too. It boils down to the fact that the Xojo IDE with your newly created project is not aware of whatever you have put in Build Automation before. So it’s going to save the blank Build Automation, since that’s the state of the opened IDE.
Don’t worry, just quit the Xojo IDE, then revert the changes to Build Automation in your Version Control System. Reopen the project, and it will now pick up the previous state which you’ve just reverted. Now it’s possible to add more build steps for the third project.
Similar issues might happen if you’re then going to copy-paste shared code items e.g. from «project_one» to the newly added «project_three». After you save, your Version Control system might show a ton of changes in the shared code, e.g. properties being saved as “True” when before they’ve been saved without quotes. So I usually do the same procedure: revert the (unnecessary/unwanted) changes in the shared code items after a copy-paste and save to a new project. That’s fine since there have been no “real” changes to those files. All that’s important is that the files are being linked properly in the main project file of «project_three».
Everything Else
I don’t intend to explain advanced possibilities here. Just two situations you might encounter:
A Method in a shared Module contains Desktop stuff, but you want the rest of the Module to be used in a Console app, too. You can do this using «Conditional Compilation», e.g. in Code or by selecting a Target («Include in») for a Class/Method in Inspector.
You want or need to build different projects with different Xojo Versions. That might be because of a legacy project. Or that you continue to build for TargetWindows with an older Xojo Version while building for macOS with the newest Xojo Version. Then I’d suggest to code using the lowest used Xojo Version. Add functionality available only in newer Xojo Versions using Conditional Compilation:
#If XojoVersion >= 2021.01 Then
you can even leverage newer Event Handlers (that are only available in newer Xojo Versions) in there using AddHandler. We’ve done that for example with DarkMode Support for our macOS builds (while the productive Windows builds are still being built with older versions).
About Our MonoRepo
Our main MonoRepo currently has 12 projects written in Xojo. It’s a mix of Desktop and Console applications, Commercial and Internal apps. They’re being worked on by multiple developers, allowing us to code or debug by running the Xojo IDE in different OS environments with ease.
We’ve been successfully using this approach for more than 14 years with REALbasic, REAL Studio and Xojo, always with their Text Project format.
We have structured our MonoRepo more or less like this:
/
/project_A
/project_B
Such as you have seen above: All Project files, and the shared BuildAutomation in the root folder. And every project has its own project folder./shared
The common folder is being used in all our projects, no matter if the project effectively needs every bit in there at its current development stage. It’s kind of our own addition to the Xojo Framework that we can rely on in all our projects./shared/controls
We’ve subclasses every Control (to have extended functionality, fixes and workarounds) and only use subclassed Controls in all our projects./shared/classes
/shared/functions
/shared/resources
Same story here. Over the years we’ve written many Modules with custom Extensions to Xojo Framework Classes, additional/custom String/XML/JSON functionality, abstracted the encryption related functionality we need, and we have a set of own data structures/types that are not available in the Xojo Framework. And there are some resources we use in about every project, such as the company logo or Toolbar Icons./components
/components/reporting
/components/webservice
These components are being used in some, but not all projects. Important here is that they need to be functional on their own, without dependencies to app/project related code. Examples known in the Xojo community are e.g. the reporting engine Shorts, or Aloe for WebServices./build
/build/configuration
/build/processing
Last but not least, in that folder we have all (post) build related functionality. That’s per-project build settings (being read and used by the post build scripts – and yes, you’re right, this could be put into the individual project’s folders), but also our shared post build processing (again kicked off by post build scripts) which deploy all our builds (Alphas/Betas/Final versions) internally and upload it to our app-update WebServices.
I can only recommend to have such (post) build-related stuff under version control! Be it for an emergency fix for an old version (while the build process/configuration of your current version has changed significantly), or to work in a feature branch on new functionality that requires changes to the build processing (without affecting the productive flow).
That’s All Folks!
I hope this brief introduction of how one can share code between different Xojo Projects using a MonoRepo has been helpful to some, food for thought to others.
Jürg Otter is a long term user of Xojo and working for CM Informatik AG. Their Application LehrerOffice is a Xojo Design Award Winner 2018. In his leisure time Jürg provides some bits and pieces for Xojo Developers.