
Here’s something teachers can do in an hour: create a web app that lets their students practice their math facts.
One of the best ways for children to get better at simple math problems is to do lots of them! Let me show you how easy it is to create a Xojo web app that displays a bunch of random math problems for a child to go through and answer as quicly as they can.
Get Started
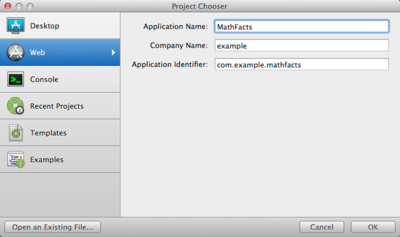
To start, launch Xojo (grab it from here if you don’t already have it) and select Web from the project chooser:
Normally when you create a web page, you drag controls from the Library onto the web page layout. What you will do for this example is create your own special MathProblem control that displays a random math problem with a field to type an answer. The control will also know the answer to its math problem.
To get started, add a Container Control to your project using the Insert button on the toolbar and change its name to “MathProblem”. On this MathProblem control, drag in a Label and a Text Field from the Library (use the toolbar button on the top right to display it if necessary) to look like this:
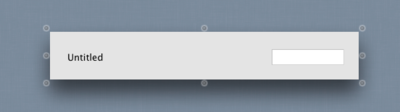
The label displays a math problem and the text field is where the answere is typed.
Adding Code
In order to know if the problem is answered correctly, you will want to store the answer to the math problem within the control. Since the answer will just be a simple number, an Integer Property will work nicely. Use the “+” button on the toolbar to add a Property to the MathProblem control. Change the property’s name to “Answer” (display the Inspector using the toolbar on the top if it is not visible).
Now it is time to add the code to generate a random math problem. Use the “+” button on the toolbar to add a Method to the MathProblem control and change the method’s name to “Generate”.
Here is code to generate math problems, sticking with basic addition to keep things simple:
Dim randomizer As New Random
Dim value1 As Integer
Dim value2 As Integer

value1 = randomizer.InRange(0, 20)
value2 = randomizer.InRange(0, 20)

Label1.Text = Str(value1) + " + " + Str(value2) + " = "
Answer = value1 + value2
TextField1.Style = Nil
This code generates two random numbers between 0 and 20 and combines them to form a string of the math problem which is used for display by assigning it to the Label. The code then adds the values and saves the answer in the Answer property you previously created. Lastly, it clears the style for the Text Field so that it has a plain white background.
Next, it is time to add the code to check to see if the math problem was answered correctly. If the answer is correct, you can change the background of the Text Field to green. If it is wrong, you can use red. To change the colors, you need to create a couple Web Styles.
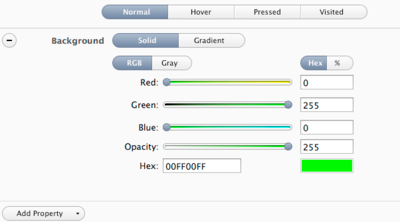
Use the Insert button on the toolbar to add a Web Style and change its name to CorrectStyle. On the Style, click the “Add Property” button and a choose “Background” from the list. Change the color so it is green like this:
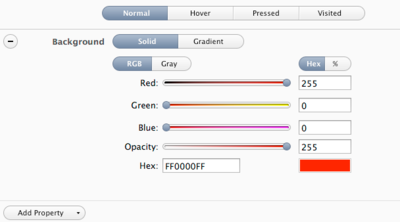
Add another Web Style and change its name to IncorrectStyle. Add the Background property and change its color so it is red like this:
Now you can go back to the MathProblem control (click on it using the Navigator on the left). Click on the Text Field and then use the “+” button on the toolbar and select “Add Event Handler”. In the Event Handler dialog that appears, select “LostFocus” and click OK:
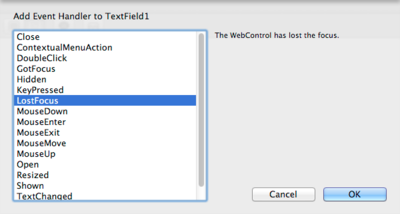
Like many programming languages, Xojo uses event-driven programming. In this case, the LostFocus event is called when the text field loses focus, such as when you press tab to go to the next field on the web page. So in this LostFocus event handler, you can check if the answer that was typed is correct.
This code checks the value of what was typed and compares it to the answer that was previously saved when the math problem was generated. If the answer is correct, the background is changed to green using the CorrectStyle. If it is wrong, the IncorrectStyle is used instead:
If Val(Me.Text) = Answer Then
  Me.Style = CorrectStyle
Else
  Me.Style = IncorrectStyle
End If
Setting Up the Web Page
And now you are ready to use your new control on a web page. Now think about what should happen when you run your app and the web page first appears. What do you expect to see? I think the first thing that should happen is that some math problems appear on the page, so it’s time to make that happen. Select WebPage1 to see its layout editor and double-click on a blank area of the web page to display the Add Event Handler dialog. Select the “Shown” event handler and click OK. This Shown event handler is called when the page is first shown in the web browser, so it is a great place to display the math problems.
This code adds five MathProblem controls to the page (vertically positioned):
Dim topPosition As Integer

For count As Integer = 1 To 5
  Dim problem As New MathProblem
  problem.EmbedWithin(Self, 0, topPosition, problem.Width, problem.Height)
  problem.Generate

  MathProblems.Append(problem)

  topPosition = topPosition + problem.Height
Next
In order to be able to generate new math problems, each of the controls that is added is saved in an array for future use. An array is a value that can contain a list of things. This array is a property of the web page. Add it using the “+” button on the toolbar and selecting Property. The property should be called “MathProblems()” and its type should be “MathProblem”.
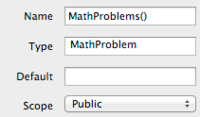
Important: Don’t forget the parenthesis after the name, which indicate that this property is an array and can contain multiple values.
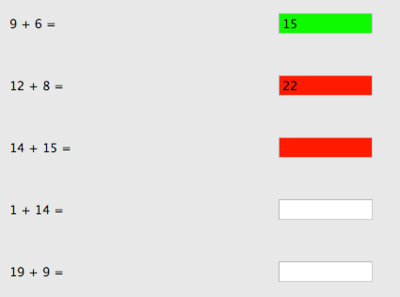
At this point you can try running your project now to see the page displayed in the browser with math problems. Press Run on the toolbar and the app will appear in your default web browser. Try answering some correctly and incorrectly to see the Text Field background change.
Finishing the App
The last thing to do is to add a button to the page to generate new math problems. Go back to Xojo and click the “Stop” button on the toolbar (if the web app is still running) and select WebPage1 in the Navigator on the left.
Drag a Button from the Library to the layout. Press return (or click the pencil icon when you hover over the button) to change its text to say “Generate”.
Double-click the Generate button to open the Add Event Handler dialog and select the Action event handler and press OK. Add this code to the Action event handler:
For Each m As MathProblem In MathProblems
  m.Generate
Next
This code loops through each of the math problem controls that were added to the page when it was show and calls the Generate method of the control which creates and displays a new math problem.
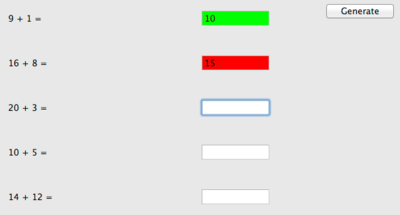
Run your app (it will appear in your default web browser). Answer some problems and then click the Generate button so that new problems appear.
While the app is running on your computer, students on your network can use it by connecting the IP address of your computer. For example, other computers can access the app running on my computer by entering 10.0.1.9:8080 in the browser address bar. And remember, this also works on the web browser in an iPad or other tablet!
Wrapping Up
Congratulations, you just created an app that can help children practice their math skills. But don’t stop now! There are many other things you could add to this app to make it even more useful:
- Add more math problems to the page
- Generate subtraction, multiplication, division problems
- Using larger (or smaller) numbers for the problems
- Provide a way to select a skill level and then adjust the problems accordingly
- Time how long it takes for all the problems to be answered
- Display the number of correct and incorrect answers
Plus I’m sure you can think of other things to add.
Thanks for participating in this Hour of Code example. The complete Math Facts project can be downloaded from here.