
Xojo is a superb choice for developing and deploying apps for Raspberry Pi. After all, Xojo not only simplifies making the User Interface of your apps via drag and drop, it’s an object-oriented and event oriented programming language that builds native Linux apps based on the ARM processor architecture for the Raspberry Pi (among other platforms).
The Raspberry Pi is a complete computer —and a very cheap one!— with USB, HDMI, Ethernet and a GPIO that gives the access to design, create, and control a lot of things (think IoT). The perfect combination to create and deploy complete solutions with Xojo.
Nevertheless, you probably don’t want to use an exclusive display, keyboard and mouse just to control and interact with your Raspberry Pi. What about accessing it remotely via SSH and/or VNC? I bet this is the first thought you had, and here is a step-by-step guide to configure it so you can use your current display, keyboard and mouse from you main computer (the one you use to run the Xojo IDE) to control the Raspberry Pi.
First of all, while you can access your RPi via SSH, displaying your well trained Geek super powers, it is really more convenient to control it via the GUI, as you do your computer. For that you’ll need a VNC client app. There are a lot out there, but VNC Viewer is one that runs just fine and is available for the main platforms. Just download it, run the installer, follow the steps… and you will have completed the first part of the process.
In order to access the Raspberry Pi from the VNC client you will need to know what IP address is using the Pi. How to get that information? Easy! (This assumes that your local network uses DHCP to assign IP addresses, the most common scenario.)
If you use macOS, open the Terminal app (Applications > Terminal) and run the command:
$ ping 192.168.1.255
Changing the ‘192.168.1’ part of the IP address for the one of your local network. What is important here is the ‘255’ number, because this is the Broadcast IP address for your local network.
What happens when we ping the broadcast address? In brief: the packets are sent to every host of the local area so they can respond, giving their IP address in the process. The second piece of the needed information, the MAC Address, is automatically obtained from the hardware interface used by the device to reply the packet request.
Let the ping command do its work for several seconds and break the process pressing Control + C. (If you are using Linux, execute the command as ‘ping -b xxx.xxx.xxx.255‘.
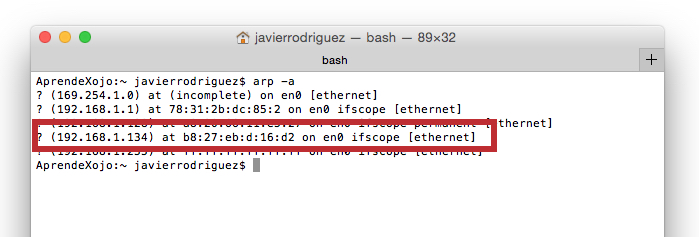
The Mac Address is all the information needed by ARP: the inner cache table used by your router/switch device (and computer too), to link the unique hardware address (MAC Address) used by every device in the network with the IP address used by the device. So, executing the command:
$ arp -a
will give us a complete list of evey active IP address and the linked MAC Address. Knowing what IP addresses are already used by the devices of our network (computers, printers, cell phones, tablets…), it will be easy to identify the IP address assigned by DHCP to the Raspberry Pi.
So with these two pieces of information you can use the DHCP Binding feature of your home switch/router (all the home/SOHO routers have this feature), in order to assign the same IP address to the Raspberry PI every time you turn the device on and, connect it to the network. DHCP Binding looks for the MAC Address of the device… and matches it with the reserved IP address from the DHCP pool.

Starting the VNC Server on the Raspberry Pi
Don’t close the Terminal window yet, there are a couple of things that we need to do first. The first one is starting the VNC Server on the Raspberry Pi, so we can start new remote sessions from our client. For that we need to start an SSH session with:
$ ssh pi@raspberry-pi-address-here
Typing ‘raspberry’ as the password when requested. (‘pi’ and ‘raspbery’ are the user and password configured by default on every Raspberry Pi out there.)
Once started the SSH session, type the following:
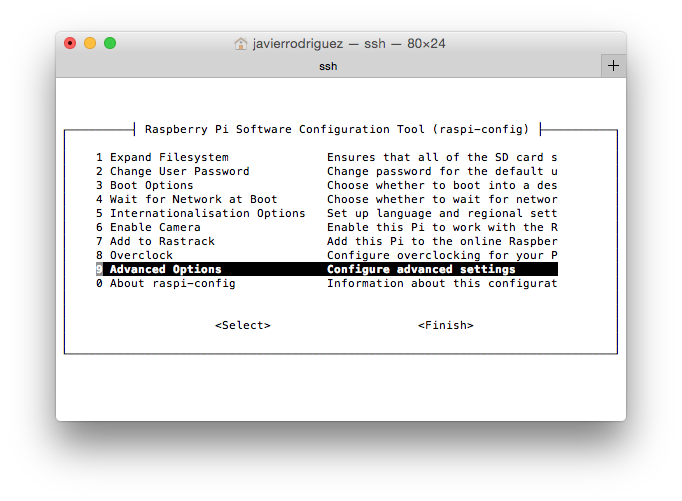
pi@raspberrypi:~$ sudo raspi-config
This will open the Configuration Tool. Use the cursor keys to choose the ‘Advanced Options’ entry and press the Return key to advance to a new screen with options. Select the VNC entry (A5) and press the Return key again. Finally, make sure that VNC Server is enabled or enable it if not. Lastly, select the <Finish> option to exit the Configuration Tool.
Adjusting the Display Resolution used by VNC
Great, we have the IP address used by the Raspberry Pi, and the VNC Server enabled so we can start a VNC Client session… just to discover that it shows an endemic resolution of 800 x 600 pixels on our full-fledged Full HD display. Not the most productive thing we can expect.
Time to return to our Terminal windows, where the SSH session is still open (or start a new one if not). This time, we will edit the configuration file to instruct the Raspberry Pi to use a better fixed display resolution. For that, type the command:
pi@raspberrypi:~$ sudo nano /boot/config.txt
Go to the end of the opened file and write these lines:
 hdmi_force_hotplug=1
 hdmi_ignore_edid=0xa5000080
 hdmi_group=2
 hdmi_mode=51
In this case we are telling the Raspberry Pi to use a resolution of 1.600 x 1.200 pixels, but you can choose other changing the ‘hdmi_mode’ option to anyone of the settings you can find in this support page of Raspberry Pi.
Save the changes and exit from the Nano editor, and reboot the Raspberry Pi so the changes take effect:
 pi@raspberrypi:~$ sudo su
 pi@raspberrypi:~$ reboot
Ready! From now on, you can remotely access your Raspberry Pi via VNC and SSH.
You can watch the video (in Spanish only) that talks you though this example.
Javier Rodriguez has been the Xojo Spanish Evangelist since 2008, he’s also a Developer, Consultant and Trainer who has used Xojo since 1998. He is in charge of AprendeXojo.com and the developer behind the GuancheMOS plug-in for Xojo Developers and the Snippery app, among others.