
You already know, you can use Xojo to create practically any kind of application; from apps used by corporations, Universities and even Government agencies around the world, to apps used by photographers, designers and, of course, developers; and even those small utilities that makes our lives a bit easier.
In fact, a lot of these little utilities are what are known as Wrappers. That is, a nice user interface that simplifies and makes more user friendly a feature that is already available in the native operating system; often, in the form of one or more combined commands that need to be typed from the Command Line prompt.
You can watch the video (in Spanish, with English subtitles) as you read and work through this example.
When it comes to utilities, Xojo excels largely due to its great Layout Designer Editor and Xojo’s powerful programming language Framework which offers a lot of ready to use classes. Including the Shell class, with the capacity of executing system commands, getting their output or not, and in an interactive mode or not. This is the way that we create Wrapper apps with Xojo.
As an example of how simple and convenient it is to create Wrapper apps with Xojo, let’s try a Desktop project that creates as many RAM Disks (volumes) as we want, without the need of messing with the Terminal or typing confusing parameters that could lead to unintended (and sometimes dangerous) results.
Designing the User Interface
As I said, a Wrapper app is mostly about designing the user interface to simplify the use of an underlaying feature, so let’s start with this. And if you are not using Xojo already, you can download and use it for free right now.
Open Xojo, select and confirm Desktop as the kind of project you want to create in the Project Chooser window. Once confirmed, the Xojo IDE will show you the Layout Editor for the Window1 object included as part of the wireframe of a Desktop Project —you always can create your own project templates.
Next, drag a Label control from the Library to the upper left side of the Window1 on the Layout Designer. Use the helpful guides shown by the IDE to align the control to the upper and left window borders using the recommended margins. With the control still selected, press the Return key to access the panel where you can type the text shown by the control by default; for example: “RAM Disk Name”.
To give you the ability to write the RAM Disk Name we need two kinds of UI Controls: TextField and TextArea. TextField is best suited for entering small pieces of text, while the TextArea is best for big chunks of text. Drag a TextField control from the Library and drop it aligned just below the Label. Use the middle right handler to change its width so it is easier for the end user to enter a medium to large RAM Disk Name. Of course, we want to offer a default name so, with the TextField control still selected, press the Return key and type “My RAM Disk” on the resulting panel.
Probably you will want that the TextField control width changes when the final user changes the container Window width. That is really simple to do in Xojo. With the TextField selected, click on the Inspector button to access the Inspector panel showing all the settable properties. Under the Locking section you see the representation of a window with four locks. By default, Xojo locks the control to the upper and left window margins. In this case, we want it also to lock the right margin so click on the right lock icon to activate it. That’s it!
Now we are going to offer our end users two ways to set the RAM Disk size (in MB). The first one is via a Slider control, and the second one is via another TextField, so the user can simply input the desired size as a numeric value.
Drag a Slider control from the Library below the TextField, again using the margin guides to correctly positioning it over the left margin of the window, and the lower TextField border. With the control still selected, access the Inspector Panel to change some of his default values. Select the Bottom Right option from the TickStyle dropdown menu under the Behavior section, and enter the following values under the Initial State section:
- Minimum. 1
- Value. 32
- Maximum. 256
As you can guess, these are the minimum and the maximum values the end user can select using the Slider, and that is set by default to 32 when the app is executed.
Now use the Locking controls so the Slider is locked to the right border too. This way, its size will vary as the window width does.
Drag now a second TextField from the Library just to the right of the Slider. Adjust the width so it can easily accommodate the typing of three numbers.
Next, with this second TextField still selected, access the Inspector Panel so we can restrict the user input to a maximum of three numbers. For that, we are going to use the Mask Property available under the Behavior Section, typing “###” without the quotes. Every hash symbol (#) establish that the TextField admits a number digit on that position, so the three hash symbols limits the TextField to permit just the typing of three digit values.
Now, under the Initial State section of the Inspector Panel, type 32 on the Text field, so the value is the same we have set by default for the Slider control.
This time we want the TextField to be locked just to the upper and right window margins, so click on the tiny lock controls to enable those, disabling the lock on the left margin.
To complete our UI we need to add a PushButton to the lower right area of the window and align it with the TextField added on the previous step. This control will be responsible for executing the Shell command, passing the parameters indicated by the end user. Probably you’ll want to change the PushButton label to “Create Disk” or something similar, using the control handlers to accommodate the size to the text. Finally, use the locking controls from the Inspector Panel to activate the lower and right locks, disabling the top and left ones.
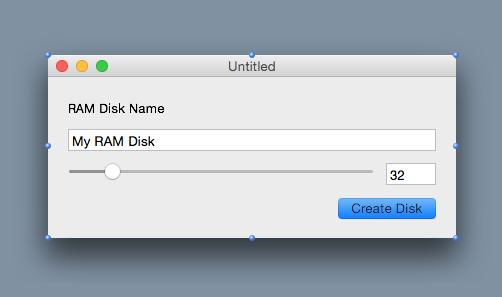
The look of the final UI will be something similar to this, after adjusting the height of the own window:
Synchronizing values
We want our Slider and second TextField control values to be in sync; and, in addition, we want that the values typed in the TextField between the allowed range (1 – 512). With the Mask Property we took care that the TextField contents were only numeric, but with the available properties we have no way to establish the range.
For these operations we can take advantage of the available Event Handlers, where we can put the code to execute as response of the action taken by the end user.
Let’s take care of the Slider first. Select the control Slider1 in the Project Browser (the leftmost column of the Xojo IDE), and choose the Add to “Slider 1” > Event Handler… option from the contextual menu. On the resulting window, choose the ValueChanged Event and confirm the selection pushing the Ok button. As result, the selected event will be added to the Slider1 control instance, showing the Code Editor where you have to simply write this line of code:
TextField1.Text = me.Value.ToText
Next, select the TextField2 control instance and repeat the same operation to access the Event Handler window. This time you have to add the LostFocus event, writing the following lines of code on the associated Code Editor:
Slider1.Value = me.Text.Val
The Shell in action: Creating a RAM Disk
It is now time to define the action to execute from the Shell, and for that we will add the Action event to the PushButton1 instance, writing the following lines of code on the associated Code Editor:
if TextField1.Text = "" then
  MsgBox("You have to provide a name for the RAM Disk")
  exit
end
if TextField2.Text.Val = 0 or TextField2.Text.Val > slider1.Maximum then
  MsgBox("The RAM Disk Size has to be between in the 1-"+Slider1.Maximum.ToText+" range")
  exit
end
dim sh as new Shell
dim size as integer = TextField1.Text.Val*2048
dim command as String = "diskutil erasevolume HFS+ '"+textfield2.Text+"' `hdiutil attach -nomount ram://"+str(size)+"`"
sh.Execute command
As you can see, we check if the user has provided a valid name and a RAM Disk size in range with the permitted values; only if these values are valid, then we create a new instance from the Shell class and execute the commands that we would otherwise have to type from a Terminal window to create a RAM Disk. The main difference is obvious, our users don’t need to deal with the Terminal, needing to memorize the confusing syntax and options.
In conclusion…
As we have seen, we have been able to design a user interface for our Wrapper app in less than five minutes that we can extend with additional options anytime! Once compiled to native code, we can share it with our users and colleagues so they can create this kind of storage volumes with total confidence. What will be your next step? After all, there are a lot of features on Windows, Linux and macOS that you can wrap under a well designed user interface.
You can watch the video (in Spanish, with English subtitles) that talks you though this example.
Javier Rodriguez has been the Xojo Spanish Evangelist since 2008, he’s also a Developer, Consultant and Trainer who has used Xojo since 1998. He is in charge of AprendeXojo.com and the developer behind the GuancheMOS plug-in for Xojo Developers and the Snippery app, among others.