
In a previous post I showed how easy it was to create a web app that displays the JSON Feed for Daring Fireball. In this post, I’ll show you how to make an iOS app to do it.
Designing the User Interface
To start, download Xojo for free, install and launch it. At the Project Chooser, select “iOS”, enter “JSONFeed” as the Application Name and click OK.
You are now looking at the Layout Editor. You can drag controls from the Library on the right to create your user interface. For this example you’ll create an iPhone app, so we’ll focus on that layout. The iPhone app will consist of two “views”. The first view will let you enter the JSON Feed URL and then display the article titles. When you click on an article, the second view will appear displaying the article content.
By default Xojo created your project with the first view, called View1. You’ll want to drag three controls to this view: a TextField, a Button and a Table. Arrange them to look like this:
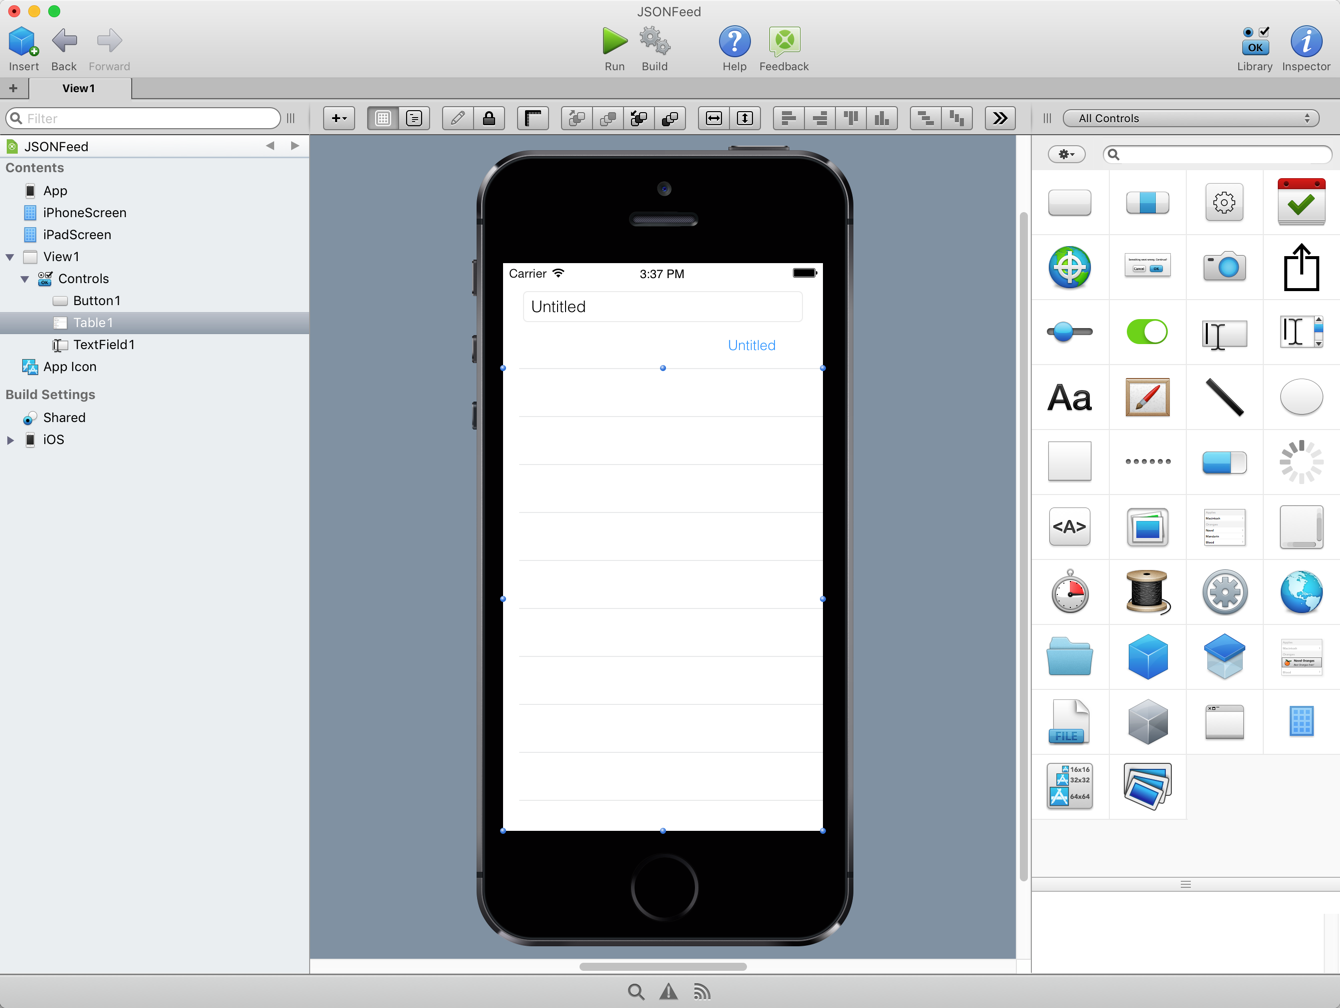
Next you’ll want to set some of the properties for these controls. But first, change the name of View1. Click the Inspector button on the toolbar to show properties and then click anywhere on the View that is not a control. This displays the properties for the view itself.
In the view change these properties:
- Name: FeedView
- NavigationBarVisible: ON
- Title: JSON Feed
You’ll next change some properties for each of the controls. Click on the TextField and set these properties:
- Name: URLField
- PlaceHolder: Enter JSON Feed URL
- Text: https://daringfireball.net/feeds/json
Now click on the Button and change these fields:
- Name: LoadButton
- Caption: Load
Lastly, click on the Table and change these fields:
- Name: FeedTable
Lastly, you want to add a non-UI control to the view. This control is what will connect and download the JSON Feed. Click on Library in the toolbar and scroll down to find the control called “Generic Object”. Drag that on to the view layout where it will appear at the Shelf on the bottom. Switch to the Inspector and change these properties:
- Name: FeedSocket
- Super: Xojo.Net.HTTPSocket
With this view finished you now need to create the second view. From the Insert button or menu, select “View” to add a new view to the project. Click on the view and change these properties (select the Inspector if it is not visible):
- Name: ArticleView
- NavigationBarVisible: ON
This view has only a single control on it: HTMLViewer. Drag it onto the view so that it takes up the entire area of the layout like this:
Click on the Inspector to show the properties for the HTMLViewer and change these properties:
- Name: ArticleViewer
With the two views done, you can now move on to adding code.
Adding Code
Now it’s time to add the code. Start by double-clicking on the button FeedView. This displays the Event Handler window. Click on Action and select OK. You are now looking at a blank Code Editor. The code you put here runs when the button is tapped. Your code needs to tell the FeedSocket to get the JSON feed for the URL entered in the TextField. This is the code to do that:
FeedSocket.Send("GET", URLField.Text)
Next you need to put code in FeedSocket to parse the JSON Feed that gets returned. Double-click FeedSocket to display the Event Handler window, select PageReceived and click OK. The code below converts the JSON from binary data to Text, then parses the JSON in the Text to get a Dictionary. From the Dictionary you can get the array of articles in the JSON (called items), loop through them and add them to the table.
If HTTPStatus = 200 Then
  Dim jsonText As Text = Xojo.Core.TextEncoding.UTF8.ConvertDataToText(Content)
  Dim jsonDict As Xojo.Core.Dictionary = Xojo.Data.ParseJSON(jsonText)

  FeedTable.RemoveAll

  // Display the feed title
  Self.Title = jsonDict.Value("title")

  // Display the feed articles
  FeedTable.AddSection("")
  Dim items() As Auto = jsonDict.Value("items")
  For Each article As Xojo.Core.Dictionary In items
    Dim title As Text = article.Value("title")
    Dim pubDate As Text = article.Value("date_published")

    // Create cell with values and content in the Tag
    Dim cell As iOSTableCellData = FeedTable.CreateCell
    cell.Text = title
    cell.DetailText = pubDate
    cell.Tag = article.Value("content_html")
    FeedTable.AddRow(0, cell)
  Next
End If
The next bit of code displays the content for the selected article. Double-click the FeedTable control and in the Event Handler window choose Action and press OK. This is the event that is called when you tap on a row in the list. In the Code Editor add this code to get the article content (that was previously saved in the RowTag) and send it to the ArticleView to display there:
Dim content As Text = Me.RowData(section, row).Tag

Dim v As New ArticleView
v.SetContent(content)
PushTo(v)
The final code is the SetContent method on ArticleView (called by the code above) that takes the content and prepares it to display in the ArticleViewer. Select ArticleView and create a new method by clicking the “+” button on the command bar and choosing Method. Set these properties in the Inspector for the method:
- Method Name: SetContent
- Parameters: content As Text
This is the code to put in the method:
// Save content to a file
Dim articleFile As FolderItem = SpecialFolder.Documents.Child("article.html")
Dim output As TextOutputStream
output = TextOutputStream.Create(articleFile, TextEncoding.UTF16)
output.Write(content)
output.Close

// Display the file
ArticleViewer.LoadURL(articleFile.URLPath)
Since the HTMLViewer can only display content from a URL, the code first saves the content to a file in the app’s private Documents folder and then tells the ArticleView to load the file using its URLPath.
Testing
You can run the project to test it out. If you don’t already have it, you’ll need to first install Xcode so that you have the iOS Simulator. With Xcode installed you can click the Run button on the Xojo toolbar which builds your iOS app and launches it in the iOS Simulator.
Click the Load button to load the feed…wait. It didn’t show anything did it?
It turns out that the Daring Fireball site does not yet have TLSv1.2 enabled, which iOS requires by default to access web sites. I checked with John Gruber and he said he’s been planning a server upgrade, but until he does so we have to tell iOS to accept a lower level of security for this web site.
Anyway, quit the iOS Simulator for now.
To change security settings, create a text file (using your favorite text editor) and name it Info.plist. This is the contents of the plist file:
<?xml version="1.0" encoding="UTF-8"?>
<!DOCTYPE plist PUBLIC "-//Apple//DTD PLIST 1.0//EN" "http://www.apple.com/DTDs/PropertyList-1.0.dtd">
<plist version="1.0">
<dict>
  <key>NSAppTransportSecurity</key>
  <dict>
    <key>NSExceptionDomains</key>
    <dict>
      <key>daringfireball.net</key>
      <dict>
        <key>NSIncludesSubdomains</key>
        <true/>
        <key>NSTemporaryExceptionAllowsInsecureHTTPLoads</key>
        <true/>
        <key>NSTemporaryExceptionMinimumTLSVersion</key>
        <string>TLSv1.0</string>
        <key>NSTemporaryExceptionRequiresForwardSecrecy</key>
        <false/>
      </dict>
    </dict>
  </dict>
</dict>
</plist>
Now drag the text file to your Xojo JSONFeed project so that it can be incorporated into the app when it gets built.
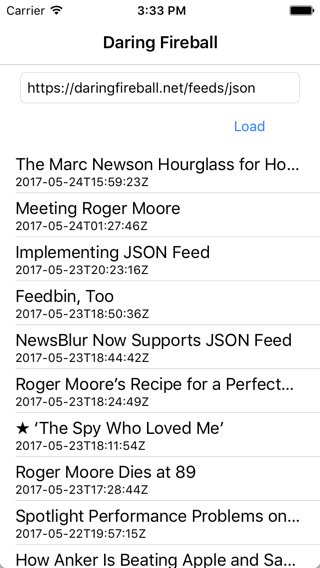
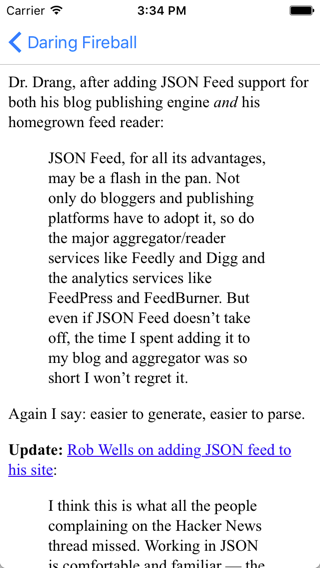
You can now Run the JSONFeed project again. This time when you click the Load button you’ll see a list of the current Daring Fireball articles. Tap on one of the posts and a new view with the content appears. Tap the Back button to go back to the list of articles.
Related posts: JSON Feed Web App and JSON Feed Desktop App