
As an Object Oriented Programming language (OOP), Xojo’s data types, especially the non-primitive ones, use or can use a Class hierarchy. This means that one class, either included by default in the Xojo Framework or created from scratch, can act as a base or root class for other classes based upon them.
The main advantage of a class hierarchy is that all the derived classes share the same set of methods, properties and events declared in their upper classes (those not set with a Private scope) and, thus, we can make our code more flexible, easier to maintain and get more dynamism from our apps at run time thanks to the Casting of types.
What is this all about? Very simple. For the subject at hand, every graphic control or User Interface (UI) control included in the Desktop Xojo Framework share the common base class RectControl (this one based, at the same time, on the base class Control); and among the methods available in that class we can find DrawInto.
This means that every UI control has the ability to draw itself in any given Graphic context. However, when drawn in the target graphic context they will lose their usual response to any user interaction. That is, they would be a mere graphic representation of themselves; something that is really useful in many cases. For example, this is the technique used for drawing all the contents of a given page or range of pages in AXControlGrid.
As you can see in the Xojo documentation, the DrawInto signature is as follows:
RectControl.DrawInto(g as Graphics,x as Integer, y as Integer)
- The first thing you can see is that the method is called on the instance (UI control) we want to draw into a given graphic context.
- Second, the first argument we provide in the
DrawIntomethod is the graphic context we want to use to draw the control. As you probably know, we can get such graphic context from several kind of classes, for example Picture. In addition, the target graphic context can be of any size we need it to be! - Third, the
xandyarguments are the top-left coordinates used to draw the control in the target graphic context and, of course, these coordinates should be in the range of the width and height of the target graphic context passed as the first argument.
For most of the cases, you don’t need to do anything special to use this method in your own classes. That means that the object calling the DrawInto method will draw itself using the same code you put in its Paint event. The unique difference in this case is that the Paint event will use the external graphic context and receive x and y coordinates that may be (or may not be) outside its own width and height range.
But there might be other times you don’t want to draw the control using the same code as the one written in the Paint event. Maybe because you need a more refined representation of the control or you simply want to leave out some details that are useful when the control is drawn as part of the UI but not when it is printed or used in a PDF document. In addition, it can be the case that inside the Paint event you may need to do some calculations on the x and y coordinates that would not make sense (or would be out of range) when done on an external graphic context.
After all, the key about using DrawInto is this:
- When a instance calls this method, what really happens is the code in the
Paintevent will be executed on the new graphic context received as argument. Of course, if you have not implemented the Paint event yourself, then Xojo will execute the default implementation.
Customizing the DrawInto Behavior
In other cases, especially on Windows, it is possible that we won’t get the right drawing when using the default implementation of the DrawInto method. If you find yourself in this situation, you can fix it by overwriting the DrawInto method for your own UI classes.
When you do that, evey time you call this method it will execute the code you included in it, and that means that you will be in control of the received graphic context as parameter, its size and origin coordinates, and especially the drawing operations available through the methods from the Graphics class.
The way to implement (overwrite) the DrawInto method in your own UI controls (derived from the RectControl class) is as simple as for any other overwritten method or Event in your own subclasses.
With your class selected in the Xojo IDE Navigator, access the contextual menu to select the Add to "instanceName" > Method option, choosing the DrawInto(graphics as Graphics, Left as Integer, Top as Integer) item in the Name field popup from the Inspector Panel.
Once selected, you will see that the associated Code Editor will contain by default a call to the same method signature on the Super class. This gives the class the control is based on the oportunity to drawn itself.
From a practical point of view, you will probably want to delete that call when you don’t want to use the same kind of representation for the control on the external graphic context when that is drawn in the UI. In addition you will save some drawing time thus improving the overall speed.
Now you only need to include in the DrawInto method the code you want to use in order to paint your control on the received context and you’ll be set! From that point on, every time you call:
aRectControlInstance.DrawInto( tContext, 100, 100 )
Xojo will execute the code put in your own implementation of the DrawInto method, and that means more flexibility and control about what is drawn and how it is drawn; especially if your UI control is going to be used both in macOS and Windows.
DrawInto in Practice
In order to see how everything works, let’s create a simple Xojo Desktop project where we will make use of our own DrawInto implementation on one Canvas based class.
Create a new Xojo Desktop project, drag the Canvas control from the Library panel into the Navigator.
Next, and with the new Canvas class selected, access the Inspector Panel to set the following values:
- Name: MyOwnControl
- Super: Canvas
With our new class still selected in the Navigator, add the Paint Event. For that, you may access the contextual menu and choose the Add to "MyOwnControl" > Event Handler…" option, selecting the Paint entry afterwards in the resulting window.
Then, write the following code in the Code Editor associated with the Paint Event:
g.DrawingColor = &cff0000
g.FillRectangle(0,0,g.Width, g.Height)
Nothing especially significant here. As you can see, it sets the foreground color to Red and then fills all the control area using the FillRect method on the control graphic context.
Now it is time to overwrite the DrawInto method. With our class still selected in the Navigator, add the DrawInto method and write the following code in the associated Code Editor:
// Uncomment the following line of code to see what happens!
// In that Case, the control first executes the code from the Paint Event,
// executing the drawing code from the overriden DrawInto method afterwards.

//super.DrawInto(graphics, left, top)

Var s As String = "From DrawInto"

Var sLen As Double = graphics.TextWidth( s ) / 2

graphics.DrawingColor = &c00FF00

// No matter what the "Left" and "Top" values are, we don't use them
// for our custom drawing.

graphics.DrawRectangle(0,0, graphics.Width, graphics.Height)

graphics.DrawingColor = &c000000
graphics.PenSize = 1
graphics.AntiAlias = True

graphics.DrawText("From DrawInto", (graphics.Width/2) - sLen, (graphics.Height / 2) )
Basically, what we are doing here is substantially changing the graphical representation of the control between what is seen when it is drawn in the user interface through the Paint Event and what we will get when calling the DrawInto method on the Control instance.
In the second case, it will draw a non-filled green rectangle using the same width and height that the control itself, writting the string “From DrawInto” centered in the control area.
You can see that the Super.DrawInto(graphics, Left, Top) code line is commented. After the initial running of the demo app, you can uncoment that line if you want in order to see how it changes the drawing when the Super class is called (remember, that means executing the code on the Paint event for the Class).
Putting it all Together
With our class already finished, it is time to start the layout of our minimal user interface. Something really simple. Choose the Window1 window in order to access the Layout Editor. Then drag the MyOwnControl item from the Project Broswer into the the Window1 area in the Layout Editor. With that action we will have added a new instance from our class. The resulting name for the instance will be MyOwnControl1.
Then, drag a standard Canvas control from the Library panel into the Window1 area in the Layout Editor. This action will result in the creation of a new Canvas instance with the by-default name Canvas1.
Lastly, add a new button from the Library into the Window1 area in the Layout Editor and use the Inspector Panel to set its name to pbDrawInto and its caption to “DrawInto”. This will be the button in charge to order our MyOwnControl1 instance to draw itself in the graphic context provided by Canvas1.
For that, and with the pbDrawInto selected, add an Action Event Handler and write the following code in the associated Code Editor:
// We create a Picture we can use to give a Graphics context to the
// Canvas1 backdrop (it would be "Nil" by default)

Var p As New Picture( canvas1.Width, Canvas1.Height, 32 )

canvas1.Backdrop = p

// And we instruct our "MyOwnControl" instance to draw itself on the
// "Canvas1" graphics context.

MyOwnControl1.DrawInto(Canvas1.Backdrop.Graphics,0,0)
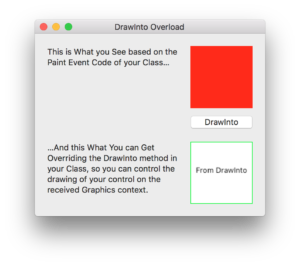
If you want, you can layout your user interface like the one displayed in the following screenshot:

Now we have our app ready to test. Press the Run button in the IDE and verify the results you get between what is drawn by the Paint Event and what you get when you click on the button labeled “DrawInto”.
Javier Rodriguez has been the Xojo Spanish Evangelist since 2008, he’s also a Developer, Consultant and Trainer who has be using Xojo since 1998. He manages AprendeXojo.com and is the developer behind the GuancheMOS plug-in for Xojo Developers, GuancheID, AXControlGrid, AXImageCanvas, Markdown Parser for Xojo, and HTMLColorizer for Xojo among others.