If you are creating a web application, you’ve already noticed most of the time you are using WebListBox controls. Xojo Web 2.0 comes with a hidden gem called Custom Cell Renderers. They allow you to create reusable pieces of code to enhance your table cells.
This post is the first of a two part series, in this first post, you will learn how to use Custom Cell Renderers that have been created already. In the second post, you will learn how to create your own.
Let’s take a look to a simple WebListBox:
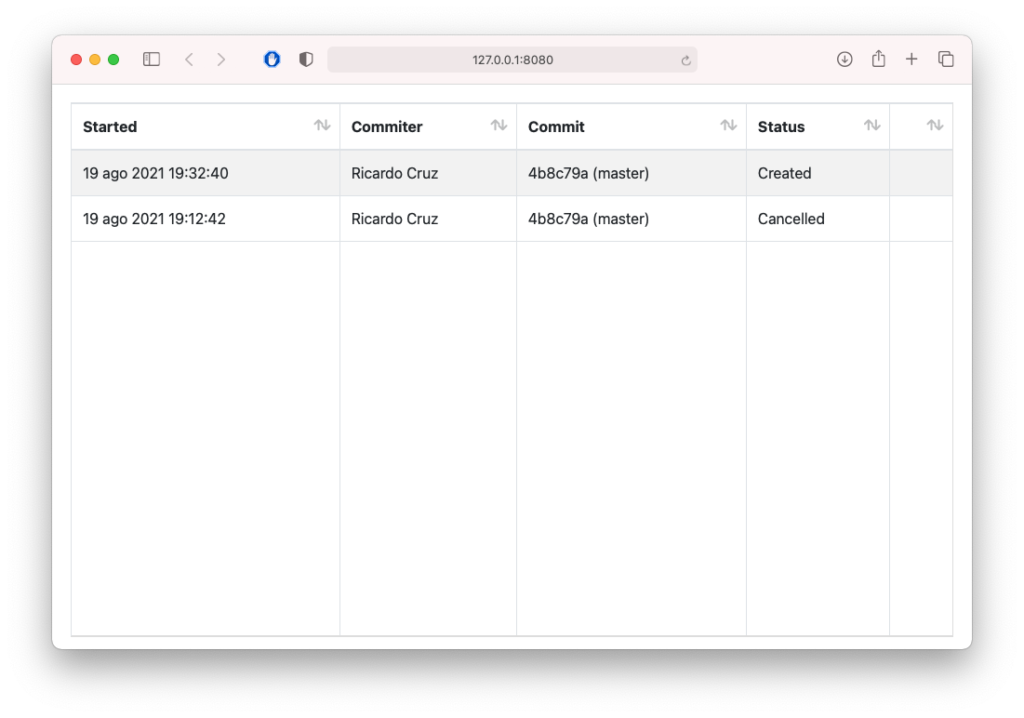
You might normally add the data from a database or a web API, in this example we will just hard-code some rows to avoid any noise and focus on cells:
table.AddRow("19 ago 2021 19:32:40", "Ricardo Cruz", "4b8c79a (master)", "Created", "")
table.AddRow("19 ago 2021 19:12:42", "Ricardo Cruz", "4b8c79a (master)", "Cancelled", "")
Now we have two problems, it looks a bit boring, and also lacks some interactivity. It can be okay if you just have one action, as you can listen to `SelectionChanged` event and do whatever you want with it, but what if you want more? Let’s fix that!
This is what we want to achieve. It’s the very same table but using some Custom Cell Renderers:
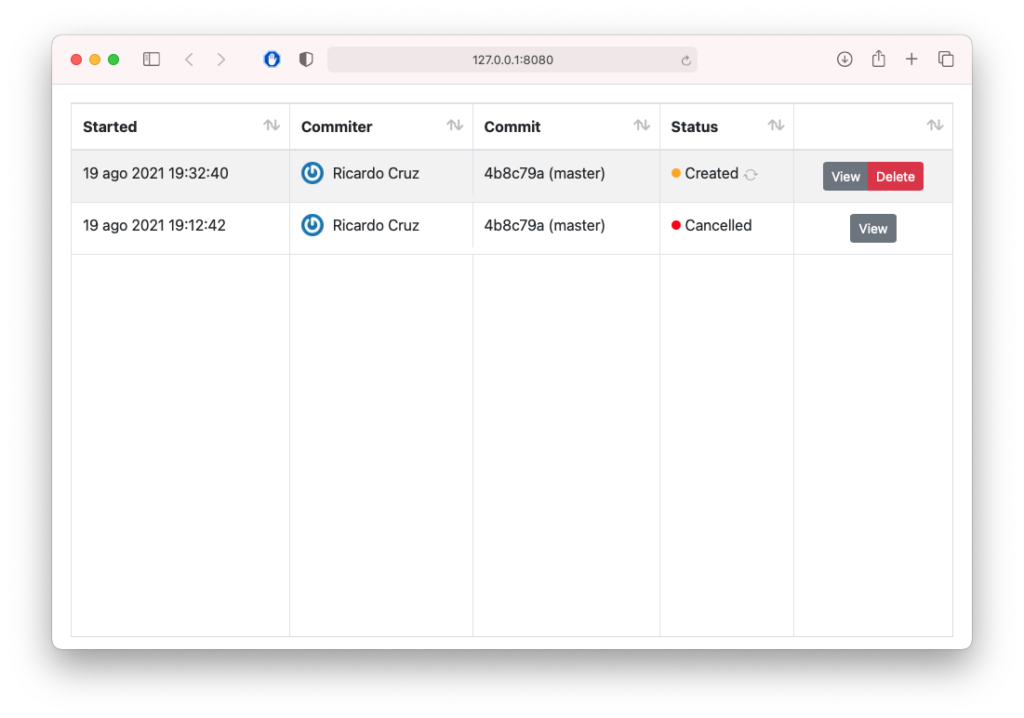
Notice in this table the user will not be required to select a row and then click on a Refresh, View or Delete button somewhere else. They can directly click on the buttons in the rows instead.
Having some Custom Cell components already downloaded (more on this later), makes it really easy to “upgrade” these cells. Following is the updated example code, we will just need to use CellValueAt:
table.AddRow("19 ago 2021 19:32:40", "Ricardo Cruz", "4b8c79a (master)", "Created", "")
table.CellValueAt(0, 1) = New GravatarCellRenderer("email@example.com", "Ricardo Cruz")
table.CellValueAt(0, 3) = New StatusCellRenderer(StatusCellRenderer.States.Unknown, "Created", True)
table.CellValueAt(0, 4) = New GroupButtonsCellRenderer(True, False, True) ' View enabled, Edit disabled, Delete enabled
table.AddRow("19 ago 2021 19:12:42", "Ricardo Cruz", "4b8c79a (master)", "Cancelled", "")
table.CellValueAt(1, 1) = New GravatarCellRenderer("email@example.com", "Ricardo Cruz")
table.CellValueAt(1, 3) = New StatusCellRenderer(StatusCellRenderer.States.Unhealthy, "Cancelled", False)
table.CellValueAt(1, 4) = New GroupButtonsCellRenderer(True, False, False) ' View enabled, Edit and Delete disabled
We’ve made the following changes:
- Commiter column now displays an avatar of the author, using their hashed email with Gravatar, so you can find rows related to specific authors easier
- The status column can show a different colour for each state, but it also can have an optional refresh button
- There is also an actions column that can be different for each row, depending on your needs
WebListBox comes with a new event called CustomCellAction that will be fired with the row and column pressed, together with the unique identifier sent by the Cell Renderer, and a value. This means you can react to different actions accordingly. For example, if you click on the red delete button of the table we’ve just made, you will be able to write this code to handle that user action:
If identifier = "GroupButtonPressed" And value = "delete" Then
  MessageBox("Deleting row " + row.ToString)
End If
Just so you can start playing with them, I’ve prepared a Free as in Beer suite of Custom Cell Renderers that you can download from GitHub and use in your projects: https://github.com/piradoiv/xojo-web-cell-renderers. Open the example that comes with the repository, drag the “Cell Renderers” folder from this project and drop it into your Xojo Web project. That’s it, now you can start using them.
Conclusion
As you can see, once you have some Custom Cell Renderers prepared, you can enhance your tables with just a few lines of Xojo code. No JavaScript knowledge is required to use them, only for creating new ones. This feature opens the door for using these little components from third-party developers, or other colleagues on your dev team. That being said, you can put HTML inside, so your imagination is the limit. If you have some JavaScript skills stay tuned for the next tutorial, as you will learn how to create new Cell Renderers from scratch using Xojo’s Web SDK.
See you for the second part!