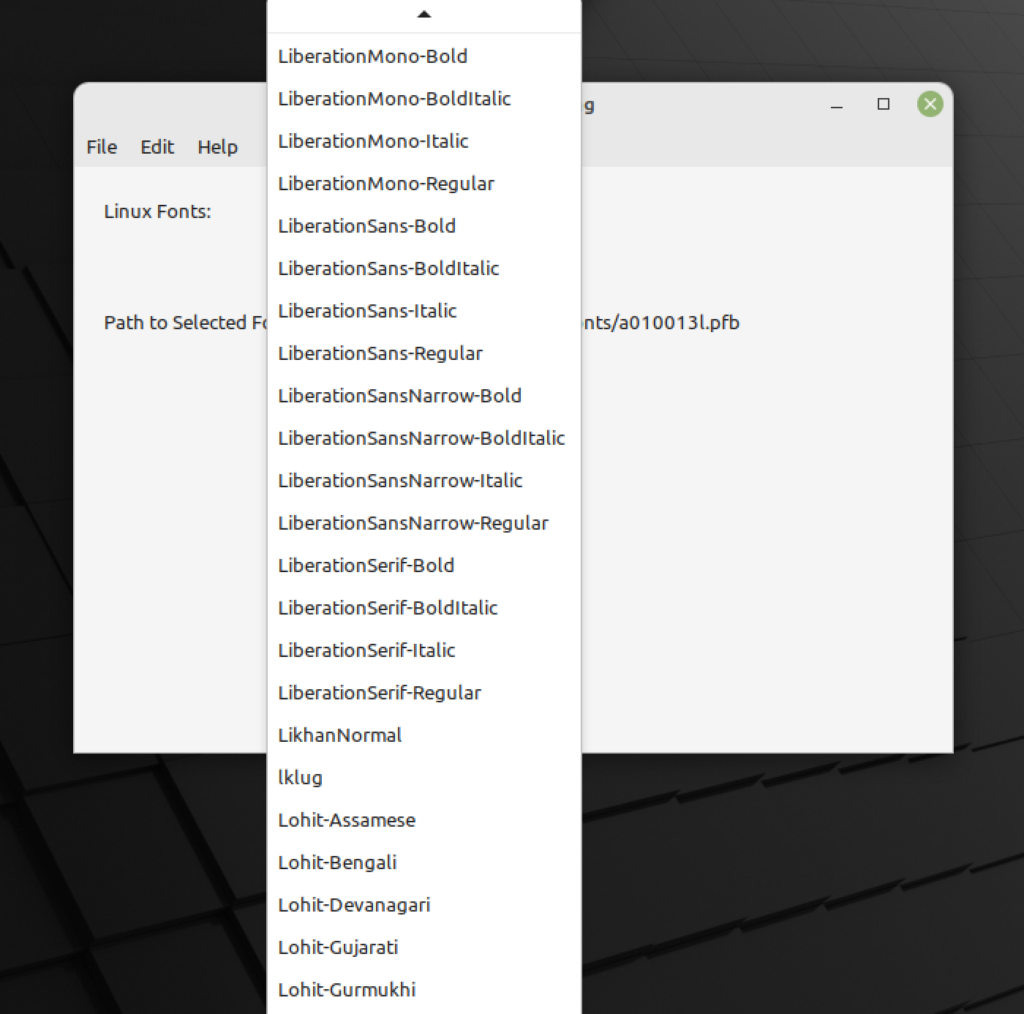
Earlier this month we published a way to get the full listing of font styles on Windows, continue reading to see how to get the same on Linux, including the path to the font file!
Once you complete this example project, you’ll be able to get a full list of all the fonts installed on your Linux computer. Moreover, when you select one of the entries in the DesktopPopupMenu you’ll get a FolderItem pointing to the file that stores the font itself with the path displayed in a Label. Of course, you will be able to use this class in your Web or Console projects too.

Start by creating a new Desktop Project and add a Class to the Navigator. Use the associated Inspector Panel to change these fields:
- Name: LinuxFonts
Change the Inspector Panel so it displays the Attributes view (click on the cogwheel (aka gear icon) to go to the Advanced items. You need to uncheck the iOS checkbox here because we don’t want to use this class on iOS devices. You’ll need to repeat this operation on each Method and Property added to the class in the next steps.
With the new Class selected in the Navigator, add a new Method to it and enter the following values in the associated Inspector Panel:
- Name: Constructor
- Scope: Private
Type the following code in the associated Code Editor. The constructor is going to be responsible for getting the font names and associated paths to the backing file, and feeding a Dictionary with those values:
// We make use of the Conditional compilation because
// we want to make this code only available when
// compiling to Linux targets.

#If TargetLinux Then

  // This is the Dictionary that will store
  // the font name as the key, and the path to the font file as its value
  mInstalledFonts = New Dictionary

  // let's make use of the "fc-list" command on Linux to retrieve
  // the list of all the installed fonts in the computer.
  // We use a new instance of the Shell class in order
  // to execute that command!
  Var ns As New Shell
  ns.ExecuteMode = Shell.ExecuteModes.Synchronous
  ns.Execute("fc-list")

  // if the command has been run sucesfully…
  If ns.ExitCode = 0 Then

    #Pragma DisableBackgroundTasks
    #Pragma DisableBoundsChecking

    // we get the output from the command execution in the Shell
    Var tResult() As String = ns.Result.Split(EndOfLine.Native)
    Var parts() As String

    // and use some String functions to get only the parts we
    // are interested in on every output line
    For Each item As String In tResult
      item = item.NthField(":", 1)
      parts = item.Split("/")

      // feeding the dictionary with the key/value pair for each font
      If parts.LastIndex <> -1 Then
        mInstalledFonts.Value(parts.Pop.NthField(".", 1)) = item
      End If

    Next item
  End If
#EndIf
Now add a new Property to the LinuxFont class using the following values in the associated Inspector Panel:
- Name: mInstalledFonts
- Type: Dictionary
- Scope: Private
Add a new method to the LinuxFonts class using the following values in the associated Inspector Panel. This will be the method responsible for retrieving the FolderItem associated with a given font name:
- Name: GetFileForFont
- Parameters: fontName As String
- Return Type: FolderItem
- Scope: Protected
Add this code in the associated Code Editor:
#If TargetLinux Then
  Var f As FolderItem

  If mInstalledFonts <> Nil And mInstalledFonts.HasKey(fontName) Then

    f = New FolderItem(mInstalledFonts.Value(fontName), FolderItem.PathModes.Native)

  End If

  Return f
#EndIf
Add a new method to the LinuxFonts class. This will be responsible for retrieving a String Array with the names of the installed fonts. Use the following values in the Inspector Panel:
- Name: GetFonts
- Return Type: String()
- Scope: Protected
Type the following code in the associated Code Editor:
#If TargetLinux Then
  Var returnedFonts() As String

  If mInstalledFonts <> Nil Then
    For Each item As DictionaryEntry In mInstalledFonts

      returnedFonts.Add(item.Key)

    Next
    returnedFonts.Sort
  End If

  Return returnedFonts
#EndIf
Because we are going to use the Singleton Design Pattern here, we need to add a couple of Shared Methods to the LinuxFonts class. Start by adding the Shared Method used to retrieve the Array with the names of all the fonts available.
- Name: Fonts
- Return Type: String()
- Scope: Public
Type the following lines of code in the associated Code Editor:
#If TargetLinux Then
  If sharedInstance Is Nil Then sharedInstance = New LinuxFonts

  Return sharedInstance.GetFonts
#EndIf
The second Shared Method is responsible for retrieving the FolderItem associated with the font name received as parameters:
- Name: FileForFont
- Parameters: fontName As String
- Return Type: FolderItem
- Scope: Public
Type the following lines of code in the associated Code Editor:
#If TargetLinux Then
  If sharedInstance = Nil Then sharedInstance = New LinuxFonts

  Return sharedInstance.GetFileForFont(fontName)
#EndIf
The last thing we need to do in order to complete our class is to add a Shared Property. This will be responsible for storing the reference for the shared LinuxFonts instance:
- Name: SharedInstance
- Type: LinuxFonts
- Scope: Private
LinuxFonts in Practice
Now let’s create a minimal user interface in order to test our class. Select the Window1 item in the Navigator so it is displayed in the Layout Editor.
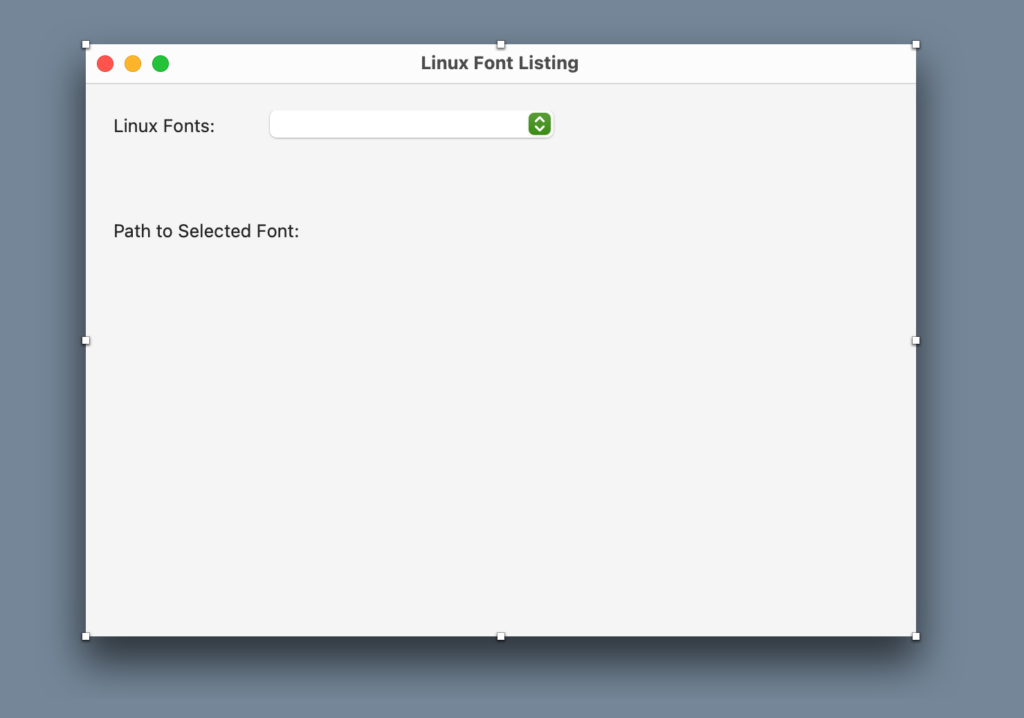
Drag a DesktopLabel from the Library panel and drop it in the top-left corner of the Window. Use the alignment guides so the label leaves enough free space over the top and left margins of the Window. Next, use the associated Inspector Panel to change its Text property to “Linux Fonts:”.
Now drag a DesktopPopupMenu and drop it at the right side of the added Label in the Layout Editor for the Window. Once again, use the alignment guides so the added DesktopPopupMenu respects the recommended margin over the right side of the Label.
With the DesktopPopupMenu selected in the Layout Editor, use the associated Inspector Panel to change its Name property to “LinuxFontSelector”. Next, double-click the DesktopPopupMenu in the Layout Editor to access the “Add Event Handler” dialog. Select the Opening and SelectionChanged events so they are added to the LinuxFontSelector item in the Navigator.
Select the Opening event handler under the LinuxFontSelector item in the Navigator in order to access the associated Code Editor and type the following lines of code:
#If TargetLinux Then
  Me.AddAllRows(LinuxFonts.Fonts)

  If Me.LastRowIndex <> -1 Then Me.SelectedRowIndex = 0
#EndIf
Select next the SelectionChanged event handler under the LinuxFontSelector item in the Navigator to access the associated Code Editor and type the following lines of code:
#If TargetLinux Then
  PathToSelectedFont.Text = LinuxFonts.FileForFont(item.Text).NativePath
#EndIf
Now add a couple of additional Desktop labels to the layout of the Window1 Window, select the Window1 item to bring up the Layout Editor again. Drag a new DesktopLabel from the Library and drop it below the first label added to the layout. Use the Alignment guides so it leaves enough free space over the left margin of the Window.
With the newly added label still selected in the Layout Editor, use the associated Inspector Panel to change the following properties:
- Name: LinuxFontPathLabel
- Text: Path to Selected Font:
Add a new DesktopLabel and drop it at the right of the previous one in the Layout Editor. With the new DesktopLabel still selected, change the following values in the associated Inspector Panel:
- Name: PathToSelectedFont
- Text: (Empty)
Done! The finished layout of Window1 should look like this:

Run the app and you should see the first font name already selected in the popup menu, displaying the associated font file path in the label under it. Try to change the selected font name in the PopupMenu as many times as you want. You’ll see that the fonts are alphabetically sorted, including all the variations available for a same font family.
Paul learned to program in BASIC at age 13 and has programmed in more languages than he remembers, with Xojo being an obvious favorite. When not working on Xojo, you can find him talking about retrocomputing at Goto 10 and on Mastodon @lefebvre@hachyderm.io.
