Starting with Xojo 2024r3, it is now possible to get image metadata, assign location data (Location Tracking), and to save images directly to a device’s photo album in your Xojo iOS apps.
Getting the Image Metadata
In order to get the metadata from a given image, first retrieve a valid instance from the Picture Class using MobileImagePicker, select Photos or Camera as the image source.
Once we get the Picture instance, for example as the received parameter in the Selected event from the ImagePicker instance, we only need to access its Metadata property. The property will return a Dictionary instance, so we can iterate its entries or convert it to a JSONItem instance for simplicity if all you want to do is store the information. For example, we can use the following fragment of code in the Selected event of the ImagePicker instance:
Var js As JSONItem
Try
  js = New JSONItem(pic.Metadata)
  MessageBox(js.ToString)
Catch e As JSONException

End Try
Assuming that “pic” is the name of the received parameter that points to the user selected (or captured) image, the previous fragment of code will show a dialog with the image metadata.
Getting the Image Location… and Putting it On the Map!
An interesting action could be reading the location data of the selected image and adding an entry on a MobileMapViewer instance. So, for example, again in the Selected event of an ImagePicker instance, we could add the following snippet of code:
If pic <> Nil Then
  ImageViewer.Image = pic

  // The metadata is retrieved as a Dictionary, so let's get the
  // metadata from the selected picture
  metadata  = pic.Metadata

  If metadata <> Nil Then
    Var jlocation As Dictionary = metadata.Lookup("Location", Nil)

    // Getting the Location information (also as Dictionary)
    If jlocation <> Nil Then

      // And assigning the Latitude and Longitude
      // values to the properties
      latitude  = jlocation.Value("Latitude").DoubleValue
      longitude = jlocation.Value("Longitude").DoubleValue

      // Then, we will show the Picture location on the Map
      Timer.CallLater(100, AddressOf Showlocation)
    End If

  End If

End If
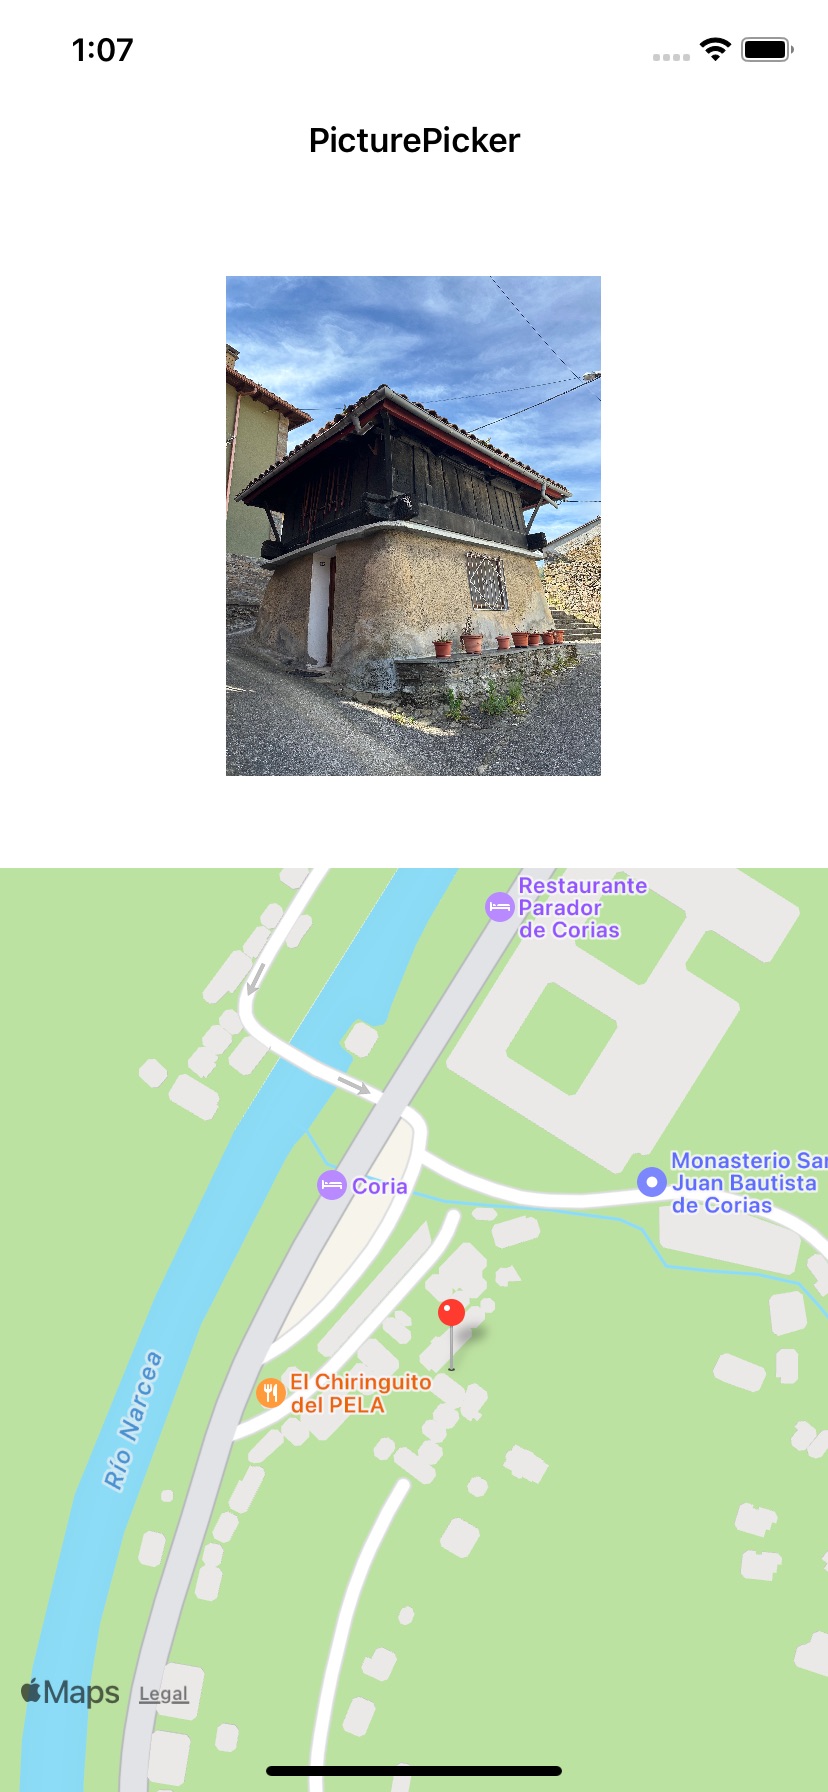
Latitude and Longitude are Double type properties that have been added to the Screen containing the ImagePicker instance, also added is an ImageViewer instance responsible for displaying the selected image preview, and a MapViewer instance on which the “pin” corresponding to the location of the image will be added.
As you can see, the shared method CallLater of the Timer class is used to invoke the ShowLocation method. This method will be responsible for displaying the actual pin on the map:
Private Sub Showlocation()
  // Let's create a new Location instance from the stored
  // latitude and longitude values in order to add it
  // to the Mapviewer…

  Var maplocation As New MapLocation(latitude, longitude)
  MapViewer1.AddLocation(maplocation)

  // …and let's make sure the metadata is updated
  // to the viewed image
  ImageViewer.Image.Metadata = metadata
End Sub
The following screenshot shows the outcome of executing the previous code:

Of course, you’ll need to enable the Maps entitlement in the Build Settings > iOS > Capabilities inspector.
Setting the Location in a Picture
Just as we can get the location out of an image, we can also modify it… or set a location to those photographs that we get through the ImagePicker using the Camera source. Assigning a location is very simple:
- Add an instance of MobileLocation to the project (for example the screen where we manage image capture).
- Add the Latitude and Longitude properties of type Double as two new properties on the same screen.
- In the LocationChanged event of the MobilLocation instance assign the values received in the Latitude and Longitude parameters to the properties created previously:
Self.Latitude = Latitude
Self.Longitude = Longitude- Then, in the Selected event of the ImagePicker instance, use the following snippet of code:
Var d As New Dictionary
d.Value("Latitude") = Self.Latitude
d.Value("Longitude") = Self.Longitude

Var Location As New Dictionary
Location.Value("Location") = d

pic.Metadata = Location
Saving Pictures to Photos
Until now, MobileSharingPanel was probably the go-to option when it came to saving any of the images generated in your iOS Xojo app or images captured with the camera using the ImagePicker. Starting with Xojo 2024r3, you can also use the SaveToPhotos method of the Picture class, which will take care of saving the image while preserving the associated metadata.
So, for example, you will only have to add the following line of code at the end of the previous block so that the captured image is saved with the location:
pic.SaveToPhotos(Picture.Formats.PNG)However, when using this method on images in your iOS app, make sure to enable the Photos Access capability in the Build Settings > iOS > Capabilities Inspector Panel.
Wrapping-Up
As you have seen, it’s now really easy to get metadata from Picture instances in your Xojo iOS apps, as well as leverage Location information and assign location information to any of existing or new images. Plus, you no longer need to resort to MobileSharingPanel if all you want is your iOS app to save images to the Photos app album on the iOS device.
Javier Menendez is an engineer at Xojo and has been using Xojo since 1998. He lives in Castellón, Spain and hosts regular Xojo hangouts en español. Ask Javier questions on Twitter at @XojoES or on the Xojo Forum.
