
In this post I will show you how to create you own solar system in Xojo with the help of the Monkeybread Software plugin component SceneKit. SceneKit is an Apple framework that supplies functions for graphic and animation designs.
Please run a current Xojo version with MBS Xojo Mac64bit Plugin installed. Due to our dependencies list, please add Main, MacCloud, MacBase, MacCocoa, MacControls, MacCG and MacCF plugins too. Start with a new project. To the window we add a SCNControlMBS control from the library and rename it MyControl. Drag it across the entire window size and lock all edges. It is very useful because we want fullscreen mode later.
Then we need two properties MyScene and MyView. MyScene has the type SCNSceneMBS and MyView has the type SCNViewMBS. Afterwards, add the open event of the SceneKit control.
We start with the setting of MyView and MyScene like this:
MyView = Me.View
MyScene = New SCNSceneMBS
MyView.scene = MyScene
Then we enable the default light and the camera control, because we want to see a 3D effect and want to move the camera using the mouse. We set black as the background color.
myView.autoenablesDefaultLighting = True
MyView.allowsCameraControl = True
myView.backgroundColor = NSColorMBS.blackColor
Next we add our first node to the scene. The center of the scene is the Sun. In basic structure the Sun is a lit up sphere. So we add a sphere geometry with a given size. In this project we can’t work with the original conditions, because Mercury would be so small that it is impossible to see. Plus, we would have same problem for the distance between the Sun and the planets. Because that, our Sun has a radius of 13. Then we add a node and give it geometric information about the Sun. The position of the node is the origin with the coordinates 0,0,0. Finally, we add the node to our scene.
Dim SunGeometry As New SCNSphereMBS(13)
Dim Sun As New SCNNodeMBS(SunGeometry)
Sun.Position = New SCNVector3MBS(0, 0, 0)
MyScene.rootNode.addChildNode(Sun)
Then we start our program.
We see a white sphere on the screen. The Sun looks a bit edged because of the segment count. Our Sun sphere is very big and needs more segments then the default segment count. Set the segment count property ahead of adding the node to the scene command.
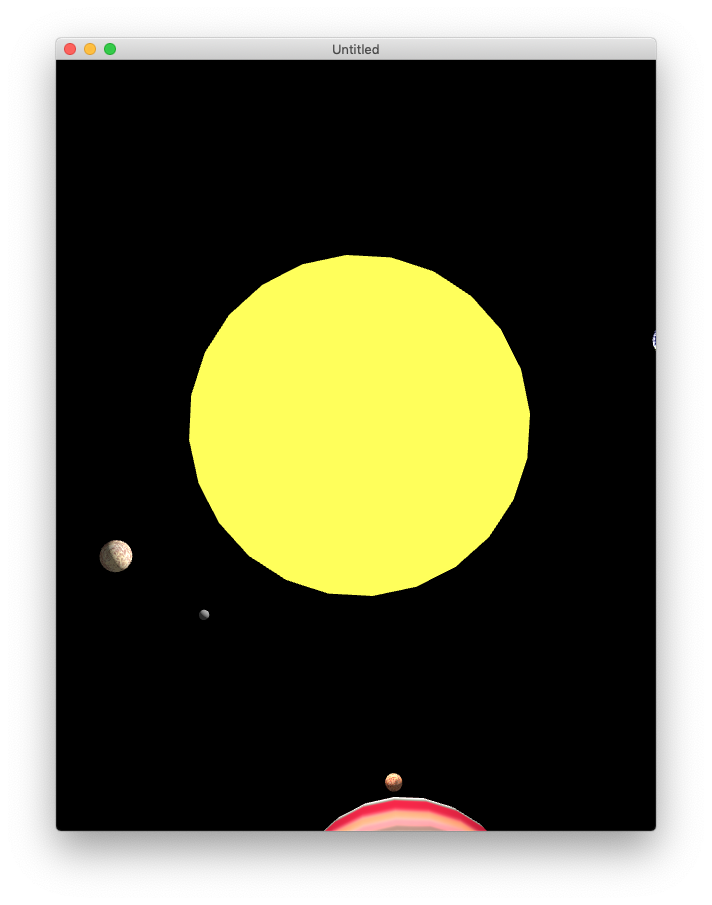
SunGeometry.segmentCount=100
Then we set each planet in a similar way. Because the planets look different, we want to change their colors as appropriate or even put a picture as a graphic over each sphere. For the color of an object we have the firstMaterial.diffuse.contents Property. This is how you would set a gray color for Mercury.
MercuryGeometry.firstMaterial.diffuse.contents = NSColorMBS.grayColor

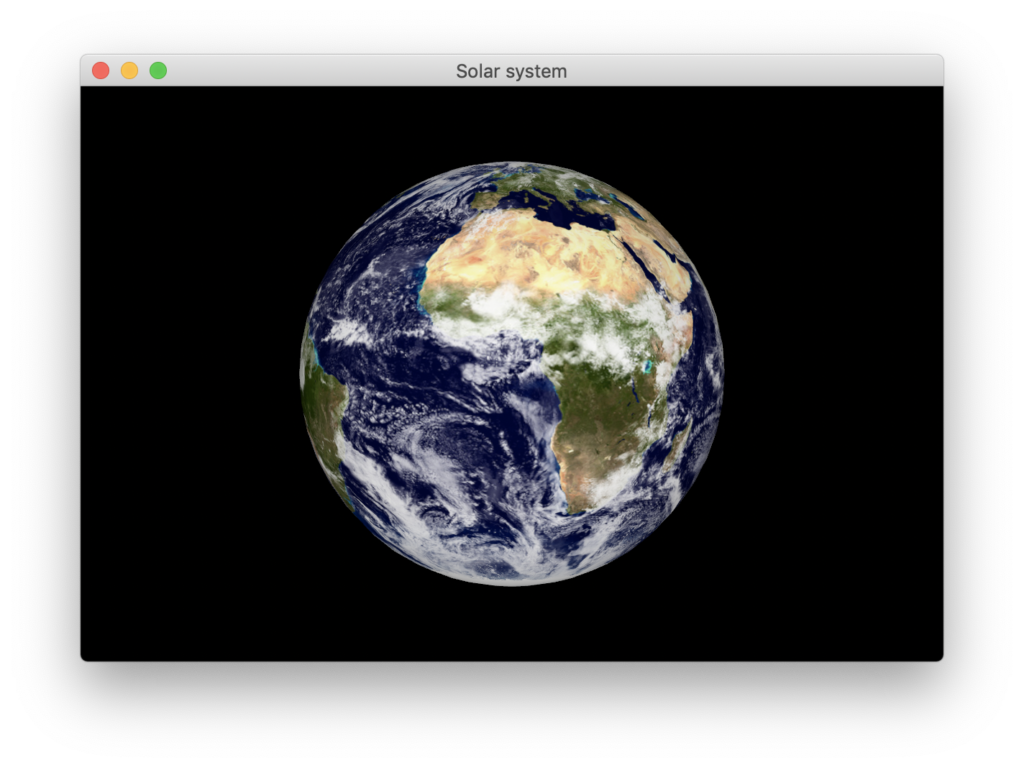
If we want to map a picture on a geometry, for example for Earth, we add this picture to our project and set it to the geometry. It’s a bit like covering it with a blanket with a high percentage of elongation. We can imagine that by covering a sphere, we stretch the blanket on the equator more than on the polar caps. Because that, if you look on a map, the longitudes and latitudes are not parallel, but rather bent. In reality the longitude and latitude are parallel. You can see that on a globe. Fortunately for us a world map is already a perfect UV map for a sphere. Thanks to the website www.ginkgomaps.com which supplies world maps to everyone. I used one of these maps in my example. You can customize the map with a graphic program. Then add it to the project and set it in the property.
Dim EarthGeometry As New SCNSphereMBS(1.47)
EarthGeometry.segmentCount=100
Dim Earth As New SCNNodeMBS(EarthGeometry)
EarthGeometry.firstMaterial.diffuse.contents = EarthPic
Earth.Position = New SCNVector3MBS(25, 0, 0)
MyScene.rootNode.addChildNode(Earth)
All other textures I draw myself in a graphic program.
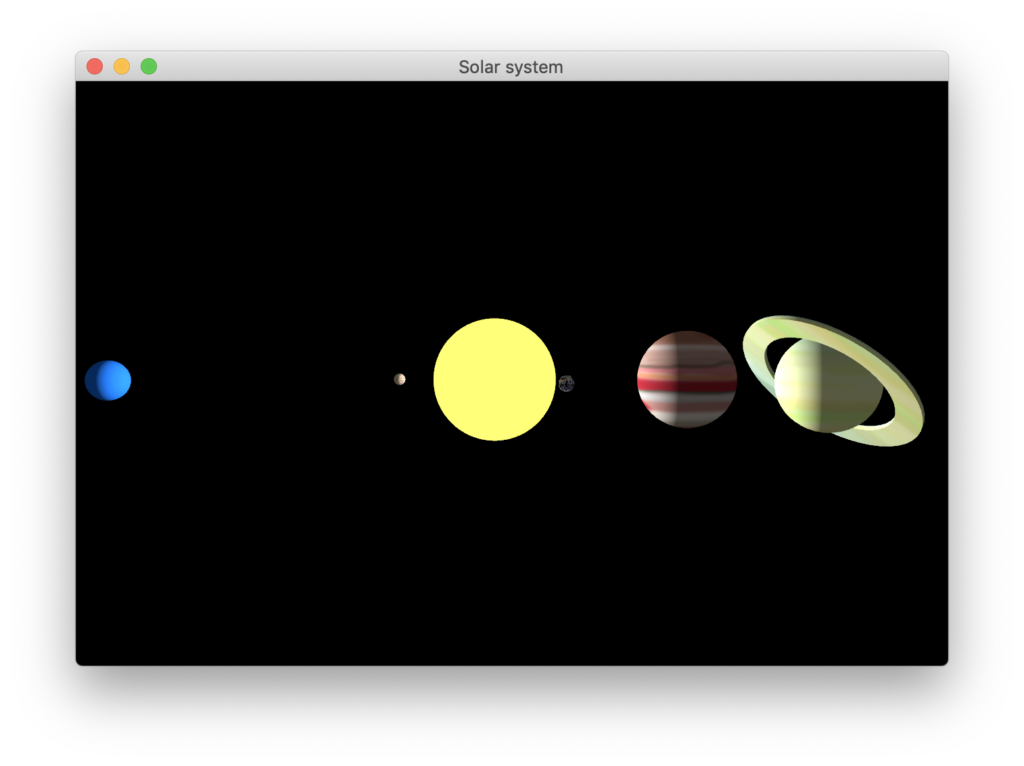
For the position of the Planets, we must pay attention to the fact that the origin of the single planets are in the center of the sphere and we set in the constructor of the geometry as the radius and not the diameter. The distance between two planets are: radius of planet 1+radius of planet two+ space between them.
Following this same pattern we add the other planets. Saturn has a planetary ring. The ring is a tube with an inner radius that is bigger than the planet and a small hight. I use the same structure on the ring as on the planet. The tube is a bit rotated. We rotate the ring a bit by x and y. The specification of a rotation looks like this:
saturnRing.orientation = New SCNVector4MBS(-0.4, -0.5, 0, 1)

Let’s Move the Solar System
Now we want to move the Scene. We assume that the planets’ orbits are all parallel to the xz plane and that they are exactly circular. To roate around a certain point, we create a geometry for each rotation. It lies in the point and is a parent node of the geometry. If a parent node moves, a child node moves too. The inverse does not apply. In that way, if we rotate the helping node in the origin, the child node moves around the origin too. We cannot use the Sun as the parent node for all planets because the planets are supposed to move at different speeds.
The creation of the geometry looks similar for each planet:
Dim UranusRotationGeometry As New SCNSphereMBS(1)
Dim UranusRotation As New SCNNodeMBS(UranusRotationGeometry)
UranusRotation.Position = New SCNVector3MBS(0, 0, 0)
MyScene.rootNode.addChildNode(UranusRotation)
UranusRotation.addChildNode(Uranus)
These geometries are covered by the Sun.
Then we add the movements. We defined a rotation of the helping node and set the information about the rotation. We want to rotate around the y axis in each cycle about 360°. The information is given in the unit rad. Because of this we must convert 360° to 6.283 rad. The last parameter is about the speed of the operation. In this section we can set the proportion of the speed of the planets. The speed of Earth is the basic value. Everything is based on this value. The assumption is: an Earth year lasts 365 days. For each planet we use the number of Earth days a planet takes to rotate once around the Sun. We divide this value by the days of an Earth year. For Neptune we get a value that is approximate to 164.79 rad. That we can multiply with a variable. The variable can be set by the customer to regulate the speed of the solar system. We want to repeat this movement again and again. In this way we set it. In the last step we set this rotation to the scene.
Dim moveNeptune As SCNActionMBS = SCNActionMBS.rotateBy(0, 6.283, 0, 164.79 * speed)
Dim Neptunerepeat As SCNActionMBS = SCNActionMBS.repeatActionForever(moveNeptune)
NeptuneRotation.runAction(Neptunerepeat)
Finally, we want to talk about lighting. The Sun is the light source. It is a light that comes from a point and shines in all directions. That type of light source is called an omni light. We define a light as a property from a node. Since our Sun is a node in the scene, we add the light property directly. All nodes that spray light don’t get any light and they are normally black. With the emission property we can make the sphere look like it is glowing. We choose yellow as color.
Dim SunGeometry As New SCNSphereMBS(13)
Dim Sun As New SCNNodeMBS(SunGeometry)
sun.Light = New SCNLightMBS
sun.Light.Type = SCNLightMBS.SCNLightTypeOmni
sun.Light.Intensity = 2000
sun.light.Color = NSColorMBS.whiteColor sun.Light.Intensity = 2000 SunGeometry.firstMaterial.emission.contents = NSColorMBS.yellowColor SunGeometry.segmentCount = 100
Sun.Position = New SCNVector3MBS(0, 0, 0)
MyScene.rootNode.addChildNode(Sun)
The scene seems very dark if the Sun is our only light source, so add weak ambient light that lights up all elements in the same way. The unit of the light intensity is lumen. Now you can run the project and admire your own programmed solar system. Have a lot of fun with that. Link to project.
If you have questions about SceneKit don’t hesitate to contact me. And please join my session about SceneKit at the XOJO.CONNECT conference in Nashville.
Download the project.
Stefanie Juchmes studies computer science at the University of Bonn. She came in touch with Xojo due to the work of her brother-in-law and got a junior developer position in early 2019 at Monkeybread Software. You may have also read her articles in Xojo Developer Magazine.