
What is Docker?
If you haven’t heard of Docker, go ahead and read their excellent Documentation: Docker – Overview.
I’m just going to quote some basics from the Overview to give a brief introduction of Docker, Docker image and Docker container:
Docker is an open platform for developing, shipping, and running applications. It provides the ability to package and run an application in a loosely isolated environment called a container. The isolation and security allow you to run many containers simultaneously on a given host. Containers are lightweight and contain everything needed to run the application, so you do not need to rely on what is currently installed on the host. You can easily share containers while you work, and be sure that everyone you share with gets the same container that works in the same way.
A Docker image is a read-only template with instructions for creating a Docker container. Often, an image is based on another image, with some additional customization. To build your own image, you create a Dockerfile with a simple syntax for defining the steps needed to create the image and run it.
A Docker container is a runnable instance of an image. You can create, start, stop, move, or delete a container. By default, a container is relatively well isolated from other containers and its host machine. You can control how isolated a container’s network, storage, or other underlying subsystems are from other containers or from the host machine. A container is defined by its image as well as any configuration options you provide to it when you create or start it.
A Docker Registry is a stateless, highly scalable server side application that stores and lets you distribute Docker images.
Why use Docker with a Xojo Web App?
You can package your Xojo Web Apps in a Docker Image. That allows you to run an instance of your applications easily in a Docker Container. Docker provides the infrastructure to host the apps, start/stop them, switch between image versions – and much more.
The Docker Images containing your Xojo Web Apps can be copied to other machines. This might be some Linux or macOS machine (Windows seems to be a bit more tricky), a Cloud Service – or even a Synology NAS. You then can import the Images on the Docker environment of those machines, and serve your apps from there.
If you’re pushing the Docker Images to a Registry (e.g. Docker Hub), it gets even more convenient. Docker Hub is a service provided by Docker for finding and sharing container images with your team or the public. So you’ll build the Docker Image with your Xojo Web App, push it to the Registry. After that, you (or your team, or everyone) can just pull the Images to their Docker infrastructure and run them in a Container.
How to build a Docker Image containing a Xojo Web App?
One could answer obviously: it depends. But let me try to explain the basic required steps. For this example we’re going to use a macOS machine to build the Xojo Web App and Docker Image. Then we’ll deploy and run a Docker Container on the local developer machine and on a Synology NAS.
Requirements
- Xojo with a license allowing you to build a Xojo Web App for Target Linux (Intel, 64Bit).
Docker Desktop installed on the macOS developer machine. Download and install it from here: Docker for macOS. After that you should have the Docker GUI up and running. And in Terminal.app you should have the command line tools available. You can double check this by entering this command:
docker version
- We’re going to build a Docker Image based on Ubuntu (Linux). To run a Docker Container with this image, we obviously need a machine supporting this. Both macOS and the Synology NAS will work just fine.
Are you ready and set up? So let’s go and try this.
Build a Xojo Web App
Open a Xojo Project with a Web Application. I’m going to use a CRC Calculator I’ve written. Debug-Run it locally to make sure the Web App works as expected.
Once we’re ready to build we should think of what we’re going to need for the Docker Image. Check the following properties in your Xojo Project:
- The most obvious one: Tick the “Build Target: Linux, x86-64Bit”. Since our Docker Image will run Ubuntu / Linux-64Bit, we need the Xojo Web App to run in such an environment.
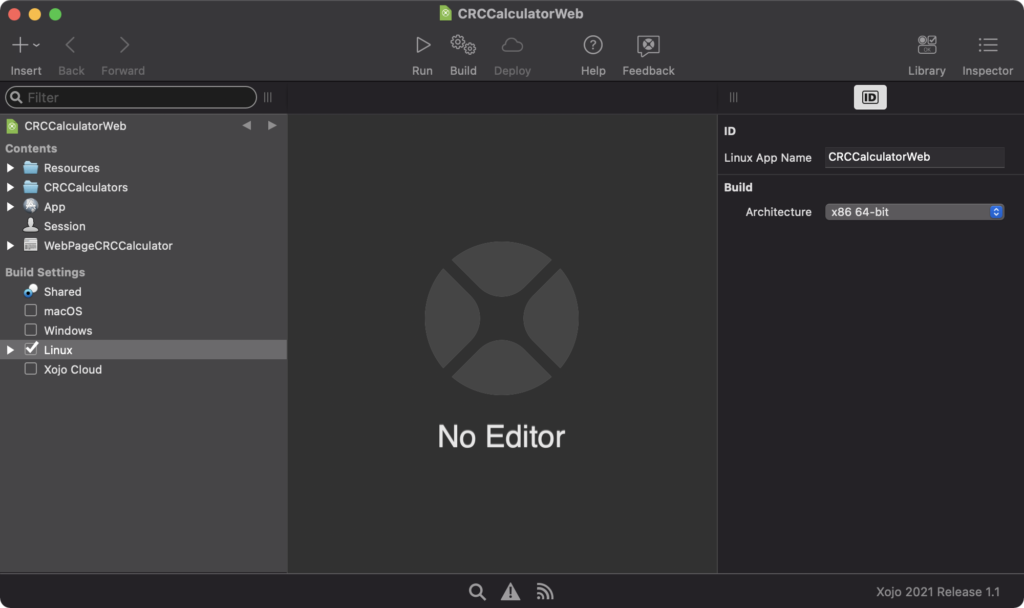
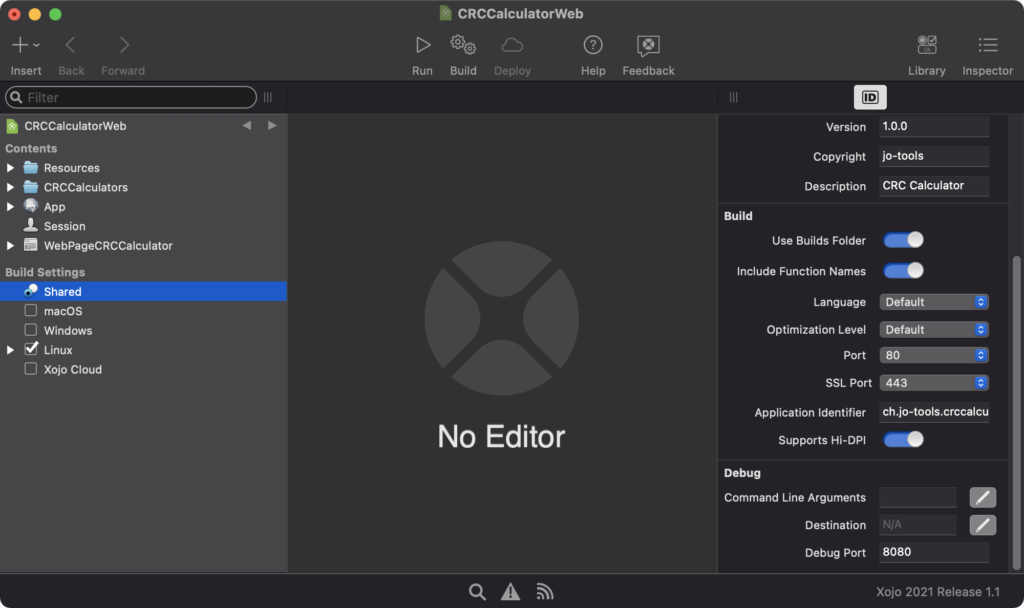
- Then in “Build Settings – Shared”, set the “Build – Port: 80“. In fact it doesn’t really matter which Port you’re choosing. All that is important for now is that you know which one it is.
- That’s about all we need to do within the Xojo IDE – so let’s hit “Build”.
We now have the built Web App ready. Next step is to package it in a Docker Image.
Dockerfile
Open the Web App’s Build Folder in Finder. Next we need to write the instructions to get it in a Docker Image. Open your favourite Text Editor. Create a Text-File with Filename: Dockerfile (no file extension). Save it in the Build folder (next to the application’s executable file). The Content we’re saving in Dockerfile is:
#BASE IMAGE
FROM ubuntu:20.04

#INSTALL REQUIRED LIBRARIES
ENV DEBIAN_FRONTEND noninteractive
RUN apt-get update && apt-get install -y libunwind8 libglib2.0

#ADD APPLICATION TO DOCKER IMAGE
ADD / /app/

#EXPOSE PORT AND RUN APPLICATION
EXPOSE 80
WORKDIR /app
CMD /app/CRCCalculatorWeb
This describes how Docker is going to create the Docker Image. Let’s briefly explain the steps of this Dockerfile:
- We’re going to use Ubuntu 20.04 as a base image. That about the same as saying: “Let’s set up an environment running Ubuntu 20.04 first.”
- We then set an environment variable allowing to install updates without user interaction. Then the system gets updated, and required Libraries installed (libunwind8, libglib2.0).
- The whole Content of the Build Folder (or in other words: everything next to the Dockerfile – that’s basically our Xojo Web App) is being copied into the image to the location /app
- Expose 80: Do you remember? That’s the “Build Port” we’ve set in the Xojo IDE. So this tells that when running this Image as a Container Instance later we can attach to this “virtual port”. It doesn’t matter if several applications in different Images/Containers use the same port. That’s because when running an Instance, we can later configure the running Instance to map the Ports, e.g.: “8088 (external) -> 80 (internal)”. So a second Web App Instance or App could use e.g.”8089 (external) -> 80 (internal)”. That’s why for our own convenience we can use Port 80 for every of our Xojo Web Apps’s Docker Image.
- Finally, the instructions tell where the working directory is, and with the last command the Xojo Web App is being launched.
Alright – everything is ready so that we can now create the Docker Image.
Docker Image
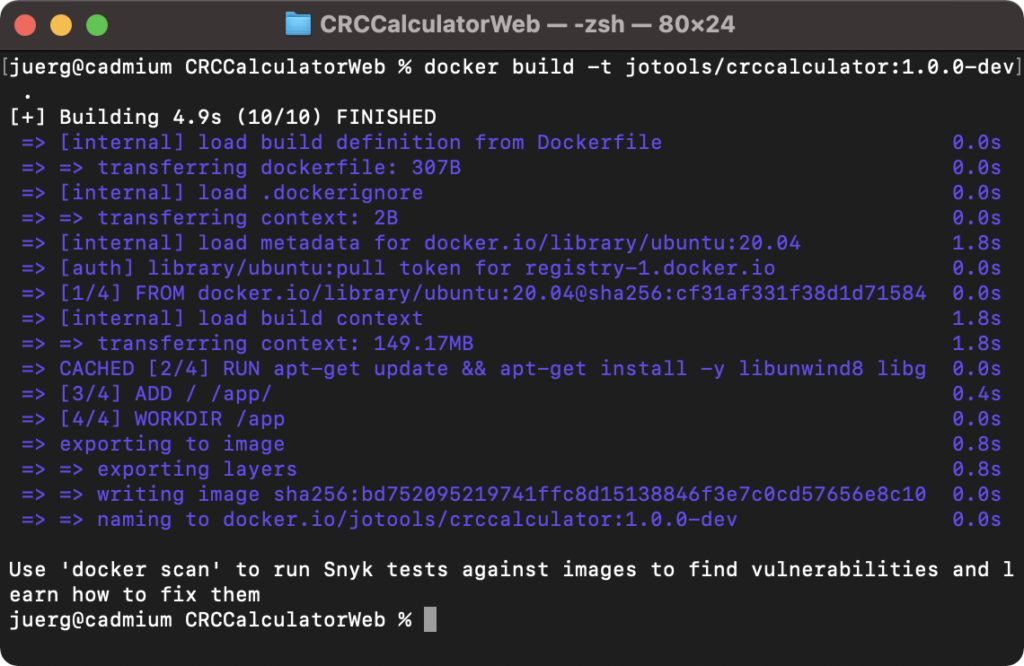
Open Terminal.app and change directory to the Build Folder of the Web App:
cd /path/to/your/xojo-webapp-project/Builds\ -\ CRCCalculatorWeb/Linux\ 64\ bit/CRCCalculatorWeb
You’re now in the folder with the Dockerfile and your Web App.
A Docker Image always needs a Tag. Such a Tag looks like this:
jotools/crccalculator:1.0.0-dev
The parts are: (company-name)/(product-name):(version-label-tag)
So… let’s build the Docker Image – enter this in Terminal:
docker build -t jotools/crccalculator:1.0.0-dev .
What this does is: Build a Docker Image with Tag ___ from “this current directory” (the dot at the end).
Side-Note: If you’re re-building an Image with the same Tag of an already existing Image, it gets overwritten. You could also first remove an existing image like this:
docker image rm jotools/crccalculator:1.0.0-dev
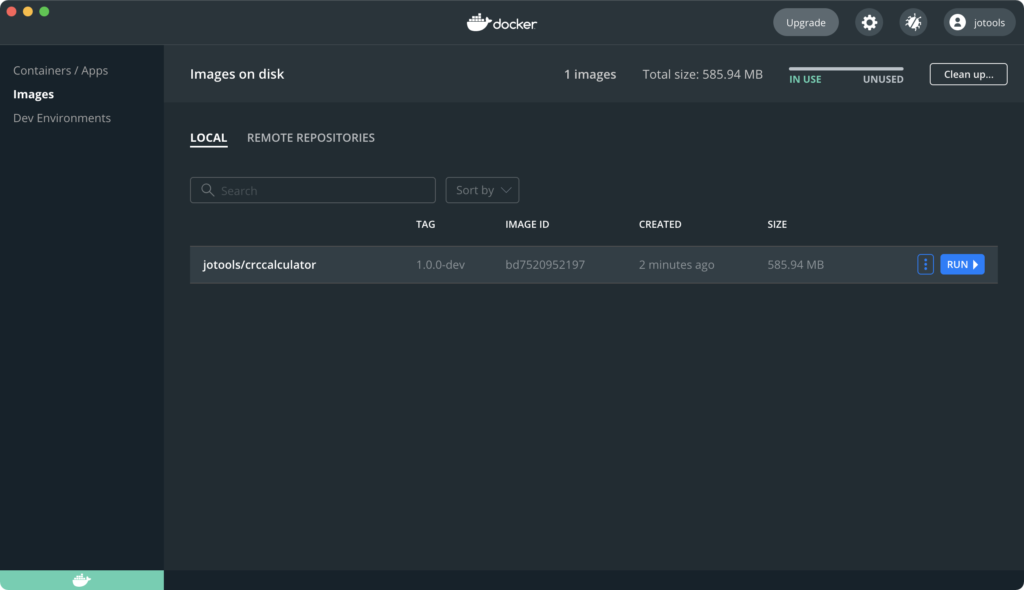
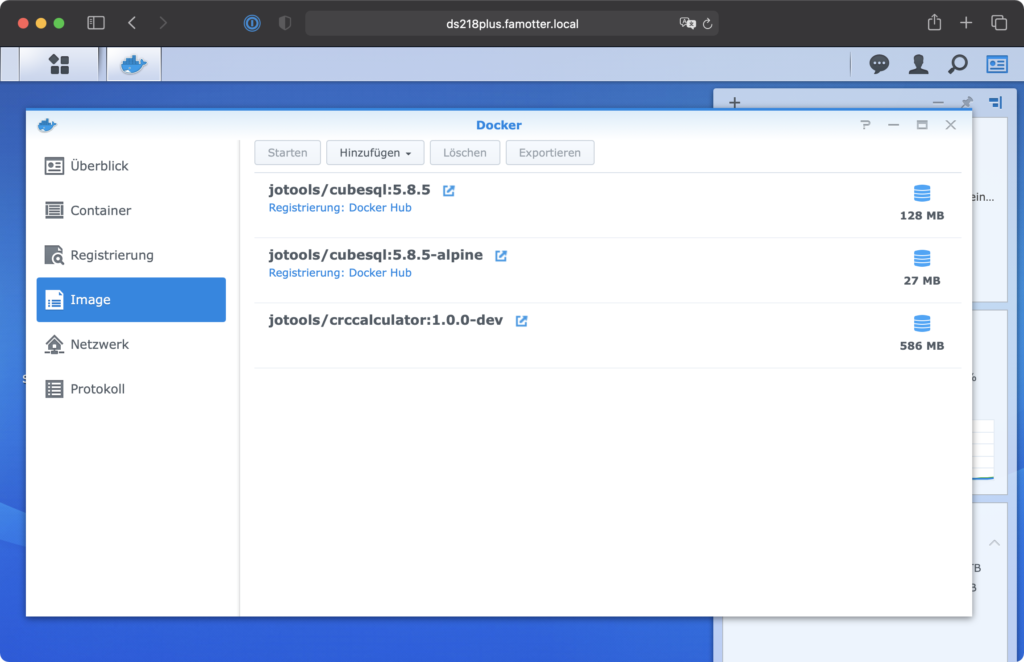
You can now launch the Docker Desktop .app and find your Image there:
If you prefer to see the image using the command line:
docker image ls
Run Docker Container
Let’s now take the Image and run a new Docker Container using that Image. We will configure the Docker Container Instance to use the local Port 8088. In Docker Desktop GUI:
- Select the Image, click on the Button “Run”
- Expand the optional settings, enter a Container Name of your choice and Map the “LocalPort: 8088” to “Container Port: 80”
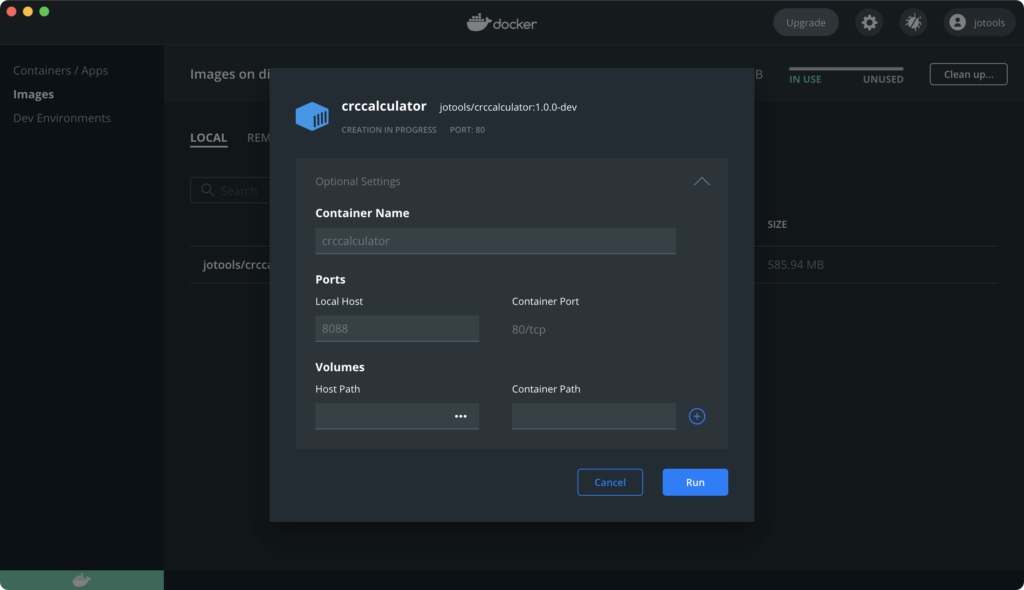
- Then… click on “Run”
And that’s it – we have the Container up and running:

If you prefer the command line:
docker run -d --publish=8088:80 --name crccalculator jotools/crccalculator:1.0.0-dev
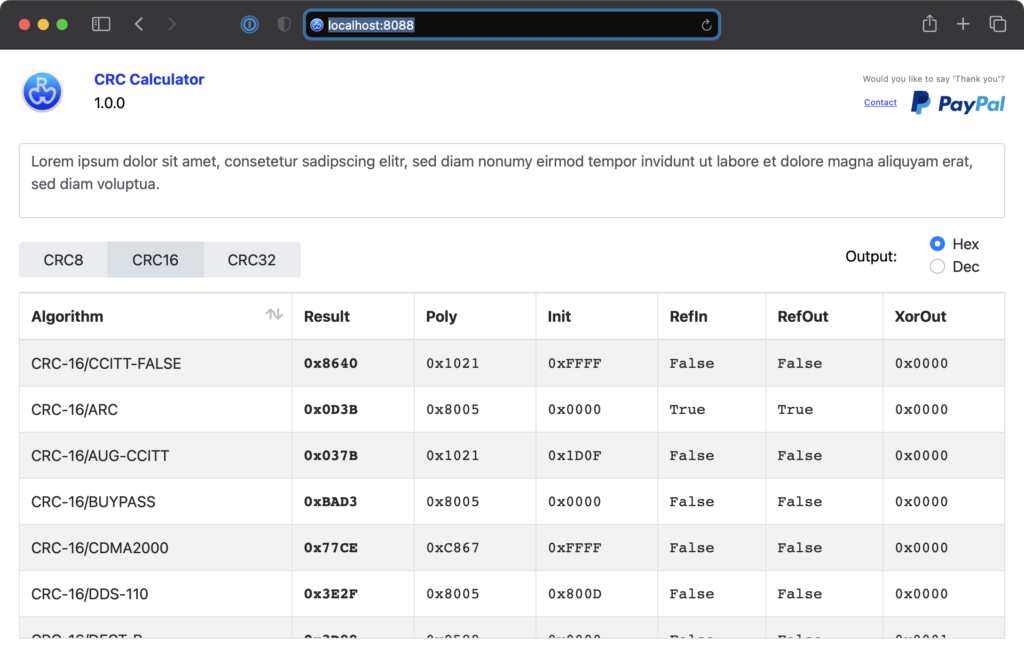
Let’s access our Xojo built Web App running in the local Docker Container using Safari:
Side-Note: If you just want to try this example project then you can pull the image like this in Terminal.app:
docker pull jotools/crccalculator:1.0.0
Export Docker Image
The easiest way is to push the Image to a Registry such as Docker Hub. That obviously requires a registration – so we won’t cover this here and now.
Let’s export the Image using Terminal.app.
You should still be in the Build – directory of the Xojo Web App. If not, change to that folder.
Then export the Docker Image to a file like this:
docker save jotools/crccalculator:1.0.0-dev | gzip > ./CRCCalculatorWeb.dockerimage.tgz
This command is saving the Image/Tag to a .tgz located in the current directory.
Run Docker Image on a Synology NAS
If you have a Synology NAS supporting Docker – this is how you can run the exported Image on your NAS:
- First of course: Install the Synology Docker Package
- Copy the exported CRCCalculatorWeb.dockerimage.tgz to a Share on the NAS
- Launch the Docker .app on the NAS
- Under “Images”: Add -> From File -> (choose your CRCCalculatorWeb.dockerimage.tgz)
- Select the imported Image, click on “Run”
- Enter a Containername of your choice:
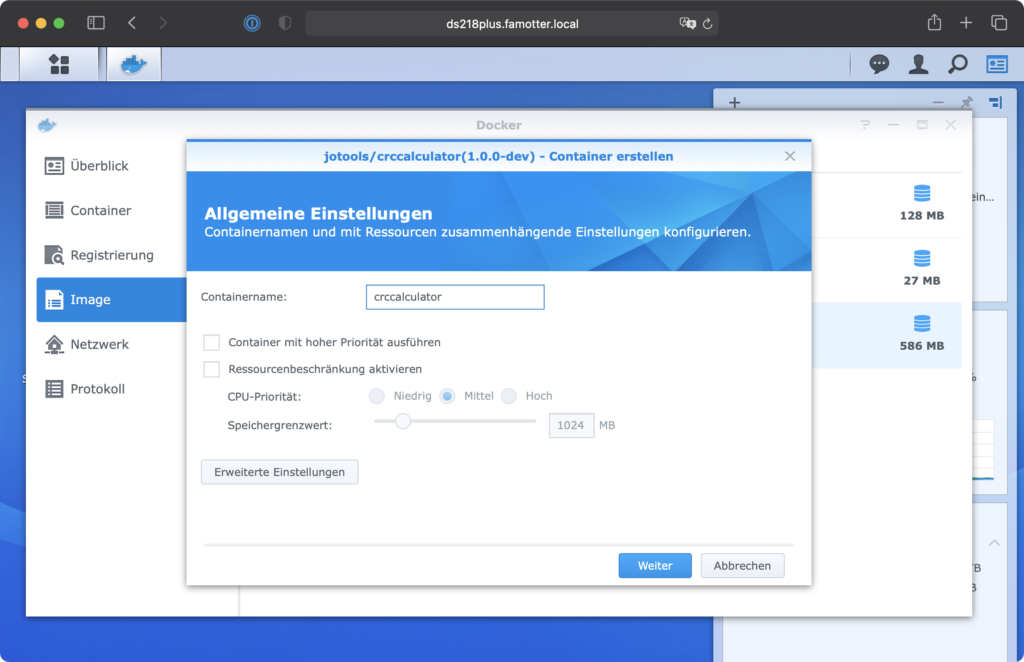
- Click the Button “Advanced Settings”: Same story here – Map the Local<->Container Port. In this example: Local 8099 <-> Container 80
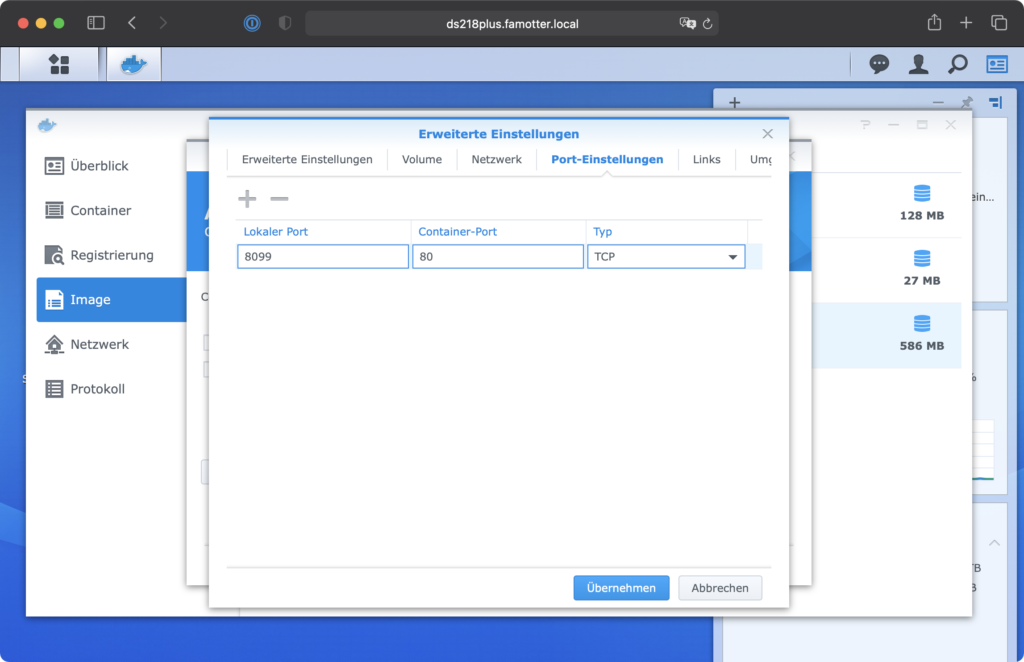
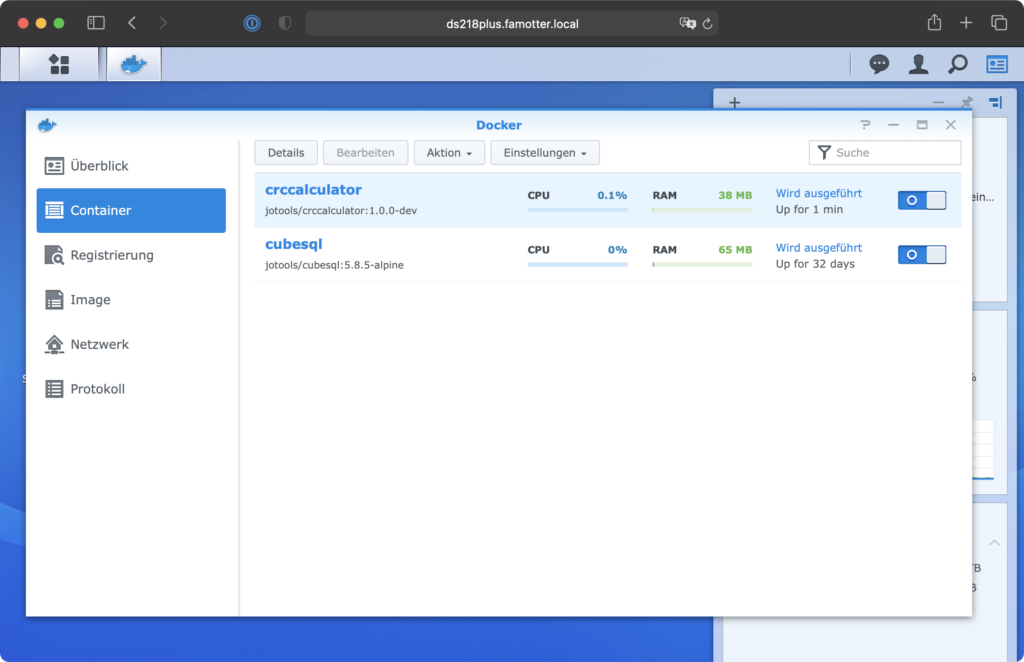
- Finish the assistant. The Container should now be up and running:
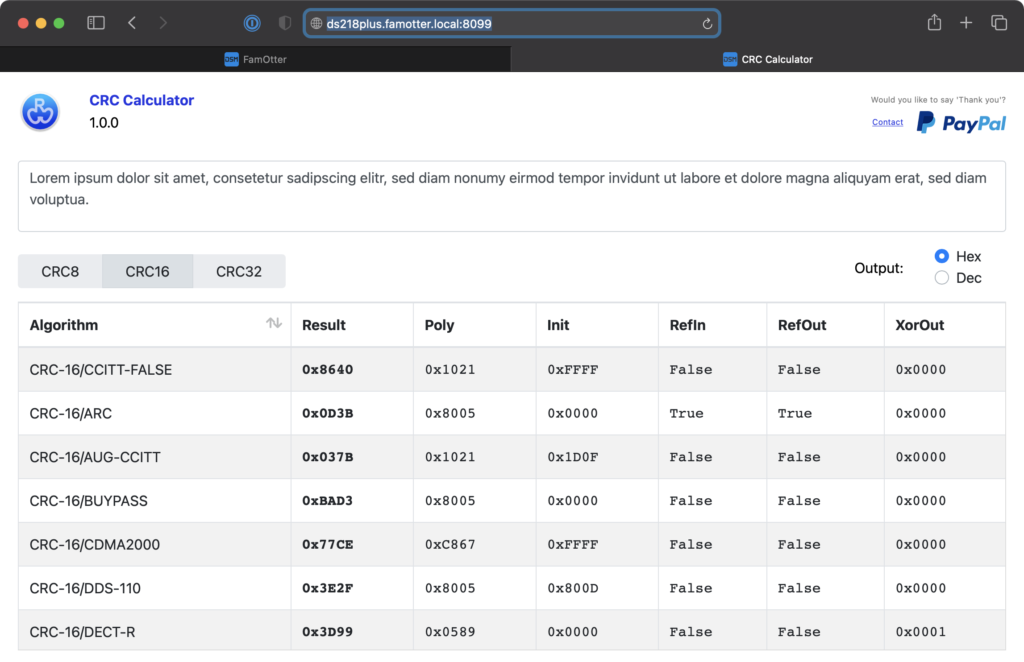
Let’s access our Xojo built Web App running in the Docker Container of the Synology NAS using Safari:
What next?
There are a lot of features and possibilities which we won’t cover here. Let’s just pick a couple and briefly explain without going into detail. You’ll find excellent documentation on Docker’s Website if you want or need to dig in further.
Docker and Persisted Storage
Note that this example has no persisted storage. Which means that you can save files within a Container – but once you stop or remove the Container (e.g. to run a new Container with a newer Image version) the created data is gone. That’s a good thing – as a Container will always behave the same when deployed, not being cluttered with data that has come from somewhere.
If your Web App requires to store data on the filesystem you should add a Volume. In the Dockerfile add a line like this:
VOLUME /data
You then can have your WebApp save data to the folder /data.
If you run a Container from such an Image – have a look at the Advanced Settings. Since the Image exposes a Volume, you can choose a local folder (on the machine where Docker is serving the Container) to be attached to /data. Same story on the Synology NAS.
Once you remove the Docker Container, the Data will still be there. So you can run another Container (e.g. with a newer version of your app), attach the same/existing data-folder. That way you can continue and keep existing data.
Environment Variables
Especially if you’re going to Deploy the Docker Image on various environments, you might want some “settings”. One approach is to use Environment Variables in the Dockerfile:
ENV MY_CUSTOM_SETTING=4430
Again in the Advanced options when running a Container you can override these Environment Variables to fit your needs.
Build Automation
If you’re building regularly and don’t want to enter commands in the command line after every build you could think about a Post Build Script which builds the Docker Image and optionally even pushes it to a Registry (e.g. Docker Hub).
An example is available here: Example Project – Xojo Web App 2 Docker
Docker Registry
The easiest way is to distribute a local Docker Image is to use a Registry such as Docker Hub. That obviously requires a registration and your Docker Client to be signed in. You can then push the Docker Image to the Registry, and pull it from there on the Docker Clients.
docker push jotools/crccalculator:1.0.0-dev
docker pull jotools/crccalculator:1.0.0-dev
Restart policy
In order to automatically launch a Docker Container after a reboot (of the host machine; of the Docker daemon): see Docker’s Restart Policy Documentation.
This command changes the restart policy for an already running container named crccalculator:
docker update --restart unless-stopped crccalculator
And this command will ensure all currently running containers will be restarted unless stopped:
docker update --restart unless-stopped $(docker ps -q)
That’s all Folks!
I hope this brief introduction of how a Xojo built Web Application can be used with Docker has been helpful to some, food for thought to others.
I wish you all the best and I’m curious if the Xojo Forum will get new posts in the near future with Docker Hub Links to interesting Xojo Web Apps which you do provide to the community.
Jürg Otter is a long term user of Xojo and working for CM Informatik AG. Their Application CMI LehrerOffice is a Xojo Design Award Winner 2018. In his leisure time Jürg provides some bits and pieces for Xojo Developers.