
I was recently asked how to set the background color in a WebDialog. There are a few approaches you can take to accomplish this. The simplest one is to add a rectangle as a layer of the WebDialog and set a color to it. In this tutorial you’ll learn how to set the background color by accessing the style property of the object in the DOM model and setting it there.
First, add a new Module to a web project. For this tutorial we’ll name it WebTools. Next, add the following method to it with a Global scope:
- Method Name:
ModalBackgroundColor Parameters:Extends v As WebDialog, assigns c As StringScope:Global
And type the following snippet of code in the associated Code Editor:
v.ExecuteJavascript("document.getElementById('" + v.ControlID + "_body').style.backgroundColor='"+c+"';")
With that done, we only need to call it from the Opening Event Handler of a WebDialog instance to set the desired background color:
Me.ModalBackgroundColor = "#f00" // Sets the background color to Red.
This leads to some interesting side effects. For example, the header on the WebListbox control and the loupe icon on the WebSearchField are transparent. That means that they look good when the background color on the WebDialog is the default white color, but not so good when we set a different background color on the WebDialog instance.
Avoid this issue by accessing the Style property on the proper div class on these objects. The tricky part here is to access the instance number whose inner header class we need to change. For that, the approach taken here may be a bit of overkill, but it works.
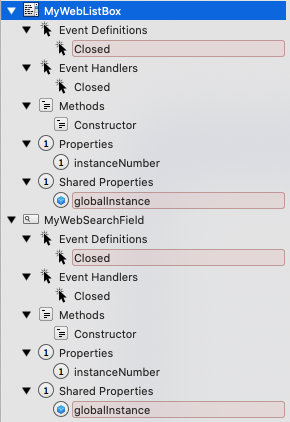
Such an approach is based on subclassing those WebControls we need to reference. In this case we are going to create subclasses for the WebListBox and the WebSearchField.
Add a new class to the project and name it MyWebListBox, setting its Super to WebListBox. Next, add a new shared property with the following values:
- Shared Property Name:
globalInstance Data Type:DictionaryScope:Private
And a second regular property with these values:
- Property Name:
instanceNumber Data Type:IntegerScope:Public
Next, add the Constructor method to the new class. The IDE will automatically include the code calling its Super class. Then, add a couple lines of code to set the instanceNumber property to the last index of the globalInstance shared property array. The final code for the method will look like this:
Super.Constructor
If globalInstance = Nil Then globalInstance = New Dictionary
Var instances() As MyWebListBox
If Session <> Nil Then
  If globalInstance.HasKey(Session) Then
    instances = globalInstance.Value(Session)
  End If
  instances.add Me
  instanceNumber = instances.lastindex
  globalInstance.Value(Session) = instances
End If
Add next the Closed Event handler to the subclass, typing the following snippet of code in the associated Code Editor:
If Session <> Nil Then
  If globalInstance.HasKey(Session) Then
    Var instances() As MyWebListBox = globalInstance.Value(Session)
    instances.Remove(Me.instanceNumber)
    For n As Integer = Me.instanceNumber To instances.LastIndex
      instances(n).instanceNumber = instances(n).instanceNumber-1
    Next
    globalInstance.Value(Session) = instances
  End If
End If
Because we are using the Closed event handler in the subclass, we need to add it again using the Event Definition option (keeping the same name, number of parameters and returned type). This way the instances based on this subclass will be able to add that event too.
Repeat the same steps to add a new MyWebSearchField class whose Super is set to WebSearchField.
The code associated with the Constructor method for the MyWebSearchField is as follows:
Super.Constructor
If globalInstance = Nil Then globalInstance = New Dictionary
If Session <> Nil Then
  Var instances() As MyWebSearchField
  If globalInstance.HasKey(Session) Then
    instances = globalInstance.Value(Session)
  End If
  instances.add Me
  instanceNumber = instances.lastindex
  globalInstance.Value(Session) = instances
End If
And the code associated with the Closed Event Handler should be this one:
If Session <> Nil Then
  If globalInstance.HasKey(Session) Then
    Var instances() As MyWebSearchField = globalInstance.Value(Session)
    instances.Remove(Me.instanceNumber)
    For n As Integer = Me.instanceNumber To instances.LastIndex
      instances(n).instanceNumber = instances(n).instanceNumber-1
    Next
    globalInstance.Value(Session) = instances
  End If
End If
With both both classes created, add them to a WebDialog instance (the one we named WebDialog1). Then, include the following line of code in the Shown event handler for each of these instances:
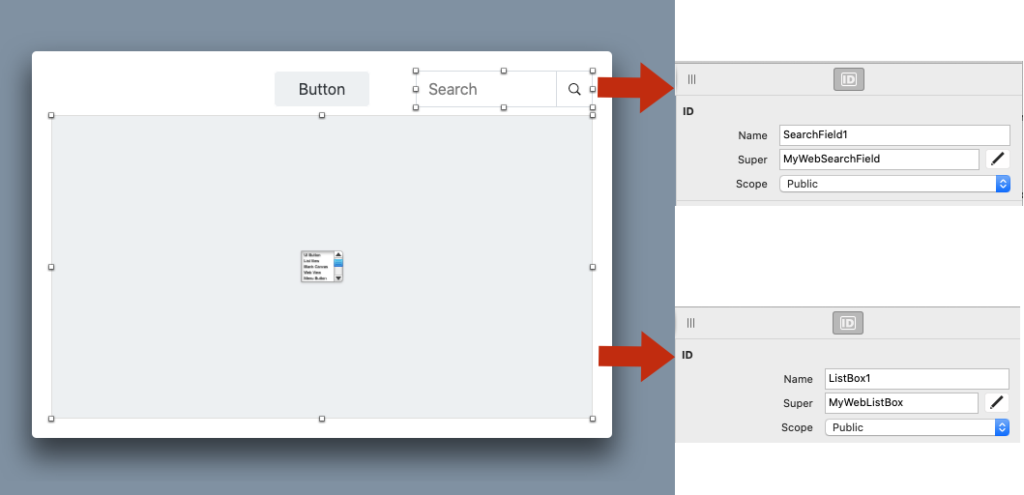
In the case of the ListBox1 instance:
Me.ExecuteJavascript("document.getElementsByClassName(""dataTables_scrollHeadInner"")["+me.instanceNumber.tostring+"].style.backgroundColor='#f00';") // This will set the listbox header background color to Red
Of course, you can improve this by accepting a variable color reference string instead of using the constant red value here (“#f00”).
And for the SearchField1 instance:
Me.ExecuteJavascript("document.getElementsByClassName(""input-group-append"")["+me.instanceNumber.toString+"].style.backgroundColor='#fff';") // This will set the "loupe" icon background color to White
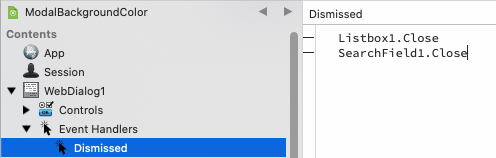
Now, we need to make sure that both the WebListbox and the WebSearchField instances are reset when we are done, something we can do by calling their Close method from the Dismissed event handler added to the WebDialog1 instance in the project:
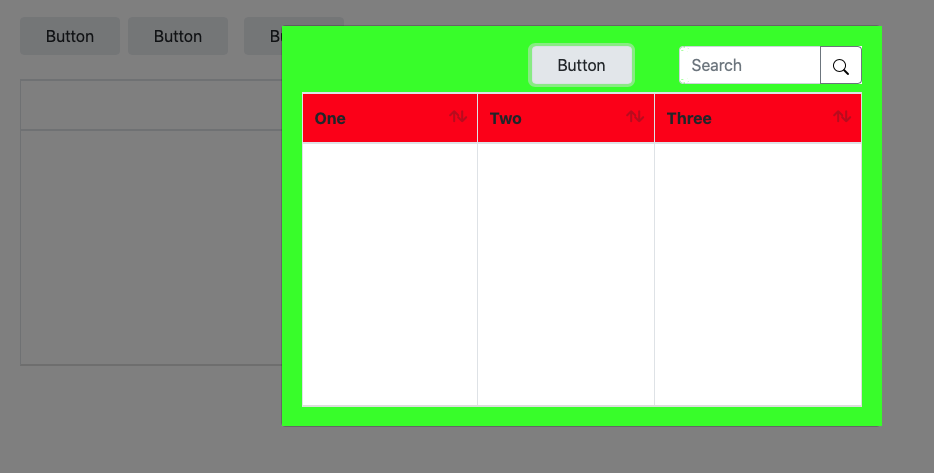
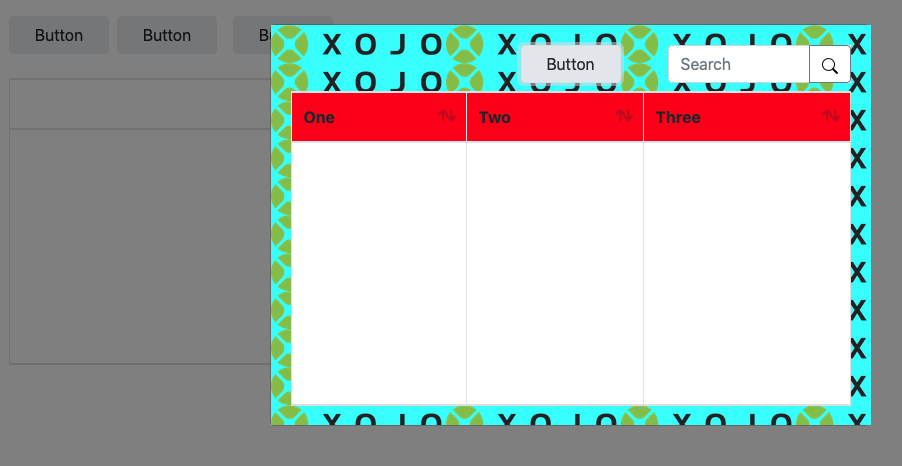
Run the example project and you’ll see how the first ListBox instance (on the WebPage1 page) keeps the header color as transparent (white, because the page background color is white), while the second one displayed by the WebDialog is set to red. Also, the SearchField control displays the loupe icon with a white background color.
Bonus Tip
Once you know the mechanics of how to access the proper ID and set the background on the WebDialog, it is easy to set an image as the background instead of a color. For example, this line of code in the Shown event of the WebDialog1 instance will load the Xojo logo as the background image:
Me.ModalBackgroundImage = "https://www.xojo.com/assets/img/logo.png"
ModalBackgroundImage is another method added to the WebTools module using the following signature:
- Method Name:
ModalBackgroundImage Parameters:Extends v as WebDialog, Assigns url As String
Add the following associated code:
Var s As String = "document.getElementById('" + _
v.ControlID + "_body').style.backgroundImage=""url('"+url+"')"";"

v.ExecuteJavascript(s)
Now that you have the basics down, you can go even further and set other background attributes such as not repeating the image, setting the image size and more.
Questions? Ask me on Twitter @XojoES or on the Xojo Forum.