
Xojo and Database Servers
There are many ways to develop with Xojo and use database servers. You might be working on a multi-user desktop application that stores data in a database. Or you’re creating a multi-user Xojo Web application that needed to be scaled up to a couple of running instances – and use a database for data storage. Or maybe you’ve written a mobile application that connects to a Backend REST API – again possibly written in Xojo (e.g. with the open source Express, or with Xojo Web).
As a Developer
When working on such projects, you’re facing quite some challenges with the various database servers available.
- You need to have a local development environment running the database server(s).
- You want to test your application against a newer version of a database server.
- A customer reports an issue occurring with a database server version that you don’t have installed.
Developer Machine
I like to have a development machine that’s as cleaned up as possible. So I don’t like the idea of installing various servers just for some tests. It’s so tedious to clean up, update to other versions, and remove all remnants of an installation when no longer required. And I don’t want to have various services running on my machine that I don’t need all the time, as they’re just eating precious memory and slowing down the machine.
Wouldn’t it be cool if there was an easy way to spin up various database servers when needed without all the hassle? Well there is – let’s have a look at Docker and Docker Compose.
Docker Compose and Database Servers
With Docker, it’s a breeze to develop with and for various database servers.
What is Docker?
If you haven’t heard of Docker, go ahead and read their excellent Documentation: Docker – Overview. Or read my previous Guest Blog Post: Running Xojo Web Applications in Docker. I’m just going to repeat and quote some basics from the Overview to get a very brief introduction:
Docker is an open platform for developing, shipping, and running applications. It provides the ability to package and run an application in a loosely isolated environment called a container. The isolation and security allow you to run many containers simultaneously on a given host. Containers are lightweight and contain everything needed to run the application, so you do not need to rely on what is currently installed on the host.
A Docker Container is a runnable instance of an image. You can create, start, stop, move, or delete a container. By default, a container is relatively well-isolated from other containers and its host machine. You can control how isolated a container’s network, storage, or other underlying subsystems are from other containers or from the host machine. A container is defined by its image as well as any configuration options you provide to it when you create or start it.
Docker Compose is a tool for defining and running multi-container applications. It is the key to unlocking a streamlined and efficient development and deployment experience. Compose simplifies the control of your entire application stack, making it easy to manage services, networks, and volumes in a single, comprehensible YAML configuration file. Then, with a single command, you create and start all the services from your configuration file.
Docker Compose for Database Server and Administration
This sounds great. Just write a YAML configuration file, and run a database server on the host (meaning: your developer machine). And be able to start, stop, delete at any time – without messing with Preferences, Launch Daemons.
But why Docker Compose for “multi container applications”? Well, the database server is one part: one application, one running docker container. And as a developer you most likely want to have some database administration tool running, too – which again is running as an own isolated container. And in order to have both available with a single command (or by simply pressing “run” or “stop”) we’re going to “compose” these two parts so that they fit and work together.
How to Run a Database Server and Administration Tool with Docker Compose
Let’s do that and install and configure three database servers which we then can use to develop an application in Xojo to connect to:
- PostgreSQL & pgAdmin
- cubeSQL & cubeSQL Web Admin
- MariaDB & phpMyAdmin
Note: All the following configuration files are available on GitHub: jo-tools/docker.
Requirements
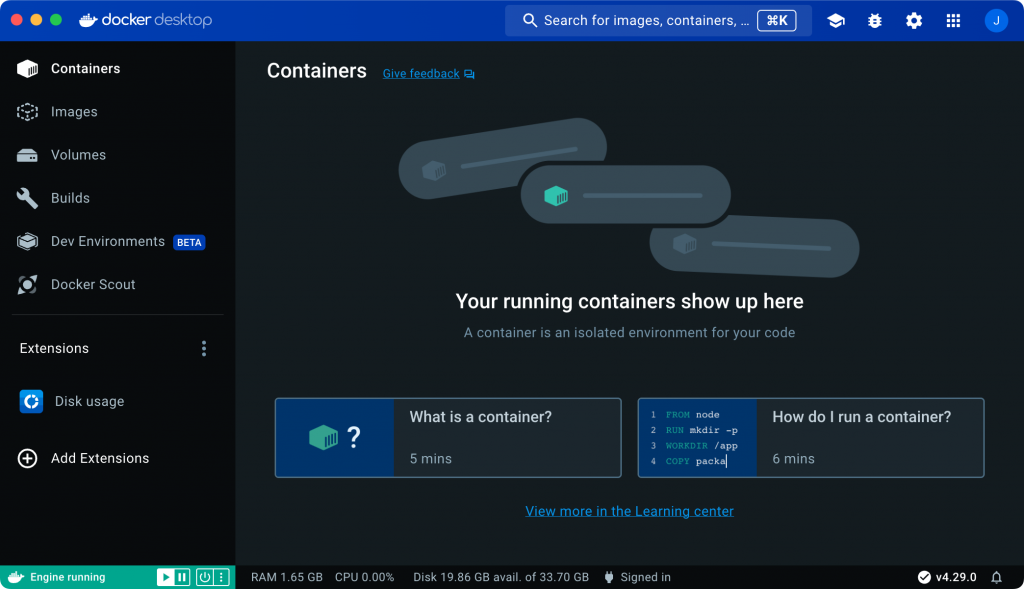
Obviously we need to have Docker installed. And since we’re talking about being a Developer and doing this on our own development machine we’re going to install Docker Desktop. With Docker Desktop you can later easily start, stop and delete the Containers we’re going to create. When it’s empty (no containers installed), it looks like this:
We’re now ready to get started…! But wait – there is one thing we should talk about before.
Data Storage
Where are the database servers going to store their data(bases)?
If you want to know all the details, head over to the Docker Documentation: Manage data in Docker. What we need to know is this:
Docker has two options for containers to store files on the host machine, so that the files are persisted even after the container stops: Volumes, and Bind Mounts.
Why is this important to know? Well, let’s assume we create and start a Container “PostgreSQL Server”. Think of that Container as a “virtual machine” or a bag. It can save data in there just fine. But once we delete that container or throw away that bag, then all it’s data is gone, too.
That might well be intended…! For example if you just wish to play with some tool and don’t care to keep the data you’re creating with it. However, if you’d like to easily back up that data, or update a Container from “v.15” to “v.16” and keep the previous data – then that’s when Volumes and Bind Mounts are needed.
Quoted from the docs:
Volumes
Volumes are the preferred mechanism for persisting data generated by and used by Docker containers. They are completely managed by Docker.
Bind Mounts
Data is stored in a directory on the host machine, which is mounted into the container.
Okay – two options, so what’s the difference?
The Bind Mounts are a folder on the host (your developer machine). So you can easily see them, view/edit/backup the data. It might be an option if you need easy access to these files.
The Volumes are the preferred way, since they are managed within Docker. Using Docker Desktop you can view the contents – but it’s not that simple to view/edit files in there as you can’t mount it as a volume or folder on your developer machine. Of course there are some more advanced ways, which I’m not going to explain here. So definitely the best option when you don’t need to work with and open these files with other tools, too. The other reason we don’t need Bind Mounts for our database servers is that we can just use their administration tools to import/export data such as database dumps.
Alright – now let’s start and set up some database servers.
PostgreSQL Server & pgAdmin
Let’s use the example setup with Volumes for Data Storage from here: GitHub: jo-tools/docker – local-postgres-volumes.
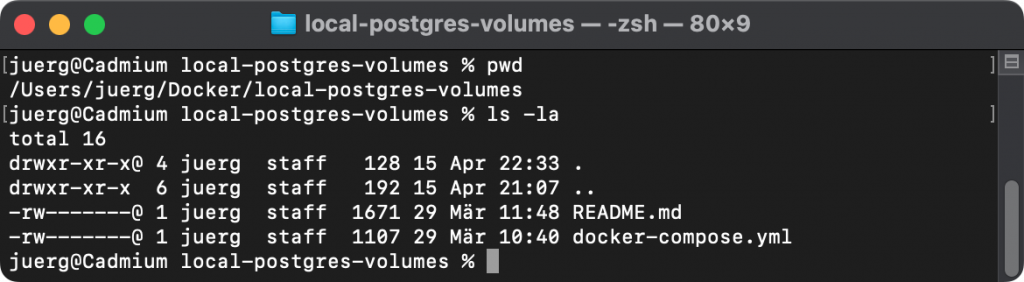
Download the docker-compose.yml file from my GitHub Repository and place it in a folder on your machine.
I’m going to save it in: ~/Docker/local-postgres-volumes
YAML file: docker-compose.yml
A word of precaution when writing and editing YAML files:
- Indentation is done by spaces (not by tabs!)
- Indentation has to be exact (use always 2 spaces), or expect to get syntax errors
Let’s look at the content of this docker-compose.yml.
x-common-timezone: &services-timezone Etc/UTC

name: local_postgresql
services:
  postgres-server:
    container_name: postgresql
    hostname: postgresql
    image: postgres:16-alpine
    volumes:
      - postgresql_data:/var/lib/postgresql/data
    environment:
      TZ: *services-timezone
      PGTZ: *services-timezone
      POSTGRES_PASSWORD: postgres
      POSTGRES_USER: postgres
      POSTGRES_DB: postgres
    networks:
      - local_postgresql_net
    ports:
      - 5432:5432
    restart: unless-stopped

  pgadmin:
    container_name: pgadmin4
    hostname: pgadmin4
    image: dpage/pgadmin4:8
    environment:
      TZ: *services-timezone
      PGADMIN_DEFAULT_EMAIL: admin@postgres.sql
      PGADMIN_DEFAULT_PASSWORD: admin
      PGADMIN_CONFIG_UPGRADE_CHECK_ENABLED: "False"
      PGADMIN_CONFIG_SERVER_MODE: "False"
      PGADMIN_CONFIG_MASTER_PASSWORD_REQUIRED: "False"
    networks:
      - local_postgresql_net
    volumes:
      - pgadmin4_data:/var/lib/pgadmin
    ports:
      - 5433:80
    restart: unless-stopped
    depends_on:
      - postgres-server

volumes:
  postgresql_data:
    driver: local
    name: postgresql_data
  pgadmin4_data:
    driver: local
    name: pgadmin4_data

networks:
  local_postgresql_net:
    name: local_postgresql
In the first hierarchy there are:
• x-common-timezone: &services-timezone Etc/UTC
In this extension we define a scalar value for the timezone, which will be used for the environment variables in both services. The template uses UTC (which is also the default for Docker). You can change it to your timezone, e.g.: Europe/Zurich. This might be desired if you’re going to select the current date/time from the database server later.
• name: local_postgresql
That’s the name of this “setup”. We’ll later see this in Docker Desktop’s Containers. There we can also start/stop/delete this setup at any time.
• services:
There are two services in this setup: postgres-server and pgadmin
• volumes:
And two volumes: one for the database server, and one for the administration tool.
• networks:
Both these two containers will be in the same network.
When we look at the two services postgres-server and pgadmin4:
• container_name:
The name of the Container. We’ll later see this as a sub-element of this docker-compose setup named local_postgresql
• hostname:
Think of a container as a virtual machine. Every one has its hostname. And the two containers in this setup we have placed in the same network. So they can talk to each other via hostname.
•image:
That’s basically the content of the container. We’re going to install:
• postgres:16-alpine
PostgreSQL Server in Version 16.x, running on Linux Alpine (a very lightweight one).
• dpage/pgadmin4:8
pgAdmin 4 in Version 8.x as the administration tool.
• environment:
Here the environment variables of the containers are being defined. TZ defines the Timezone, and uses the value we have defined in the extension on the very top. The other Environment Variables contain the defaults and standards – here used when the containers are being started the first time to define the default logins, users and passwords. Our PostgreSQL server will have a default login with both username and password: postgres. pgAdmin we have configured to auto-login without authentication required, and disabled update checks.
• networks:
Remember – both in the same one (defined below)
• volumes:
The format here is: volume_name:/mount/in/folder
We’re going to see these volumes later in Docker Desktop. They’ll contain the data. Usually the documentation of the Docker Images explain which folders are being used to save data, so they can be mounted here to either a Volume (or a Bind Mount).
• ports:
The format here is: host-port:container-port
For PostgreSQL Server we’re using 5432:5432, meaning that we can connect on our developer machine to Port 5432 (and this will be forwarded to the container running PostgreSQL Server, listening on Port 5432 inside the Container). pgAdmin is running on Port 80 within the Container, but we connect to it from our developer machine via Port 5433.
• restart: unless-stopped
This basically means: if you have this setup running and reboot your host (developer machine), then this setup gets restarted automatically. If you’re going to stop this setup (because you don’t need it at the time), then it’ll be stopped after a reboot, too.
Start Docker Compose Setup
As we can’t use Docker Desktop to start a Docker Compose setup (maybe this feature will be added in the future) we have to use Terminal. Change Directory to where the docker-compose.yml file is and type: docker-compose up -d
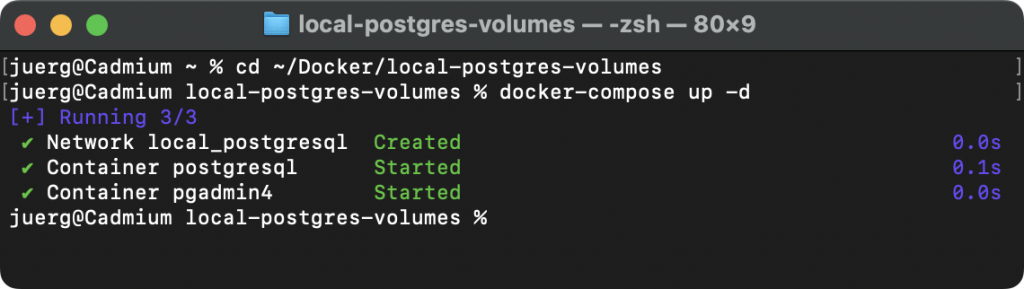
The referenced Images will be pulled, the defined network created and the Containers started.
Open the Dashboard in Docker Desktop and look at the Containers – you’ll find our setup named local_postgresql with the two Containers postgresql and pgadmin4:
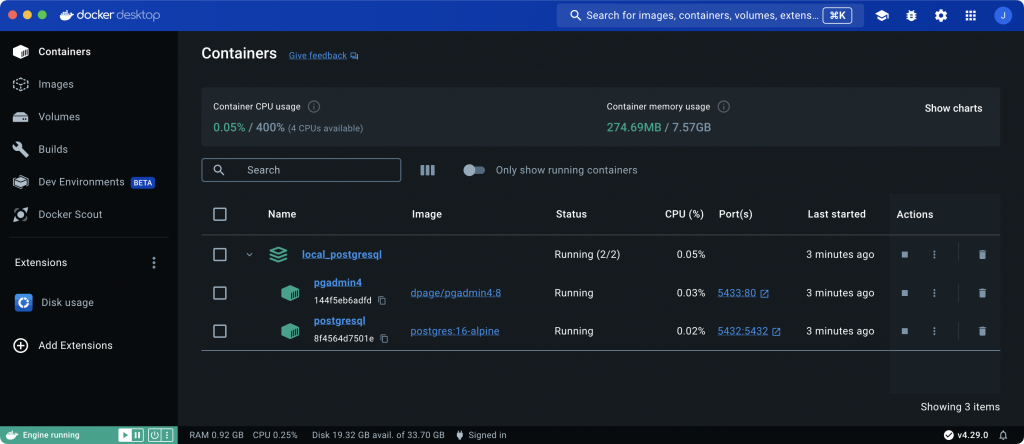
They are currently up and running.
If you want to stop this setup simply press the button under “Actions”. It then will be stopped even after a reboot. And should you need to run the setup again later, just hit the button “Run” here.
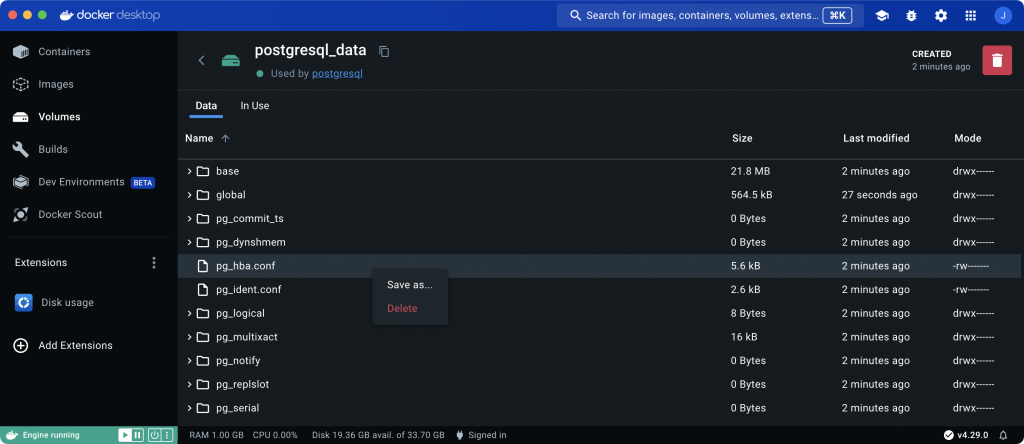
Under Volumes we see the created ones:
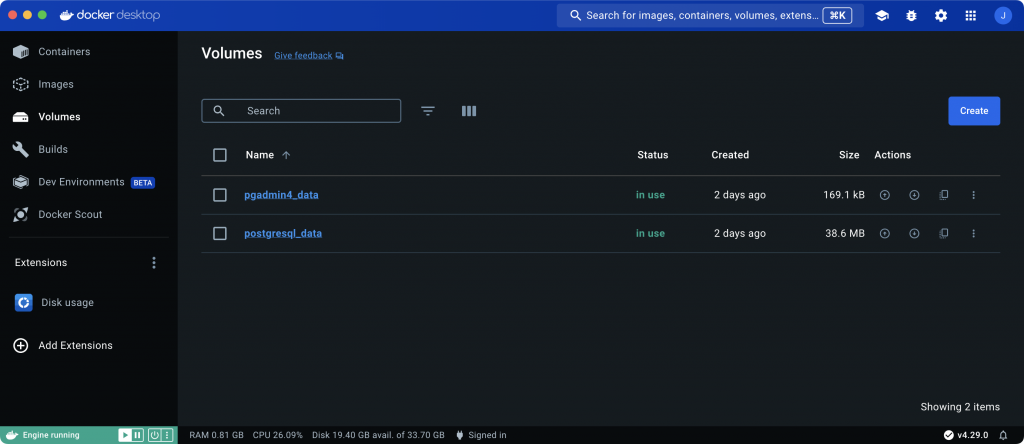
You can click on one to see it’s contents – here the data of postgresql:
Connect With PGADMIN4
Either switch again to “Containers” and click the link “5433:80” in the column “Port” of the Container “pgadmin4” in Docker Desktop, or open a browser and go to
http://localhost:5433.
Since this is the first launch of pgAdmin4 we need to add a server – I have given it the name “Docker”:
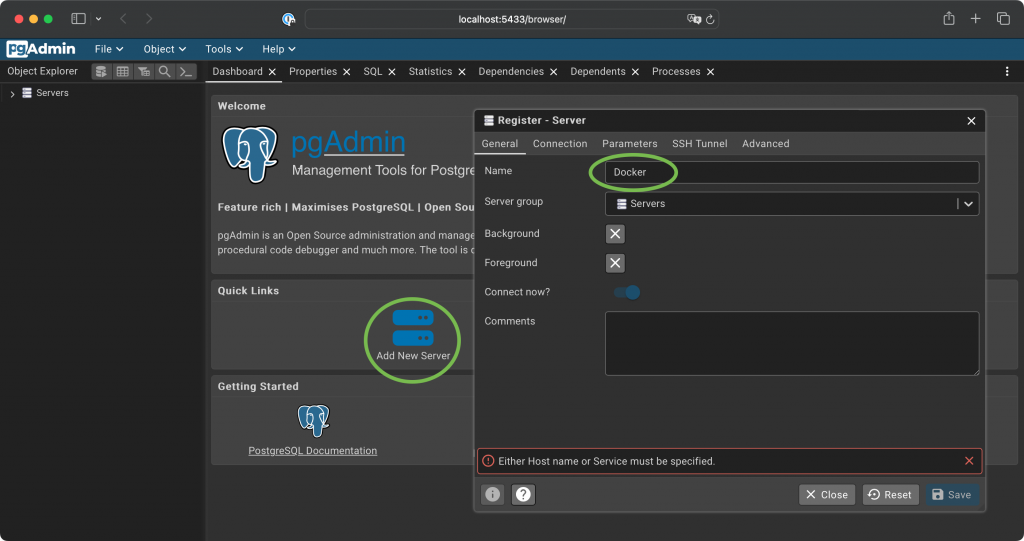
In the register “Connection” we have to enter the connection data:
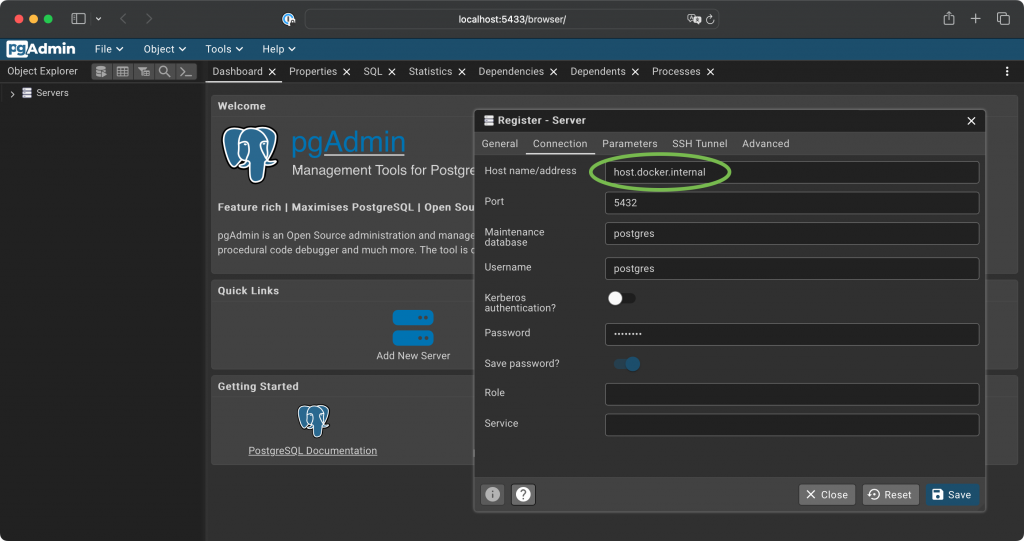
Username and password are the default ones (remember the environment variables?). And for this local developer setup I have chosen to save the password.
The most interesting part is the hostname.
- You can’t use localhost here!
The reason is simple: pgAdmin is running in a Container (think of it again as a virtual machine), so it’s “localhost” is the Container running pgadmin4. Not your developer machine, and not the Container where postgres is running. - I have entered:
host.docker.internal
This is explained in the Docker Documentation: networking: The host has a changing IP address, or none if you have no network access. We recommend that you connect to the special DNS name host.docker.internal, which resolves to the internal IP address used by the host. - Another option would be to just use the hostname:
postgresql
And why does this work? Well – we have configured these two containers to be in the same network, and the server is running in the host named “postgresql”.
And here we go: Let’s expand the entries of the just added server “Docker”, click on the main database “postgres” and execute a query: SELECT version();
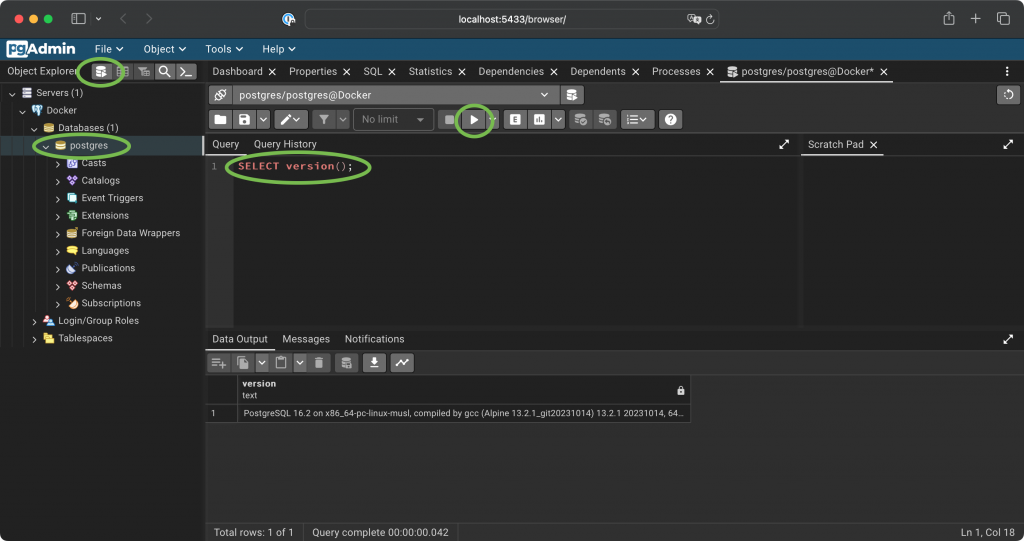
Connect with Xojo
We’re ready to use Xojo now and work on applications using our local PostgreSQL Server.
Let’s connect to our local development server running in Docker. As a simple test I have placed the following code in the Opening event of a Label:
Var db As New PostgreSQLDatabase
db.Host = "localhost"
db.UserName = "postgres"
db.Password = "postgres"
db.Port = 5432

Call db.Connect

Var rs As RowSet = db.SelectSQL("SELECT version();")
Me.Text = rs.Column("version").StringValue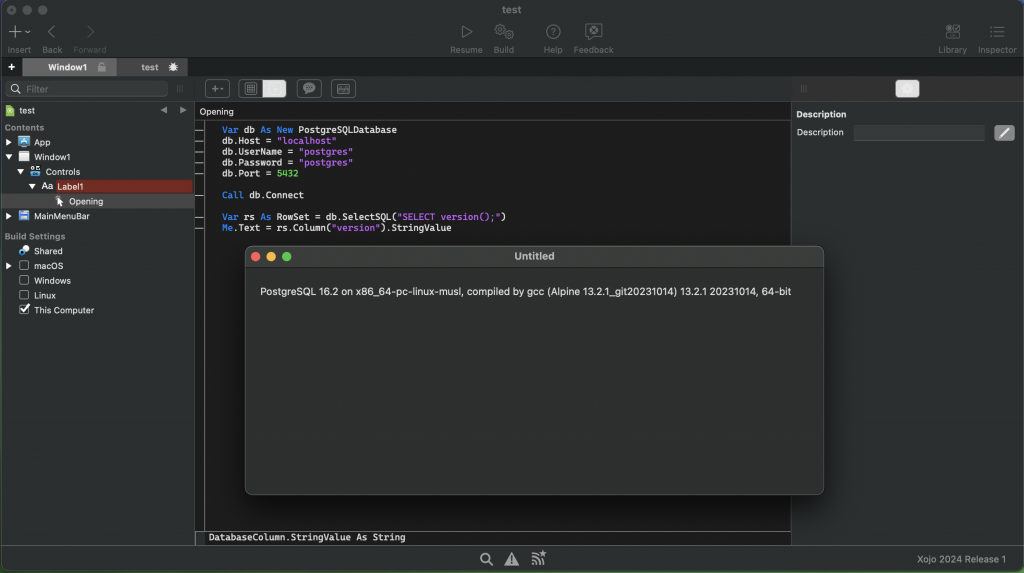
Additional Information
You’ve seen how to easily spin up PostgreSQL with Docker Compose and connect to it with pgAdmin4 and Xojo. What else do we need to know?
Images
You’ll find available Images on Docker Hub. In the above setup we have used postgres and pgAdmin4. If you look at them on Docker Hub you’ll see that they provides many images. One can select them by Tag. The used Tag “postgres:16-alpine” here means that we get the latest version 16 (e.g. 16.2, and some month later maybe 16.3 or 16.4). If for some reason we want to get exactly version 16.1, then we can use the corresponding Tag, e.g. “postgres:16.1-alpine”.
A Setup using Bind Mounts
If you’re going to try the docker-compose.yml with Bind Mounts from here: GitHub: jo-tools/docker – local-postgres-bindmounts, then you’ll notice the difference in the configuration here:
volumes:
  - ./postgresql_data:/var/lib/postgresql/data
You won’t get a Volume in Docker, but instead this will create a folder named postgresql_data in the folder where you’ve placed docker-compose.yml and launched the setup with docker-compose up -d.
Docker Compose Commands
We’ve already mentioned that the first launch of a Docker Compose setup will require Terminal. The following commands are to be executed in the same directory containing the yaml file, too:
docker-compose up -d
This looks for the file docker-compose.yml, pull the images, do all the setup and launch the containers. You can also use this command to restart this setup, should you have stopped it.
docker-compose stop
Stops all services in this setup. Or do it using the buttons in Register “Containers” in Docker Desktop.
docker-compose down -v
This removes all services and volumes from this setup. Use this to get rid of all Containers, Volumes AND data. Haven’t we mentioned that – it’s super easy to clean up 😉
You could also click the Delete buttons in Docker Desktop in both “Containers” and “Volumes” (and optionally “Images”).
If you omit the option “-v”, it will leave the Volumes in place. This might be of interest if you intend to keep the data, in case you’re going to spin up this setup again some time later.
docker-compose downdocker-compose pull docker-compose up -d
These 3 commands will first tear down the existing containers (leaving volumes and data in place), then pull the latest versions from Docker Hub and set everything up again. Remember that we have used the Image “postgres:16-alpine”, and currently got PostgreSQL 16.2? Once PostgreSQL 16.3 is available we can execute these commands and get the latest version. Again super easy to update, isn’t it?
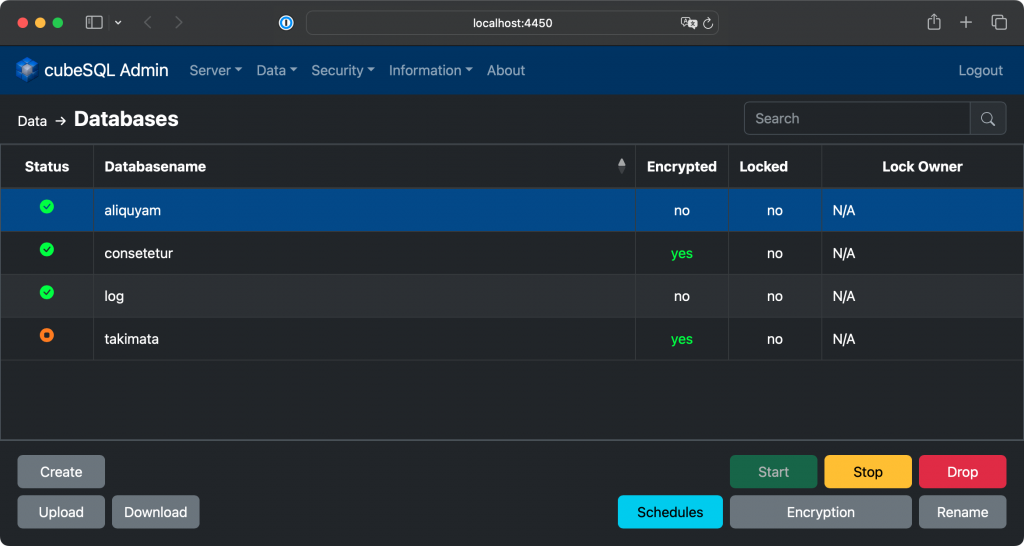
cubeSQL & cubeSQL Web Admin
Another popular database server for Xojo is cubeSQL. It basically adds multi-user handling (including groups, privileges, und much more) on top of SQLite.
cubeSQL is a fully-featured and high-performance relational database management system built on top of the SQLite database engine.
It is the ideal database server for both developers who want to convert a single user database solution to a multi-user project and for companies looking for an affordable, easy to use and easy to maintain database management system.
You’ll find an example setup for Docker Compose here: GitHub: jo-tools/docker – local-cubesql-volumes. To connect with Xojo you need a plugin, which can be downloaded from GitHub: cubesql/cubeSQLAdmin
cubeSQL Web Admin – Written with Xojo Web
cubeSQL has a desktop application for administration, which you’ll find in the above GitHub Repository, too. As you can guess a desktop based application is not quite convenient when it comes to an easy docker compose setup.
While I’m using Xojo for desktop and console applications for quite some time, I’ve never really used Xojo Web before. That’s why I took this opportunity and gave it a try. And behold – in very short time (most functionality in just a weekend’s leisure time) I’ve written “Xojo Web Admin“. It’s been a pleasure to create something more than just some simple examples – I like the idea of creating something useful even while learning something new. And I’ll be honest – I’ve found a couple of bugs in Xojo’s Web Framework while writing cubeSQL Web Admin, but most of them are already fixed and implemented for the next Xojo version. And finishing and polishing the project to make it available to the public also took an additional couple of evenings.
cubeSQL Web Admin is Open Source – so go ahead and have a look at the source (or even better: contribute to it by adding more features, find bugs and fix them). There might be some things of interest, such as:
- How to use Xojo Web to build an app that runs in a Docker container.
See also this Guest Blog Post: Running Xojo Web Applications in Docker
- A new feature added while developing GitHub: cubeSQL Web Admin: The Post Build Script builds a “Multi Architecture” Docker Image (
linux/amd64&linux/arm64v8) by building the Xojo Web App for BuildTargets Linux x86 64-bit and Linux ARM 64-bit. This allows to support running the Docker Image natively on Macs with both Intel and Apple processors.
- A new feature added while developing GitHub: cubeSQL Web Admin: The Post Build Script builds a “Multi Architecture” Docker Image (
- How to use Launch Arguments and Environment Variables for configuration. This allowed us to configure the Environment Variables in our Docker setup to preconfigure the connection data.
- The approach with subclassed WebContainer’s that implement the WebDataSource Interface. The quite generic base class cntDatasourceBase can be configured to:
- be searchable (Main Window shows/hides the WebSearchField if the subclassed Container defines to (not) be searchable).
- define which Fields of a RowSet should be displayed (cubeSQL uses special custom commands for administration, so we can’t select distinct columns ourselves, and there’s no paging within these custom commands).
- define virtual Fields, which will be shown in the WebListbox, but aren’t part of a RowSet. Internally the base class uses a Dictionary Array which gets built from the RowSet, so one could use it with other external DataSources, too.
- show the Fields in the WebListBox, while allowing each Container to override the default behaviour (see for example the Databases, which use a WebListboxImageRenderer for a virtual field – depending on a couple of Columns in the RowSet an appropriate Status Icon is being displayed).
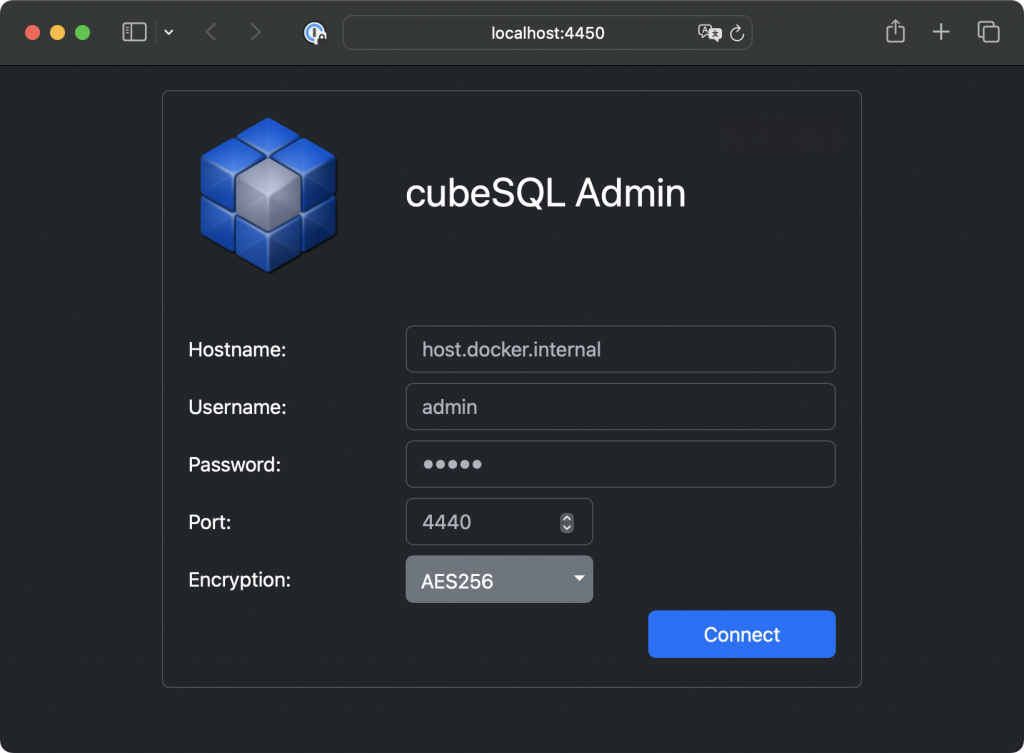
To connect to this cubeSQL setup with Xojo I have placed the following code in the Opening event of a Label:
Var db As New CubeSQLServer
db.Host = "localhost"
db.UserName = "admin"
db.Password = "admin"
db.Port = 4430

Call db.Connect

Var rs As RowSet = db.SelectSQL("SHOW INFO FOR KEY server_version")
Me.Text = rs.Column("value").StringValue
MariaDB & phpMyAdmin
MariaDB Server is a high performing open source relational database, forked from MySQL.
You’ll find an example setup for Docker Compose here: GitHub: jo-tools/docker – local-mariadb-volumes.
I’m not going to explain much more here about MariaDB (MySQL) or phpMyAdmin here – I think you should figure out easily how to launch the Administration tool and connect to the server when looking at the contents of this docker-compose.yml. But, since it’s a widely used and well-known database server, I wanted to provide a setup for this combo, too.
As a simple test for this setup I have placed the following code in the Opening event of a Label:
Var db As New MySQLCommunityServer
db.Host = "127.0.0.1"
db.UserName = "root"
db.Password = "mariadb"
db.Port = 3306

Call db.Connect

Var rs As RowSet = db.SelectSQL("SELECT version() AS version;")
Me.Text = rs.Column("version").StringValue
For some reason the connection needs an IP Address or a Hostname (and doesn’t work with localhost).
A Word of Caution
The above setups are only intended as a local test setup – don’t use them like this for production. Even on a local developer machine you shouldn’t run the services with these simple initial login credentials, so go ahead and change them.
The purpose is to explain how Docker Compose works, and how it can help developers to easily setup up local environments to work on database applications. And of course these examples might well be a head start to those that haven’t used Docker before.
That’s All Folks!
I hope this brief introduction of how to use Docker and Database servers for and with Xojo has been helpful to some, food for thought to others.
Jürg Otter is a long term user of Xojo and working for CM Informatik AG. Their Application CMI LehrerOffice is a Xojo Design Award Winner 2018. In his leisure time Jürg provides some bits and pieces for Xojo Developers.