
In the previous article, we saw how signing a macOS app is more than just handling certificates. Other factors come into play based on the distribution method you choose and the features it will offer.
Now, that we already know all the pieces involved in this particular puzzle (certificates, sandboxing, notarization, hardened runtime, etc.), the question to answer is…
What kind of macOS code signing do you want to do today?
Apple developer certificates installed on your Mac determine the kind of code signing and, thus, the distribution options available for your macOS app. They can also support certain macOS security requirements that distribution methods or features may impose, such as entitlements or provisioning profiles.
This diagram can help determine these based on the certificate used when signing the app, so you can get a better idea:
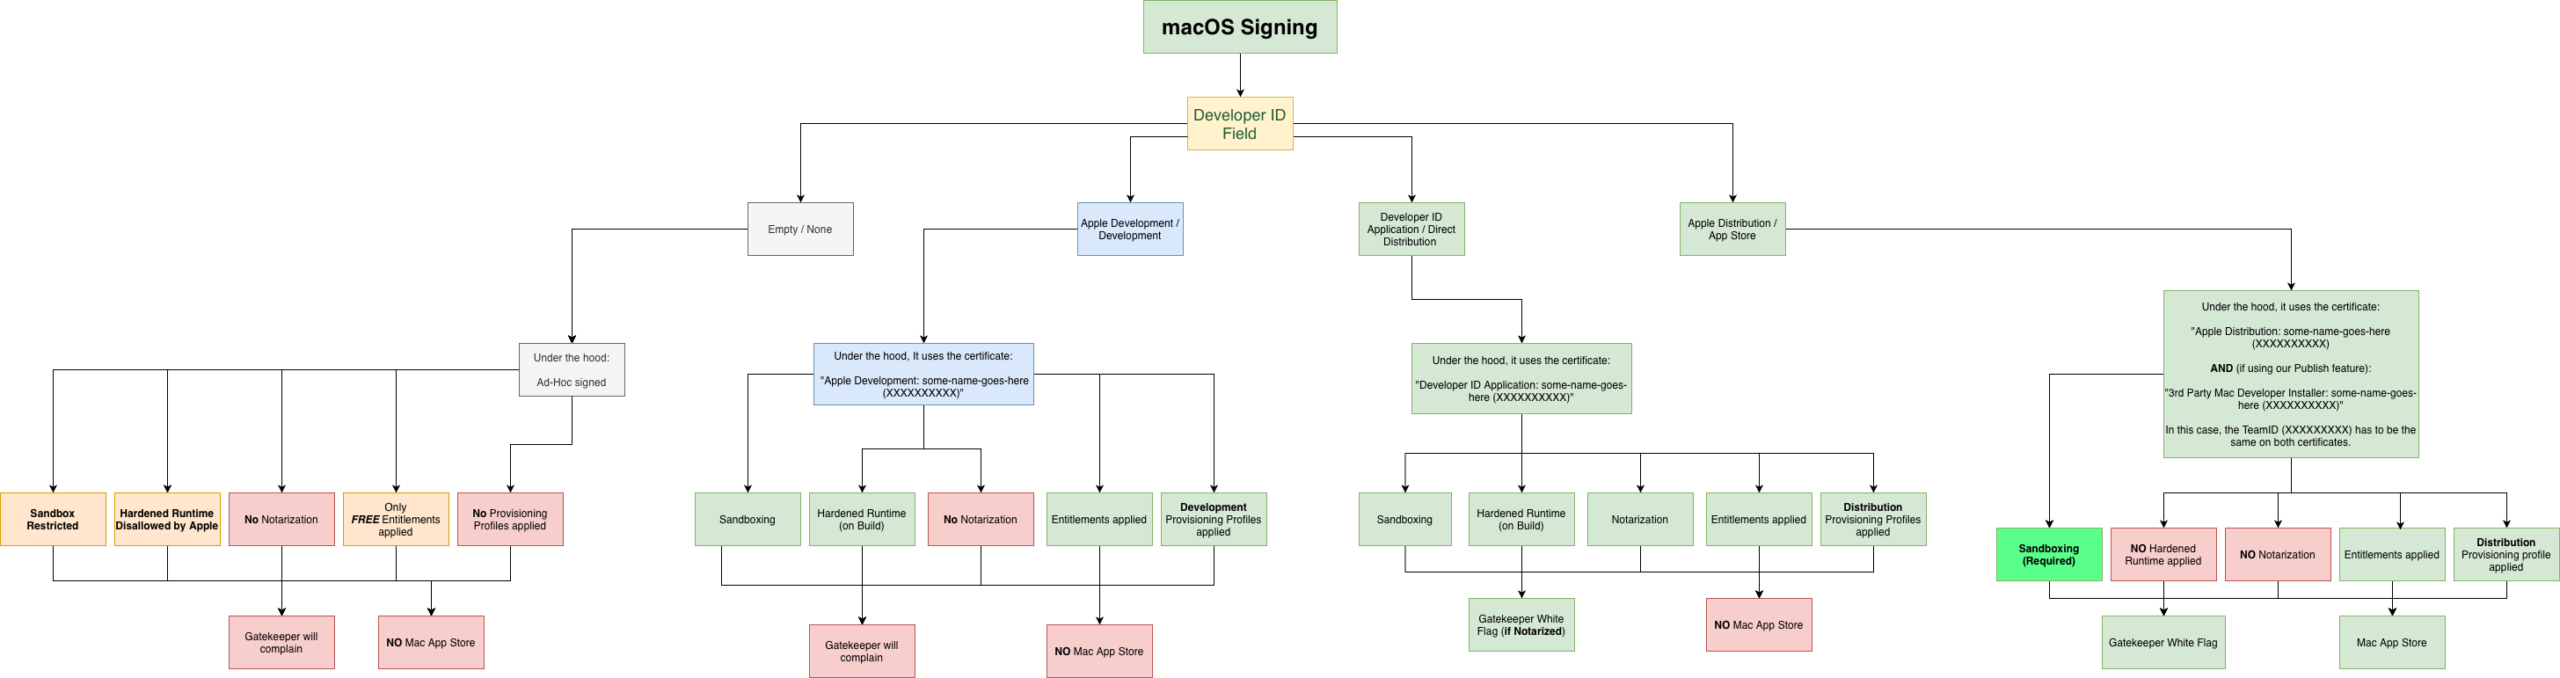
As a practical summary:
- Ad-Hoc signing / None: This option makes sense primarily when you’re developing and running or debugging the app on your Mac or on the same computer, since it typically doesn’t require special entitlements or provisioning profiles.
- Apple Developer / Development. Using this certificate enables sandboxing, hardened runtime, entitlements and provisioning profiles even when debugging from the IDE or testing the build on your own computer. It offers a better experience, but you won’t be able to notarize it or bypass the Gatekeeper barrier if distributed to other users.
- Developer ID Application / Direct Distribution. With this certificate, you can notarize your app so Gatekeeper won’t block distribution outside the Mac App Store. When debugging from the IDE, entitlements and provisioning profiles (if needed) are applied as well, along with optional sandboxing.
- Apple Distribution / App Store. Use this certificate when the app has been tested and it is ready to be sent to App Store Connect… or even when you’re planning to send it to the App Store Connect so a group of beta-testers can test it using Apple’s TestFlight.
How the Xojo IDE helps with all of this?
We have been adding features to the Xojo IDE to make code signing and distributing your macOS apps an easier and leaner process; most of these are available under Build Settings > macOS > Sign:
Developer ID – Build For
This is the most recent addition to better deal with the first, and most important, piece of the puzzle: handling certificates! Instead of having to go back and forth between the Keychain Access and the Xojo IDE to copy/paste the expected data from the certificates for the kind of build or distribution you plan for the app, you can now find under the Developer ID field all the available Developer Teams (usually just yours) and, when a Developer Team is selected, the “Build For” popup menu will be populated with the available options for builds/distributions based on the installed developer certificates for that team.
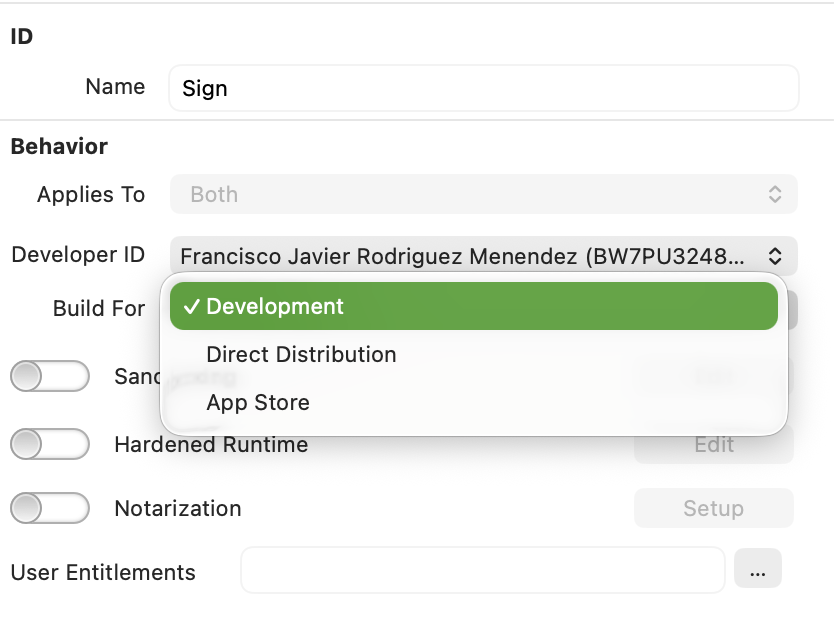
When all the Apple developer certificates are properly installed for a given Developer Team, the available options will be: Development, Direct Distribution and App Store (plus None, meaning Ad-Hoc signing).
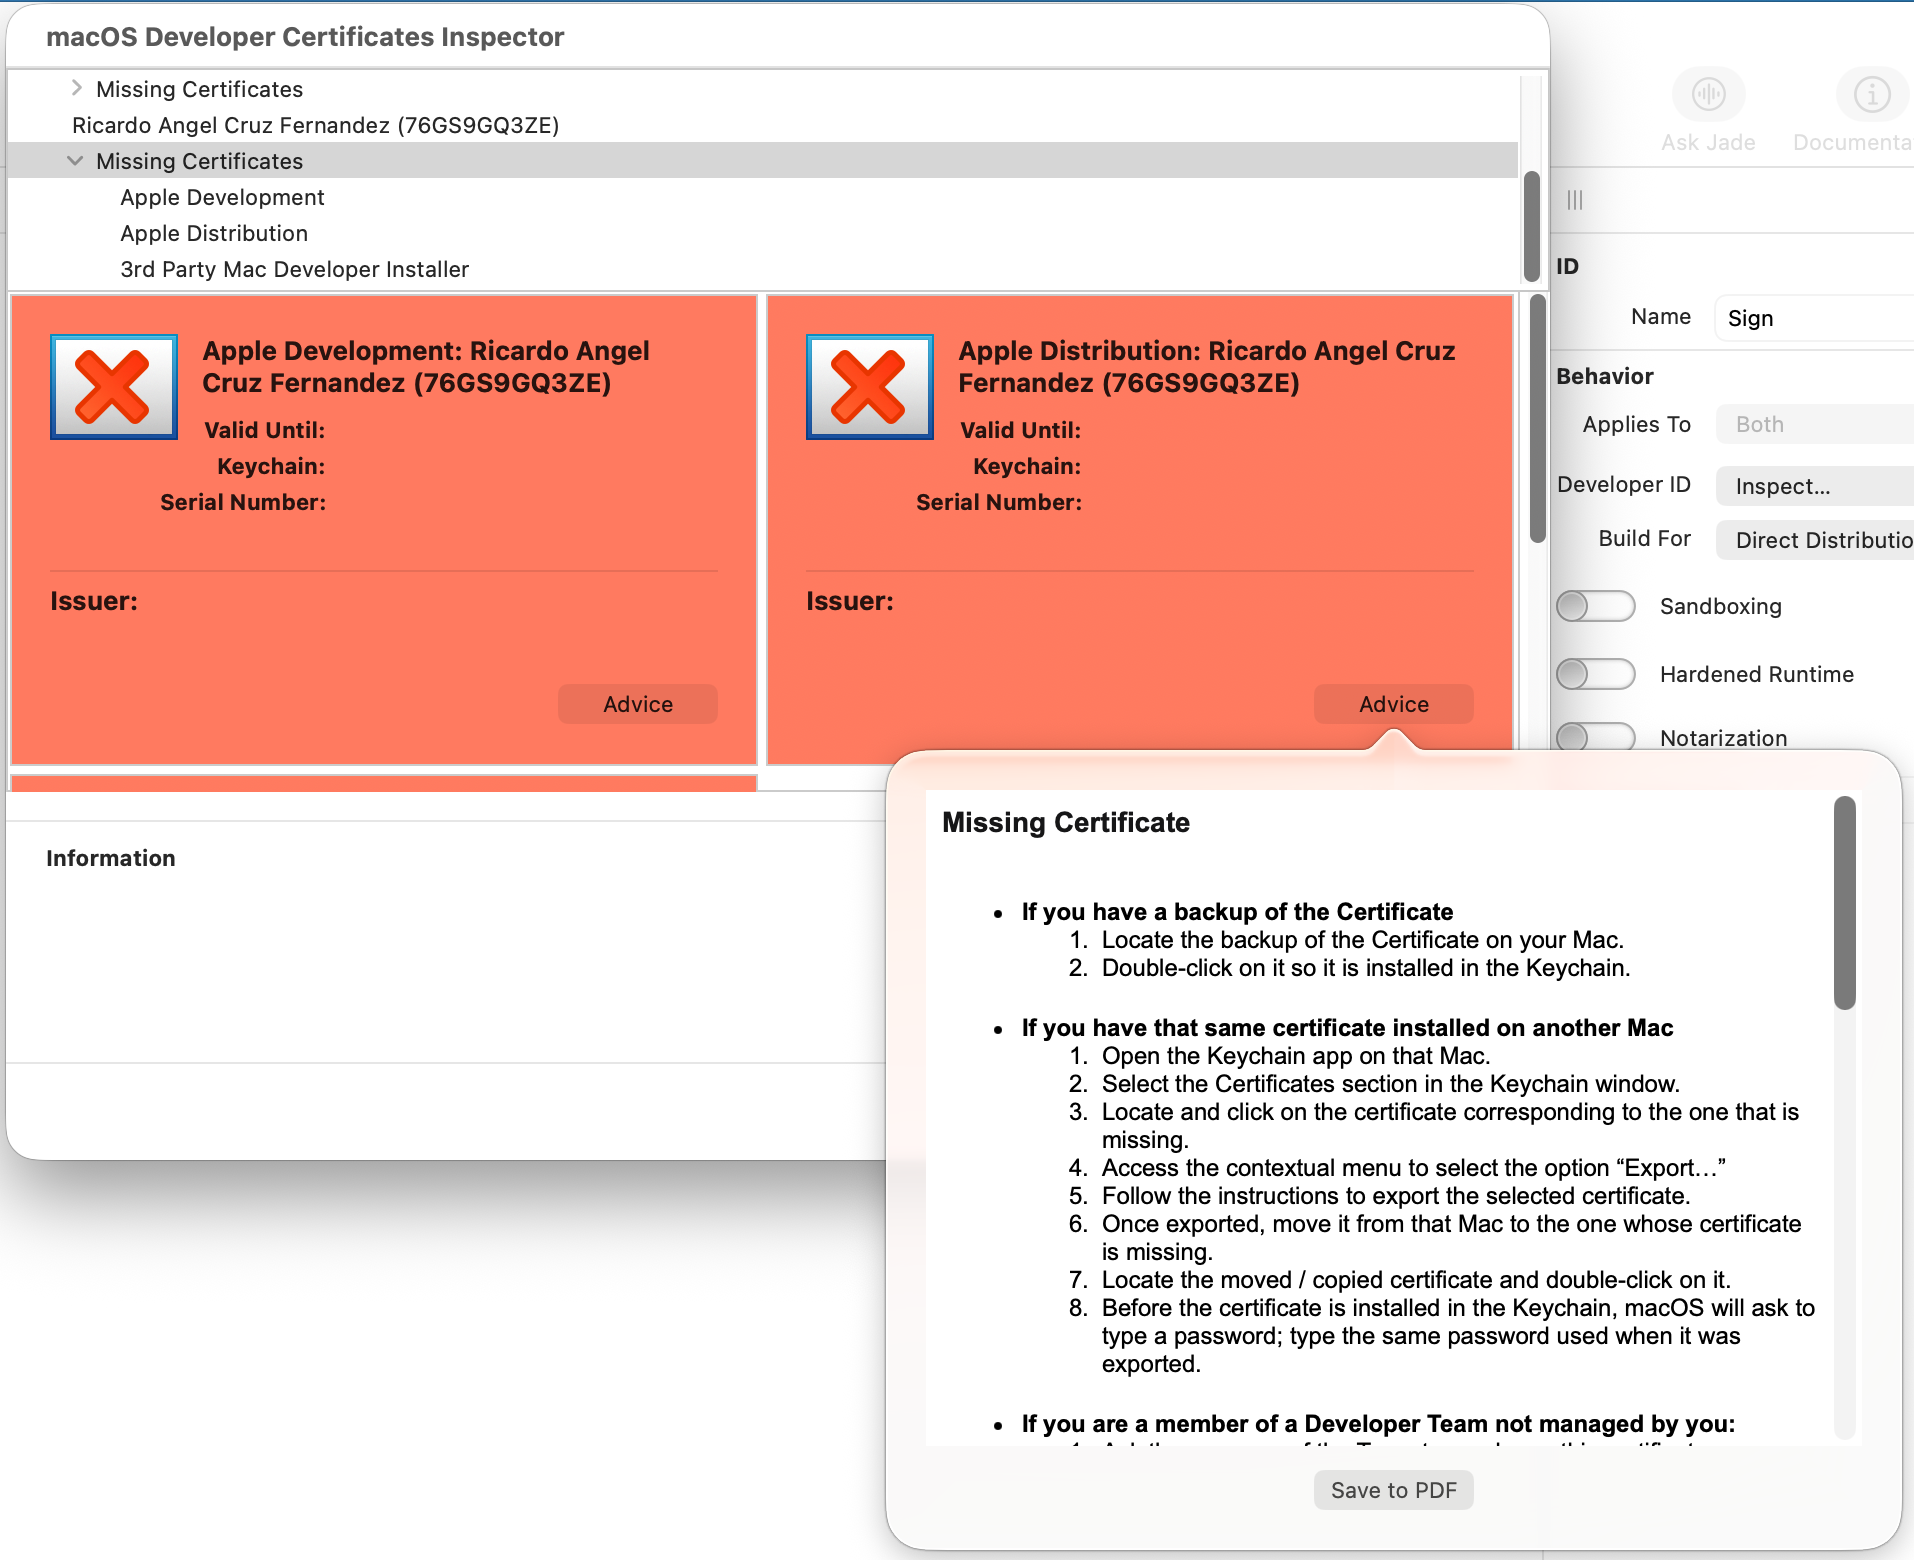
If you find that some of these options are missing from the “Build For” popup menu, that means the corresponding certificate is not installed or there is some kind of issue with that certificate (maybe it has expired or has its private key missing). In those cases, we included the “Inspect…” option under the “Developer ID” popup menu. Selecting Inspect lets you gain a better picture about everything related to your Apple developer certificates and even get advice about how to fix the most common issues.
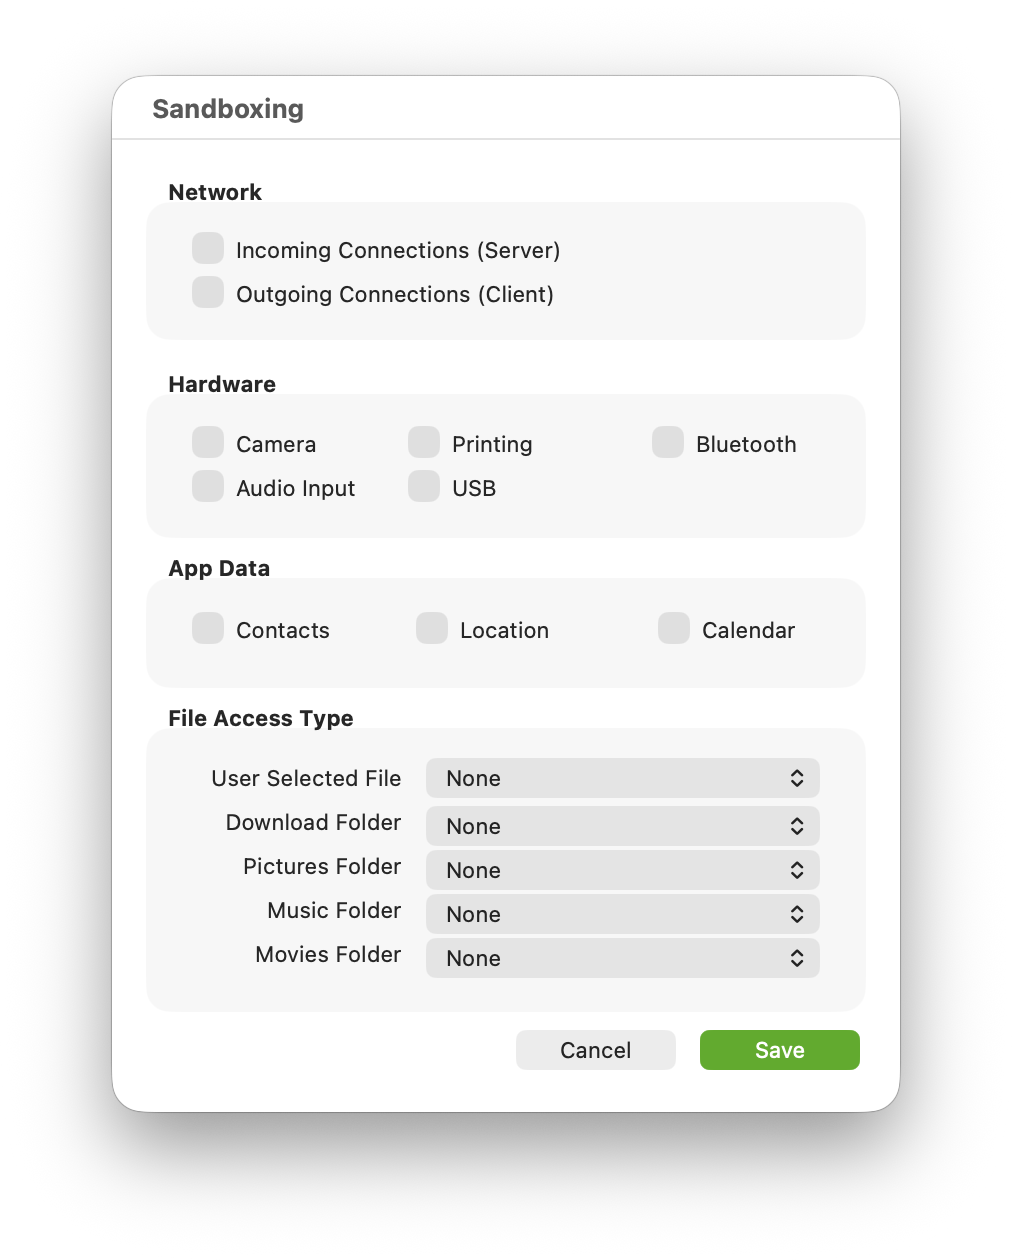
Sandboxing
Enable this feature if you plan to debug, build, or distribute your app as a sandboxed app. In that case, the associated editor will make it even easier to enable the sandboxing features that may apply to your particular app. The IDE will take care of all the rest. Note that, while sandboxing was previously only applied to built/distributed macOS apps in previous Xojo releases, starting with Xojo 2026r1 it is also applied when the app is being debugged from the IDE.
Hardened Runtime
Enable this option mainly for apps meant to be built and/or distributed using Direct Distribution or the App Store options. While this is optional when distributing it via the Mac App Store, it is still highly recommended to enable it for that scenario.
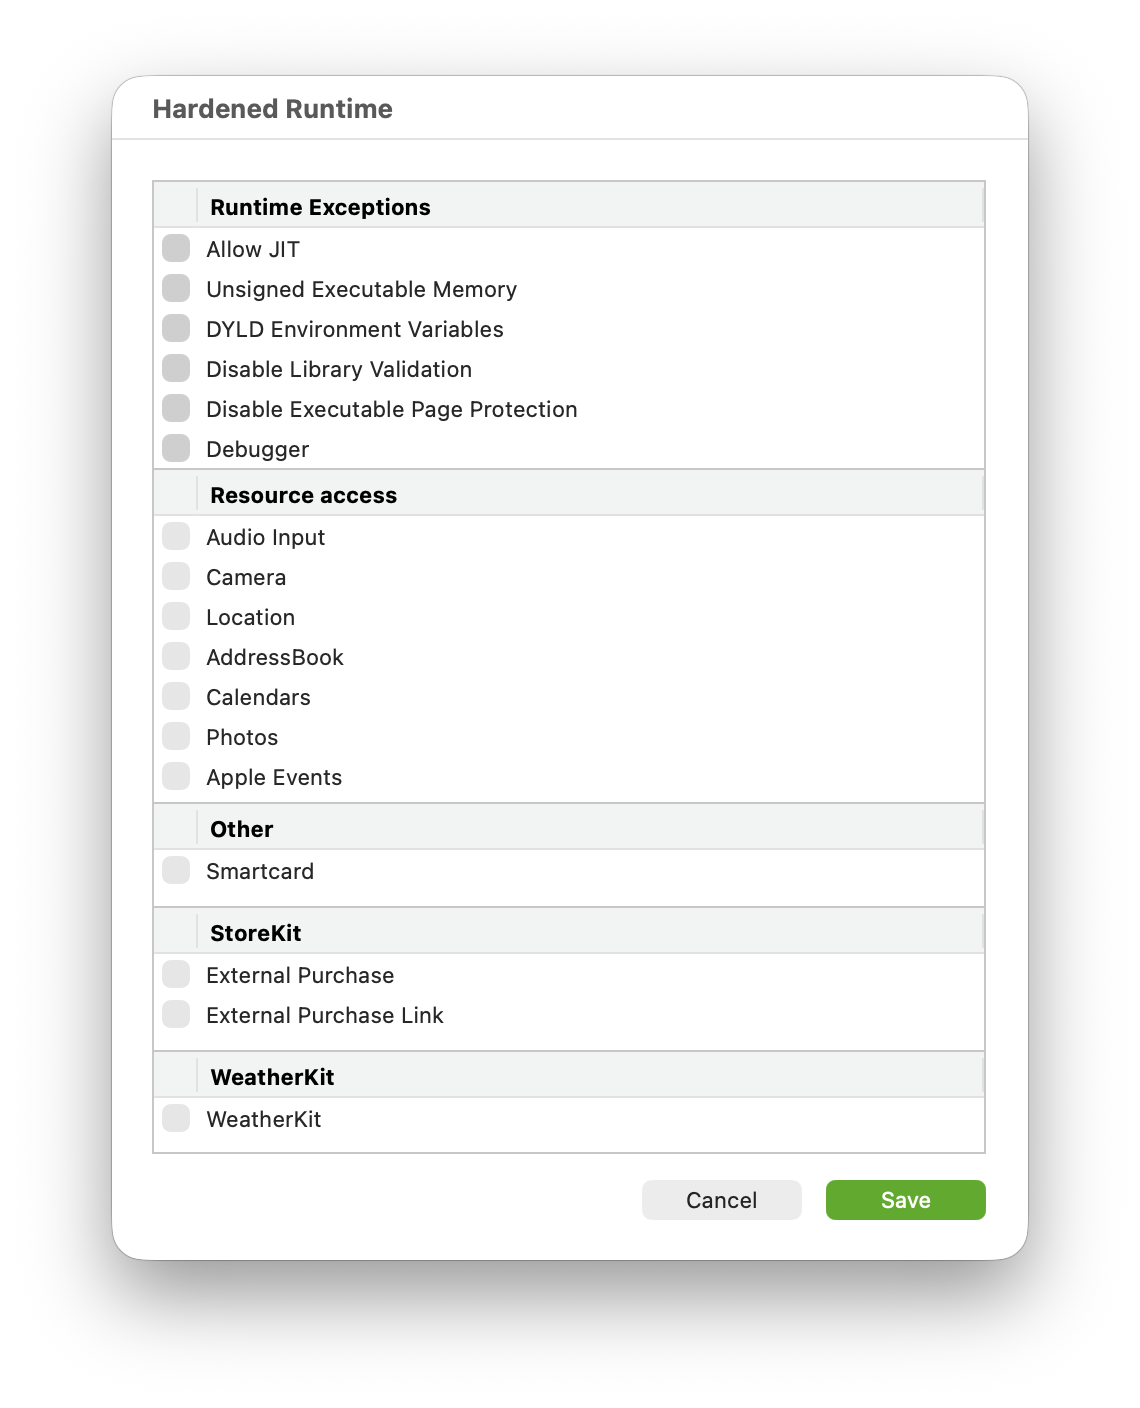
When the app is debugged from the IDE, the hardened runtime won’t be applied even if it is enabled… mainly so you can debug it!
As with sandboxing, the hardened runtime option also includes its own editor to make your app-specific selections easier. The IDE will take care of the under the hood processing when the app is built.
Notarization
If you haven’t started notarizing your macOS apps yet, now is the time! This will be possible only with the Direct Distribution option (equivalent to the Developer ID Application Certificate) and implies enabling hardened runtime. When you enable notarization, the associated hardened runtime will be enabled for you, even if you don’t select additional option from its editor.
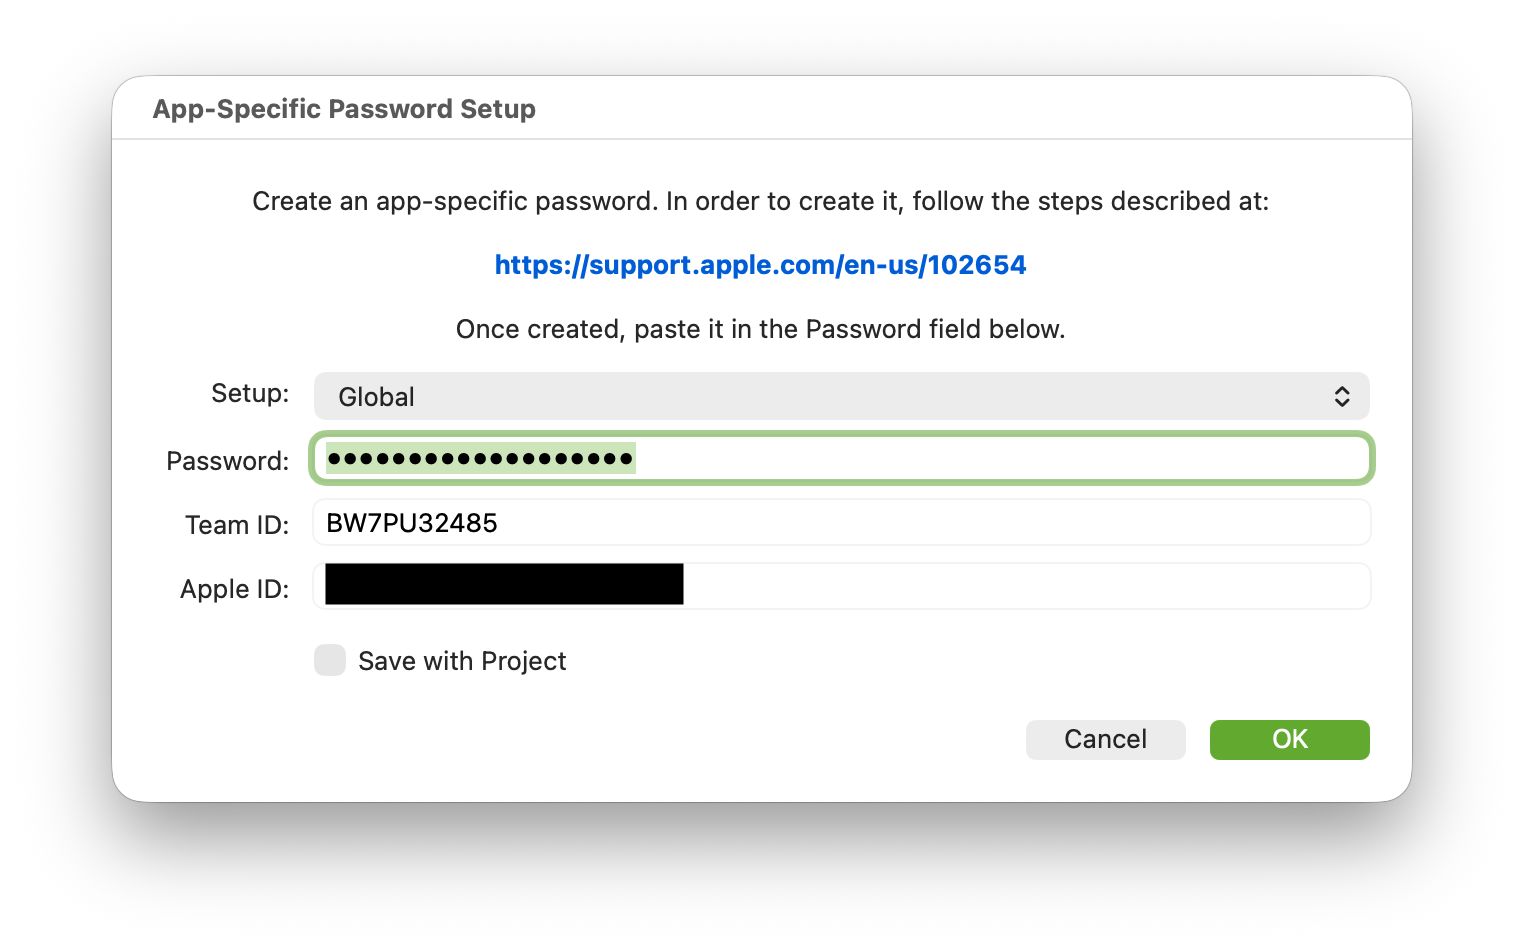
Notarization requires the use of what Apple calls an App-Specific Password, which you can set up by following the steps found in the window that appears when the associated Setup button is clicked.
Once everything has been setup, the notarization process will happen the next time the app is built. Note, the notarization process will not take place when the app is debugged from the IDE (as with hardened runtime); you don’t need to specifically disable that option.
Entitlements
The combination of certain certificates, build, and distribution options you choose for your app may require you to set a series of entitlements; for example, when enabling sandboxing and/or hardened runtime. Additionally, with Xojo 2026r1 it is possible to attach your built or debugged apps to Xcode Instruments for further inspections beyond the current capabilities of Xojo’s debugger.

In all of the above scenarios, Xojo will take care of the required entitlements without you needing to notice it; but if your app also makes use of some features that require adding extra entitlements (and probably a matching provisioning profile), as happens with most of the Apple specific services such as iCloud, Keychain, In-App Purchases, etc., you will need to craft the corresponding .plist file for them and add it using the User Entitlements option. These entitlements will be combined with the ones automatically generated by Xojo and included in the app during the code signing process.
Provisioning Profiles
On macOS, provisioning profiles are supported by a Copy Files build step, which requires selecting Contents as the destination folder. Not ideal, but that way you can select what kind of provisioning profile you want to apply to builds or when debugging your project (this is a new feature starting with Xojo 2026r1).
Property List Editor
The ability to add your own property list entries to the compiled/distributed macOS app is enhanced by a complete Property List Editor available under Build Settings > macOS since Xojo 2025. It makes it easier to create these entries and even save them for reuse in other projects.
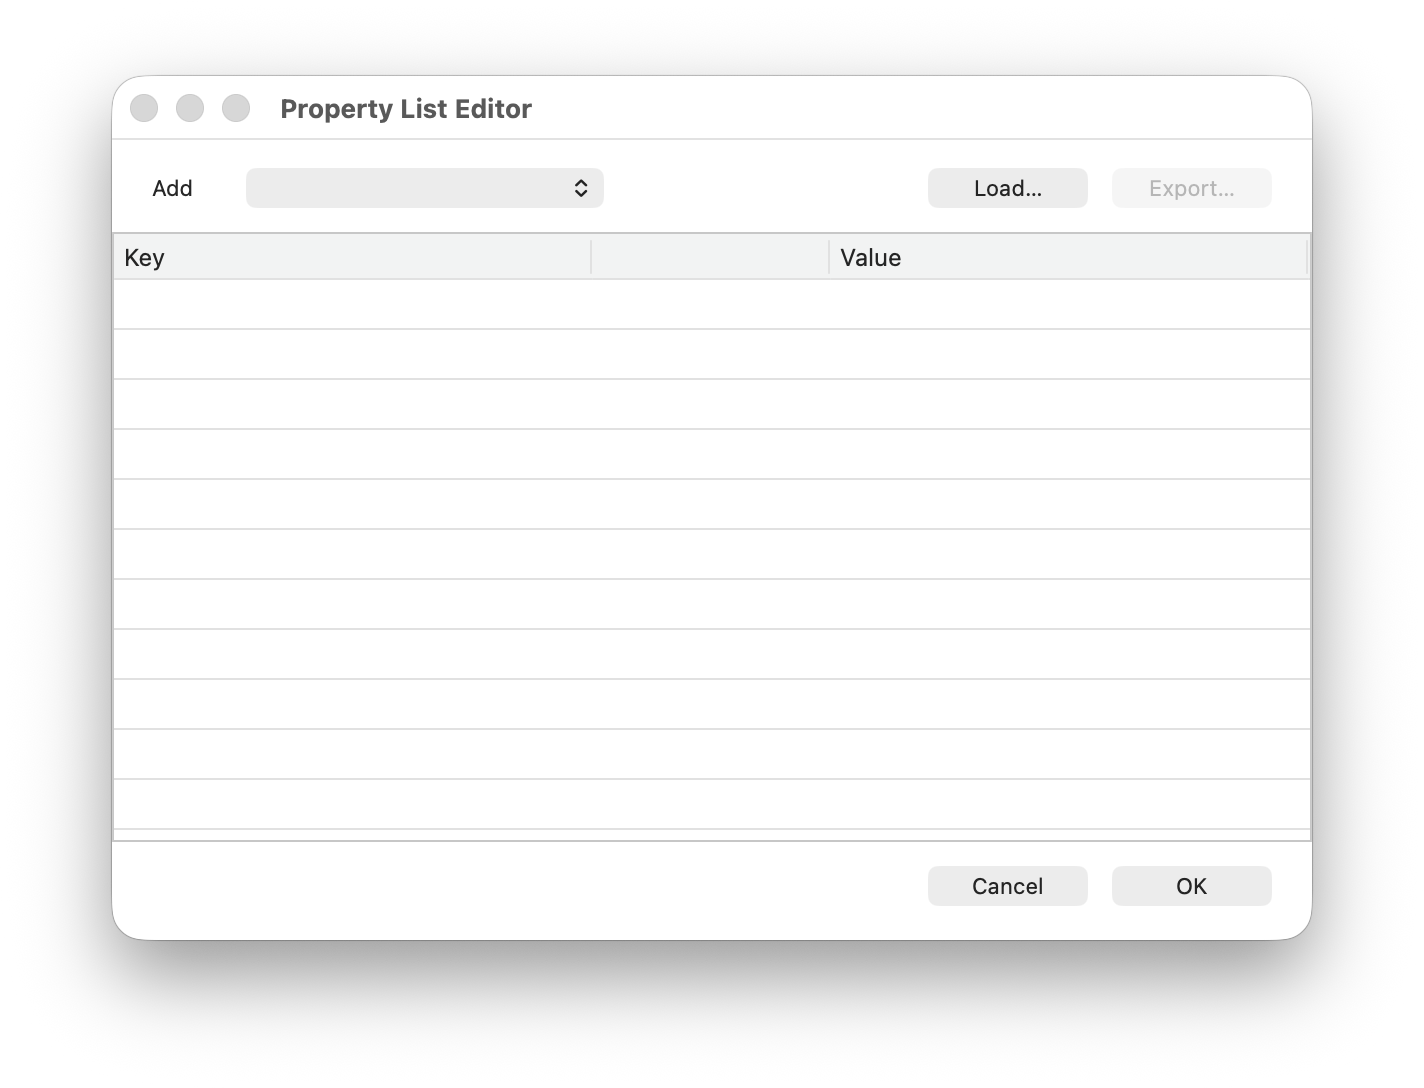
The entries you add with the Property List Editor will be combined with those automatically generated by the IDE, or with entries that may have been added to the project using previous methods (such as adding an external .plist file to the Project Navigator sidebar).
Publishing to the Mac App Store
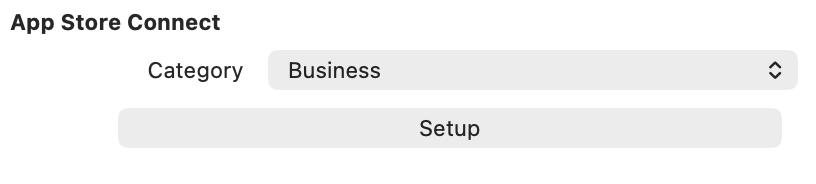
While there are some steps that need to be done both at Apple’s Developers Portal and App Store Connect Website, you will be able to set your app category directly from the IDE under Build Settings > macOS.
In addition, the Publish feature (responsible for sending your app to App Store Connect) will be in charge of verifying that the project meets everything that Apple requires prior to send it for reviewing or making available through TestFlight.
In order for the Publish button to be enabled, you need to select the App Store option for the selected “Developer ID” Team from the “Build For” popup menu under Build Settings > macOS > Sign.
Dealing with Certificates Issues
It doesn’t matter if your app requires entitlements, provisioning profiles, or if you are going to notarize it or enable sandboxing plus hardened runtime. All of this is based on the signing of your developer certificates, so let’s go back and see how to deal with the most common issues related with these.
Backup Your Certificates
Once you have installed your certificates, the first thing you should do is export them from Keychain Access to a secure place (ideally, not in your computer but an external USB key or drive). Why? Here’s why:
- Apple only allows you to create certificates a maximum of five times per year (mostly because they expire after one year, as we did see in a previous entry). Every time you install certificates, whether on the same computer or a different Mac you own, they count as new certificates, with different serial numbers and SHA1/SHA256 data. In practice, this reduces the number of installations available per year.
- In addition, some features, like provisioning profiles, rely on the specific certificates selected during their creation. You will get a signing error if you build the app on a Mac with different certificates.
- If you need to restore your Mac or migrate to a new Mac, your certificates won’t be restored using the usual tools from Apple. Having a backup of your developer certificates will make easier to restore them in Keychain Access after restoring your computer or when you change to a new Mac.
Instead of using Xcode to install new certificates on every Mac you intend to use for code signing, install them on just one Mac, export them from that Mac, and import them into the Keychain Access app on your other Macs. This ensures all of your Macs will use the same certificates.
Review Pending Apple Developer Agreements
This is one of the most common issues related to code signing: it just stops working and you don’t know why and even the returned error messages doesn’t reveal why. If you’re sure you have the required developer certificates installed, they are valid (not expired), and don’t have any other issues then it is time to sign-in into the Apple Developer and App Store Connect portals to check if there are some pending agreements you need to accept.
Missing and Expired Certificates
This is another very common issue. Starting with Xojo 2026r1, we made easier to detect this situation. If a given certificate for your team is not installed, then you won’t be able to select the signing option from the “Build For” popup menu under Build Settings > macOS > Sign. You can further dig into it selecting the “Inspect…” option from the “Developer ID” popup menu, and even receive some advice on how to fix it!
Certificates are all good… but the signing throws errors
When using the Direct Distribution or App Store options, the code signing process uses Apple Time Servers to add the date and time as part of the signing. That means that the computer requires an active Internet connection, and that such time servers must be reachable from Apple’s side (it’s very rare for them to be down).
Other operations such as notarization and publish also require an active Internet connection, and the corresponding Apple services must be up and running. Some times these can be down.
When these issues occur, it is a good idea to check the Apple Services status webpage.
In summary
It’s been a long four-article ride with the aim of giving you a clearer understanding of what happens under the hood when you code sign your macOS apps, what kind of certificate you need for a given distribution, and which macOS security features are supported by Development, Developer ID Application or Apple Distribution certificates; and, most importantly, how Xojo helps you with all of it!
I’d love to hear about your experience with macOS code signing, the rough corners you still need to tackle, and other improvements you would welcome. The Xojo forums are a great place to keep the conversation going!
Happy macOS code signing with Xojo!
Javier Menendez is an engineer at Xojo and has been using Xojo since 1998. He lives in Castellón, Spain and hosts regular Xojo hangouts en español. Ask Javier questions on Twitter at @XojoES or on the Xojo Forum.
Code Signing on macOS: What Developers Need to Know