
Earlier this year ago I wrote a post about using the SF Font symbols on macOS Picture.SystemImagein iOS apps. However that technique has some downsides. For one, the symbol glyphs are hardcoded, which means that it’s not possible to access the new symbols added to the SF Font by Apple. In addition, it isn’t possible to set the font weight and scale for the glyph. In this new post, I’ll show a more flexible way to work with these symbols on macOS 11+.
This technique is more on par with the current Picture.SystemImage you use in your Xojo iOS apps. With it you will be able to set the following attributes:
- Glyph name. You can use Apple’s Symbols SF utility to view all the available symbols and the name associated with each of these.
- Size (in points)
- Weight. The weight of the SF Font, ranging from Ultra-Light to Black. This is an Enumeration value.
- Scale. The scale of the SF Font symbol, ranging from Small to Large. This is an Enumeration value.
- TemplateColor. If you want to tint the resulting glyph, you can provide a ColorGroup parameter (Desktop apps) or a regular Color parameter (Desktop, Console apps).
- FallbackTemplateImage. You can provide a grayscale / black and white image to use as a fallback image, in case there is no way to create a picture from the received “name” string.

As it is the case with the existing iOS method, you will receive a Picture. For example you will be able to use code like this in your desktop projects:
Var c As New ColorGroup(Color.Red, Color.White)
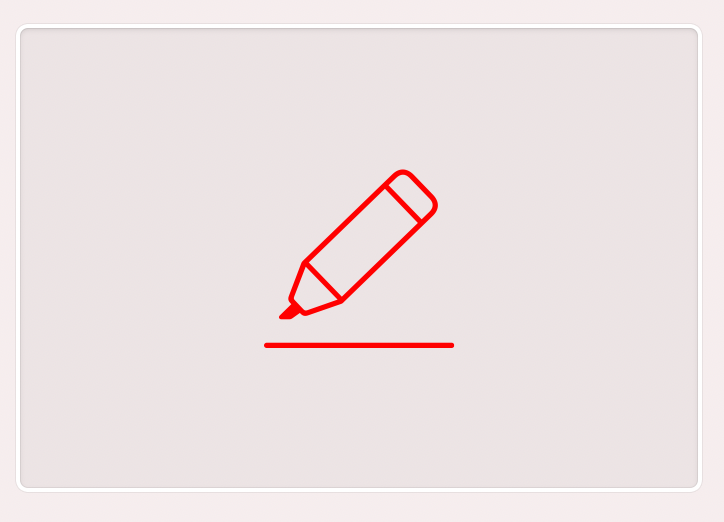
Var p As Picture = SystemImage("highlighter", 120.0, SystemImageWeights.UltraLight, Symbolscale.Small, c, fallback)
IVSFGlyph.Image = p
The “fallback” parameter refers to an image added to a desktop project that will be used if the glyph is not found. This will produce the following glyph, assigned as the image to the ImageView control named IVSFGlyph:
In order to add this kind of functionality to your Xojo Desktop and Console projects on macOS, add a new Module to the Navigator (for example, with the name macOSLib). Then, with the macOSLib item selected in the Navigator, add two enumerations with the following values:
- Name: SymbolScale
- Type: Integer
- Scope: Global
- Values:
Small = 1
Medium = 2
Large = 3
- Name: SystemImageWeights
- Type: Integer
- Values:
UltraLight = 0
Thin = 1
Light = 2
Regular = 3
Medium = 4
Semibold = 5
Bold = 6
Heavy = 7
Black = 8
Now add to the macOSLib module the method that will run both on Desktop and Console macOS apps:
- Method Name: SystemImage
- Parameters: name As String, size As Double, weight As SystemImageWeights = SystemImageWeights.Regular, scale As SymbolScale = SymbolScale.Medium, templateColor As Color, fallbackTemplateImage As Picture = Nil
- Return Type: Picture
- Scope: Global
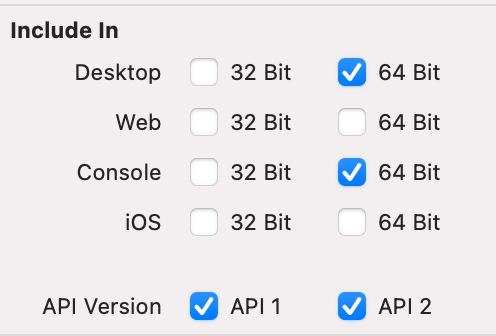
Click on the cog wheel icon in the Inspector to change to the attributes section for the method, and make sure to set only the options displayed in the following picture:
Finally, put the following code in the Code Editor associated with the newly created method:
#If TargetMacOS

  If System.Version >= "11.0" Then

    If name = "" Then Return Nil

    Declare Function Alloc Lib "Foundation" Selector "alloc" (classRef As Ptr) As Ptr
    Declare Sub AutoRelease Lib "Foundation" Selector "autorelease" (classInstance As Ptr)

    Declare Function NSClassFromString Lib "Foundation" (clsName As CFStringRef) As Ptr
    Declare Function ImageWithSystemSymbolName Lib "AppKit" Selector "imageWithSystemSymbolName:accessibilityDescription:" (imgClass As Ptr, symbolName As CFStringRef, accesibility As CFStringRef) As Ptr
    Declare Function ConfigurationWithPointSize Lib "AppKit" Selector "configurationWithPointSize:weight:scale:" (symbolConfClass As Ptr, size As CGFloat, weight As CGFloat, tscale As SymbolScale) As Ptr
    Declare Function ImageWithSymbolConfiguration Lib "AppKit" Selector "imageWithSymbolConfiguration:" (imgClass As Ptr, config As Ptr) As Ptr
    Declare Function ColorWithRGBA Lib "Foundation" Selector "colorWithRed:green:blue:alpha:" (nscolor As ptr, red As CGFloat, green As CGFloat, blue As CGFloat, alpha As CGFloat) As Ptr
    Declare Sub SetTemplate Lib "AppKit" Selector "setTemplate:" (imageObj As Ptr, value As Boolean)
    Declare Sub LockFocus Lib "AppKit" Selector "lockFocus" (imageObj As Ptr)
    Declare Sub UnlockFocus Lib "AppKit" Selector "unlockFocus" (imageObj As Ptr)
    Declare Sub Set Lib "Foundation" Selector "set" (colorObj As Ptr)
    Declare Sub NSRectFillUsingOperation Lib "AppKit" (rect As NSRect, option As UInteger)

    Declare Function RepresentationUsingType Lib "AppKit" Selector "representationUsingType:properties:" (imageRep As Ptr, type As UInteger, properties As Ptr) As Ptr
    Declare Function InitWithFocusedView Lib "AppKit" Selector "initWithFocusedViewRect:" (imageObj As Ptr, rect As NSRect) As Ptr

    Var nsimage As Ptr = NSClassFromString("NSImage")
    Var orImage As Ptr = ImageWithSystemSymbolName(nsimage, name, "")
    Var symbolConfClass As Ptr = NSClassFromString("NSImageSymbolConfiguration")

    // Getting the weight as the required SystemImageWeight float
    Var tWeight As CGFloat = SystemImageWeight(weight)

    // Creating a configuration obj for the Glyph
    Var symbolConf As Ptr = ConfigurationWithPointSize(symbolConfClass, size, tWeight, scale)

    // Getting the final NSImage from the Glyph + Conf (still in vectorial format)
    Var finalImage As Ptr = ImageWithSymbolConfiguration(orImage, symbolConf)

    // Can't create image from received glyph name, so we return Nil if fallback is not provided
    // or colorize the fallback image if there is one
    If finalImage = Nil Then

      If fallbackTemplateImage = Nil Then Return Nil

      Var fallbackData As MemoryBlock = fallbackTemplateImage.ToData(Picture.Formats.PNG)
      Var fallbackDataPtr As Ptr = fallbackData

      Declare Function DataWithBytesLength Lib "Foundation" Selector "dataWithBytes:length:" (dataClass As Ptr, data As Ptr, length As UInteger) As Ptr

      If fallbackData <> Nil And fallbackData.Size > 0 Then

        Var NSDataClass As Ptr = NSClassFromString("NSData")
        Var NSDataObj As Ptr = DataWithBytesLength(NSDataclass, fallbackDataPtr, fallbackData.Size)

        If NSDataObj <> Nil Then

          Declare Function InitWithData Lib "AppKit" Selector "initWithData:" (imageInstance As Ptr, data As Ptr) As Ptr

          Var NSImageClass As Ptr = NSClassFromString("NSImage")

          finalImage = Alloc(NSImageClass)
          finalImage = InitWithData(finalImage, NSDataObj)

          AutoRelease(NSDataObj)

        End If

      End If

    End If

    If finalImage = Nil Then Return Nil

    Var c As Color
    Var nscolor As Ptr

    LockFocus(finalImage)

    // Applying tint to the image if we receive a valid ColorGroup object

    c = templateColor

    nscolor = NSClassFromString("NSColor")
    Var tColor As Ptr = ColorWithRGBA(nscolor, c.Red/255.0, c.Green/255.0, c.Blue/255.0, 1.0-c.Alpha/255.0)

    // We need to set the Template property of the NSImage to False in order to colorize it.
    SetTemplate(finalImage, False)

    Declare Function ImageSize Lib "AppKit" Selector "size" (imageObjt As Ptr) As NSSize

    Var tRect As NSRect

    tRect.Origin.X = 0
    tRect.Origin.Y = 0
    tRect.RectSize = ImageSize(finalImage)

    Set(tColor)
    NSRectFillUsingOperation(tRect, 3)

    // Getting bitmap image representation in order to extract the data as PNG.

    Var NSBitmapImageRepClass As Ptr = NSClassFromString("NSBitmapImageRep")
    Var NSBitmapImageRepInstance As Ptr = Alloc(NSBitmapImageRepClass)
    Var newRep As Ptr = InitWithFocusedView(NSBitmapImageRepInstance, tRect)

    UnlockFocus(finalImage)

    Var data As Ptr = RepresentationUsingType(newRep, 4, Nil) // 4 = PNG

    AutoRelease(newRep)
    AutoRelease(nscolor)

    // Getting image data to generate the Picture object in the Xojo side

    Declare Function DataLength Lib "Foundation" Selector "length" (obj As Ptr) As Integer
    Declare Sub GetDataBytes Lib "Foundation" Selector "getBytes:length:" (obj As Ptr, buff As ptr, len As Integer)

    // We need to get the length of the raw data…
    Var dlen As Integer = DataLength(data)

    // …in order to create a memoryblock with the right size
    Var mb As New MemoryBlock(dlen)
    Var mbPtr As Ptr = mb

    // And now we can dump the PNG data from the NSDATA objecto to the memoryblock
    GetDataBytes(data, mbPtr, dlen)

    // In order to create a Xojo Picture from it
    Return Picture.FromData(mb)
  End If

#EndIf
As you can see, this method calls the SystemImageWeight method, and also makes use of some Structs. Let’s add to the method that will convert the received enum value to the required CGFloat value needed by the Declare:
- Method Name: SystemImageWeight
- Parameters: weight As SystemImageWeights
- Returned Type: CGFloat
- Scope: Global
Add the following code in the associated Code Editor:
Var tWeight As CGFloat = 0

Select Case weight
Case SystemImageWeights.UltraLight
  tWeight = -1.0
Case SystemImageWeights.Thin
  tWeight = -0.75
Case SystemImageWeights.Light
  tWeight = -0.5
Case SystemImageWeights.Regular
  tWeight = -0.25
Case SystemImageWeights.Medium
  tWeight = 0
Case SystemImageWeights.Semibold
  tWeight = 0.25
Case SystemImageWeights.Bold
  tWeight = 0.5
Case SystemImageWeights.Heavy
  tWeight = 0.75
Case SystemImageWeights.Black
  tWeight = 1
End Select

Return tWeight
And now add three new Structures to the macOSLib module using the following values:
- Structure Name: NSOrigin
- Scope: Global
X as CGFloat
Y as CGFloat
- Structure Name: NSSize
- Scope: Global
Height as CGFloat
Width as CGFloat
- Structure Name: NSRect
- Scope: Global
Origin as NSOrigin
RectSize as NSSize
Add an overloaded method only intended for macOS desktop apps. The main difference is that this one can receive a ColorGroup parameter instead of just a Color object:
- Method Name: SystemImage
- Parameters: name As String, size As Double, weight As SystemImageWeights = SystemImageWeights.Regular, scale As SymbolScale = SymbolScale.Medium, templateColor As ColorGroup = Nil, fallbackTemplateImage As Picture = Nil
- Returned Type: Picture
- Scope: Global
And type the following code in the associated Code Editor for the method:
Var c As Color

If templateColor <> Nil Then
  c = templateColor
End If

Return SystemImage(name, size, weight, scale, c, fallbackTemplateImage)
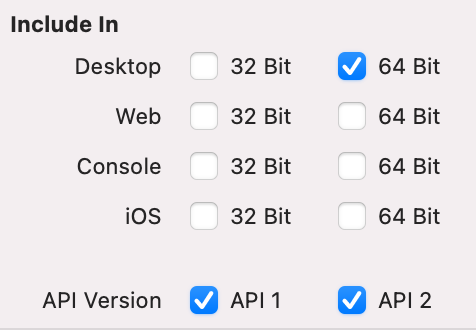
Click on the cog wheel icon from the method Inspector and set the attributes as shown in the following picture:
Setting SF Glyphs directly to Views
Let’s add now a third method to the module whose main difference is that it will not return a Picture; instead, it will set the specified SF glyph as the image for the received control handler. For example, this is neat if you want to set a SF symbol to a button in you UI interface (among other UI controls).

This is the signature for the new method:
- Name: SystemImage
- Parameters: name As String, size As Double, weight As SystemImageWeights = SystemImageWeights.Regular, scale As SymbolScale = SymbolScale.Small, controlHandler As Integer
- Scope: Global
And the code to put in the associated Code Editor:
#If TargetMacOS

  If System.Version >= "11.0" Then

    If name = "" Then Exit

    Declare Function Alloc Lib "Foundation" Selector "alloc" (classRef As Ptr) As Ptr
    Declare Sub AutoRelease Lib "Foundation" Selector "autorelease" (classInstance As Ptr)

    Declare Function NSClassFromString Lib "Foundation" (clsName As CFStringRef) As Ptr
    Declare Function ImageWithSystemSymbolName Lib "AppKit" Selector "imageWithSystemSymbolName:accessibilityDescription:" (imgClass As Ptr, symbolName As CFStringRef, accesibility As CFStringRef) As Ptr
    Declare Function ConfigurationWithPointSize Lib "AppKit" Selector "configurationWithPointSize:weight:scale:" (symbolConfClass As Ptr, size As CGFloat, weight As CGFloat, scale As SymbolScale) As Ptr
    Declare Function ImageWithSymbolConfiguration Lib "AppKit" Selector "imageWithSymbolConfiguration:" (imgClass As Ptr, config As Ptr) As Ptr

    Var nsimage As Ptr = NSClassFromString("NSImage")
    Var orImage As Ptr = ImageWithSystemSymbolName(nsimage, name,"")
    Var symbolConfClass As Ptr = NSClassFromString("NSImageSymbolConfiguration")

    // Getting the weight as the required SystemImageWeight float
    Var tWeight As CGFloat = SystemImageWeight(weight)

    // Creating a configuration obj for the Glyph
    Var symbolConf As Ptr = ConfigurationWithPointSize(symbolConfClass, size, tWeight, scale)

    // Getting the final NSImage from the Glyph + Conf (still in vectorial format)
    Var finalImage As Ptr = ImageWithSymbolConfiguration(orImage, symbolConf)

    // We need to know if the received Handler can respond to the setImage message (that is, it's a View)

    Declare Function RespondsToSelector Lib "/usr/lib/libobjc.A.dylib" Selector "respondsToSelector:" (obj As Integer, sel As Ptr) As Boolean
    Declare Function NSSelectorFromString Lib "Foundation" (sel As CFStringRef) As Ptr

    Var sel As Ptr = NSSelectorFromString("setImage:")

    // We check if it's a valid handler, we have an NSImage object and the handler can receive the "setImage" message
    If controlHandler <> 0 And finalImage <> Nil And RespondsToSelector(controlHandler, sel) Then

      Declare Sub Set Lib "AppKit" Selector "setImage:" (control As Integer, Image As Ptr)

      // We set the NSImage to the received control
      Set(controlHandler, finalImage)

    End If

  End If

#EndIf
So, for example, you can set now the Gear symbol as the image of a PushButton control added to the app UI using the following code in the Open Event Handler of the PushButton instance:
SystemImage("gearshape.2", 14.0, SystemImageWeights.Regular, SymbolScale.Small, Me.Handle)
Summary
And that’s all! As you can see, there are no hardcoded codepoints for the SF glyphs. You’ll be able to create a picture from any SF symbol at the desired points size, weight and scale. Plus, you’ll be able to colorize it and receive a fallback image if anything goes wrong in the process.
You can download the example Xojo project with the Module already created from this link.