How to Publish macOS and iOS Apps to the App Store Directly from Xojo
Published March 25, 2025 by
Javier Menendez
Starting with Xojo 2025r1, you can publish macOS and iOS apps to App Store Connect directly from the Xojo IDE. Keep reading to learn how!
App Store Connect is where developers create app records as part of the process to make their apps available on the Mac App Store and/or iOS App Store. All apps must go through Apple’s review process for approval. Once an app record exists in App Store Connect, every new app build uploaded from the Xojo IDE will be available there!
First Things, First
Before exploring how to use Xojo’s new Publish feature, let’s review the requirements and previous processes to better understand how it works.
You may have already met these requirements, but it’s always a good idea to review them.
A paid Apple Developer membership (approximately US $99/yr).
Xcode installed on your Mac, preferably the latest version (Xcode 16.2 at the time of writing, which requires macOS Sequoia 15.2). However, Xojo also works with Xcode 13 or later, such as on macOS Ventura.
The following certificates are present in your Mac’s Keychain:
Developer ID Application
Apple Distribution
3rd Party Mac Developer Installer
An explicit App ID (Identifier) has been created for your app at developer.apple.com.
A Provisioning Profile has been created at developer.apple.com to ensure the uploaded build is available for testing via TestFlight.
No pending agreements are waiting for your approval at both developer.apple.com and appstoreconnect.apple.com.
Handling Certificates
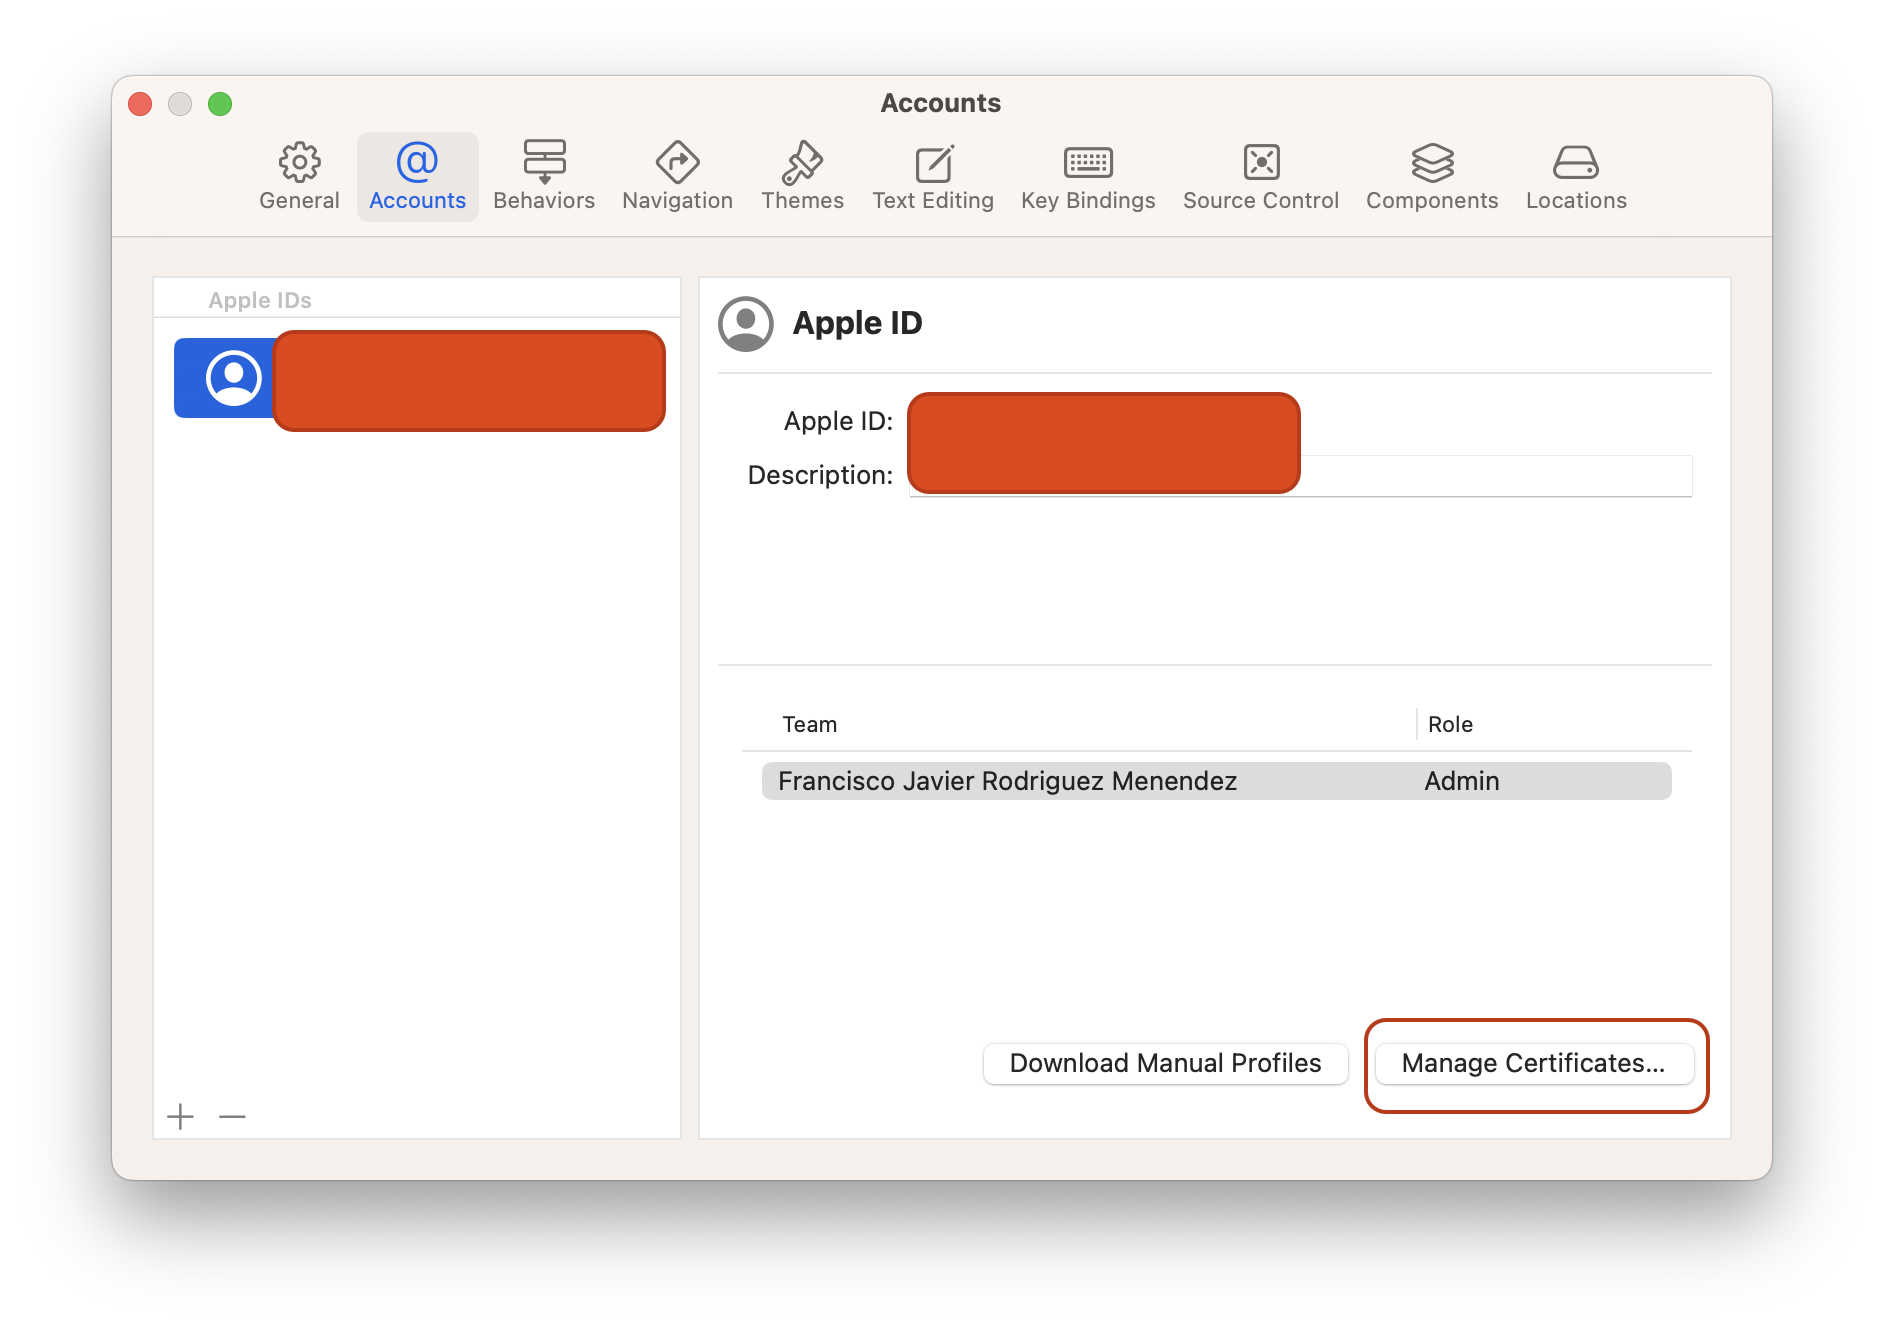
The best way to ensure you have the correct certificates installed in your Mac’s Keychain is to manage them directly from Xcode. Open Xcode, go to Preferences > Accounts, and make sure you are signed in with your developer.apple.com credentials.
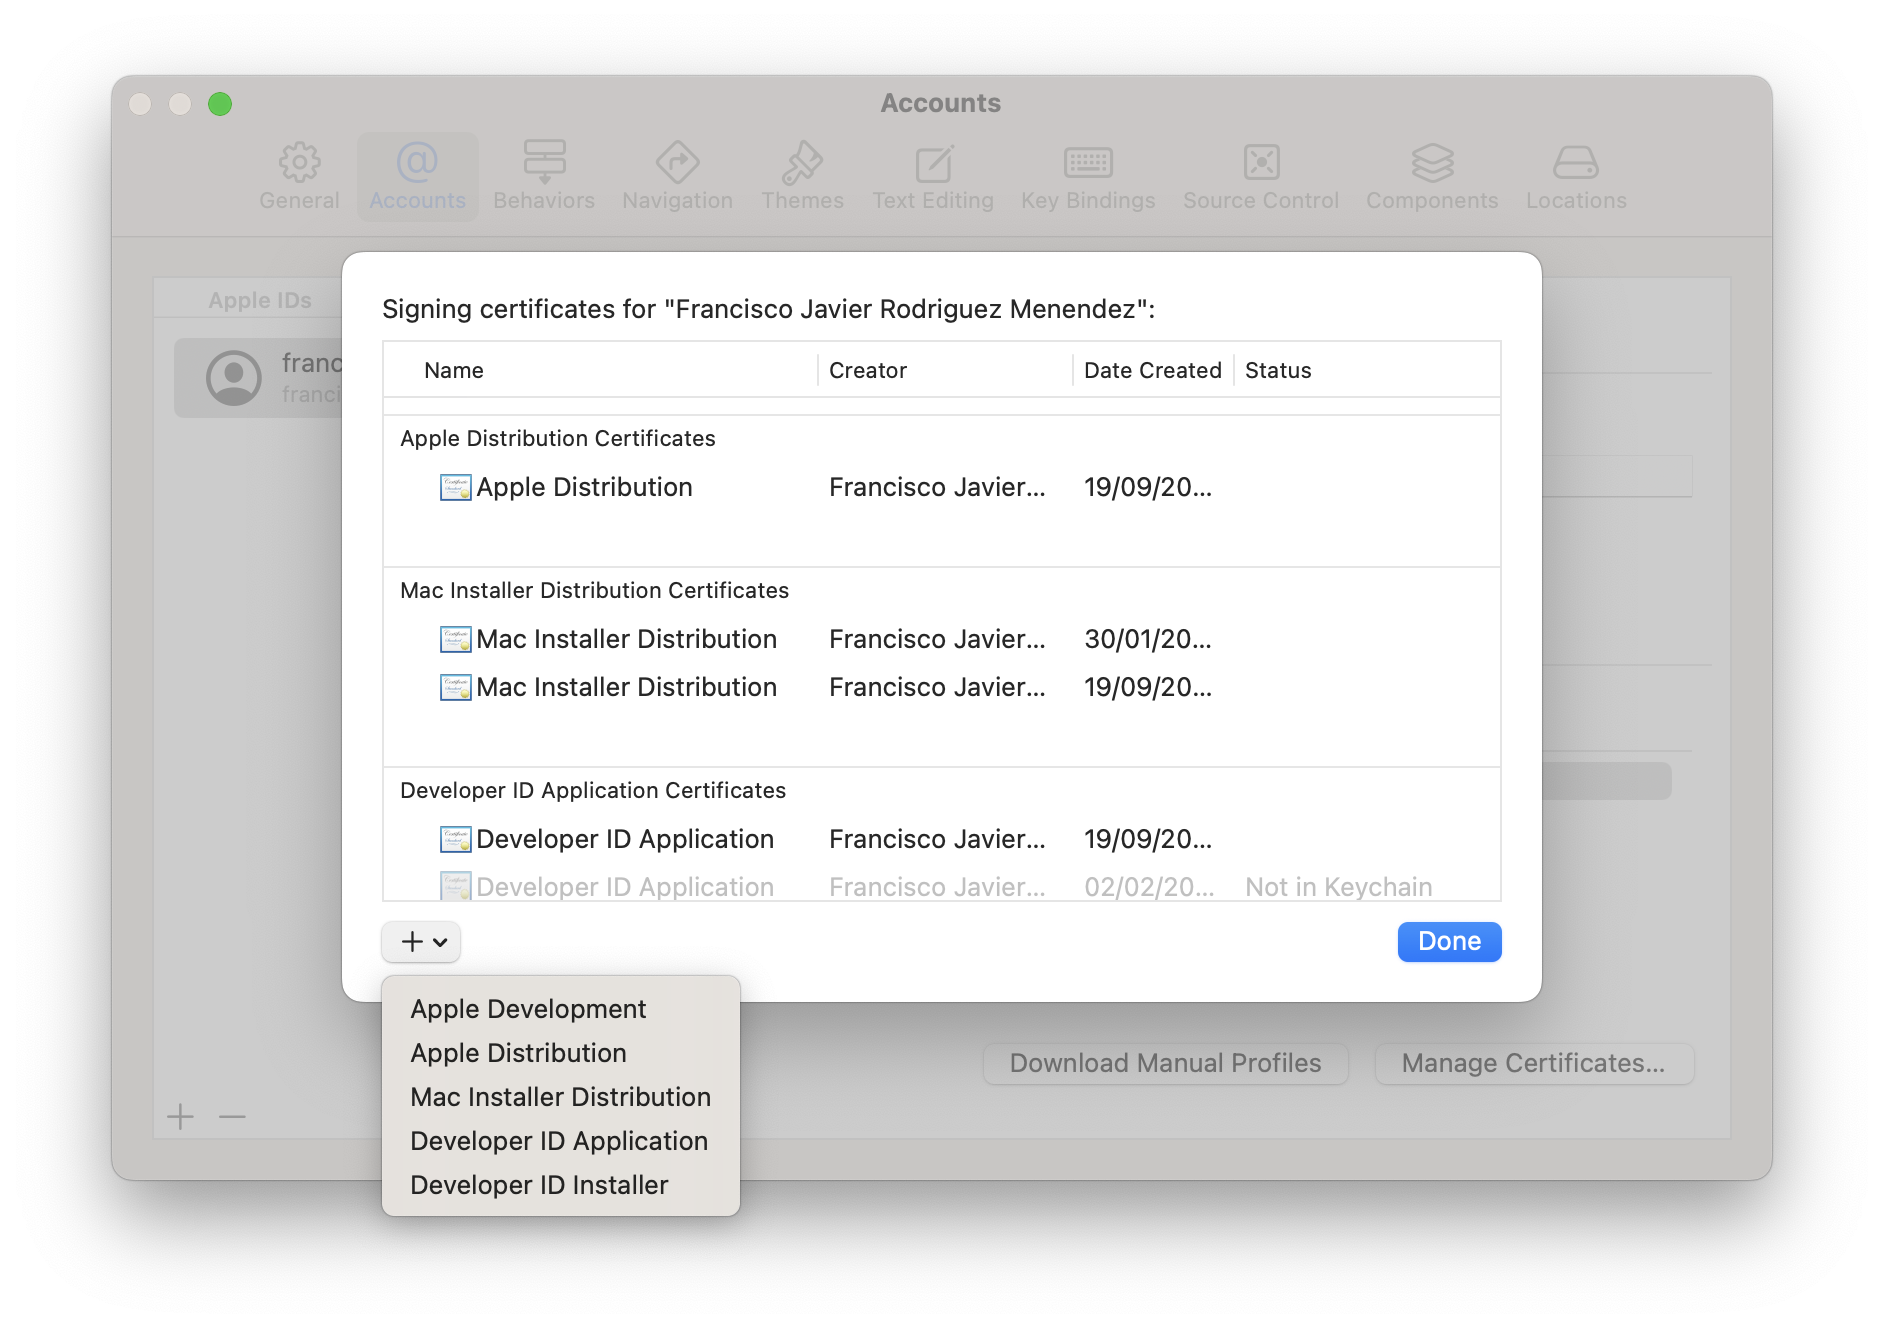
Next, click the “Manage Certificates…” button. A new window will appear, displaying the installed certificates—including expired ones or those missing a private key. From here, you can also download any missing certificates.
Once the required certificates are installed on your Mac, I recommend opening the Keychain app to remove any revoked, expired, or incomplete certificates (those missing a private key) to keep your Keychain clean and organized.
Handling App ID
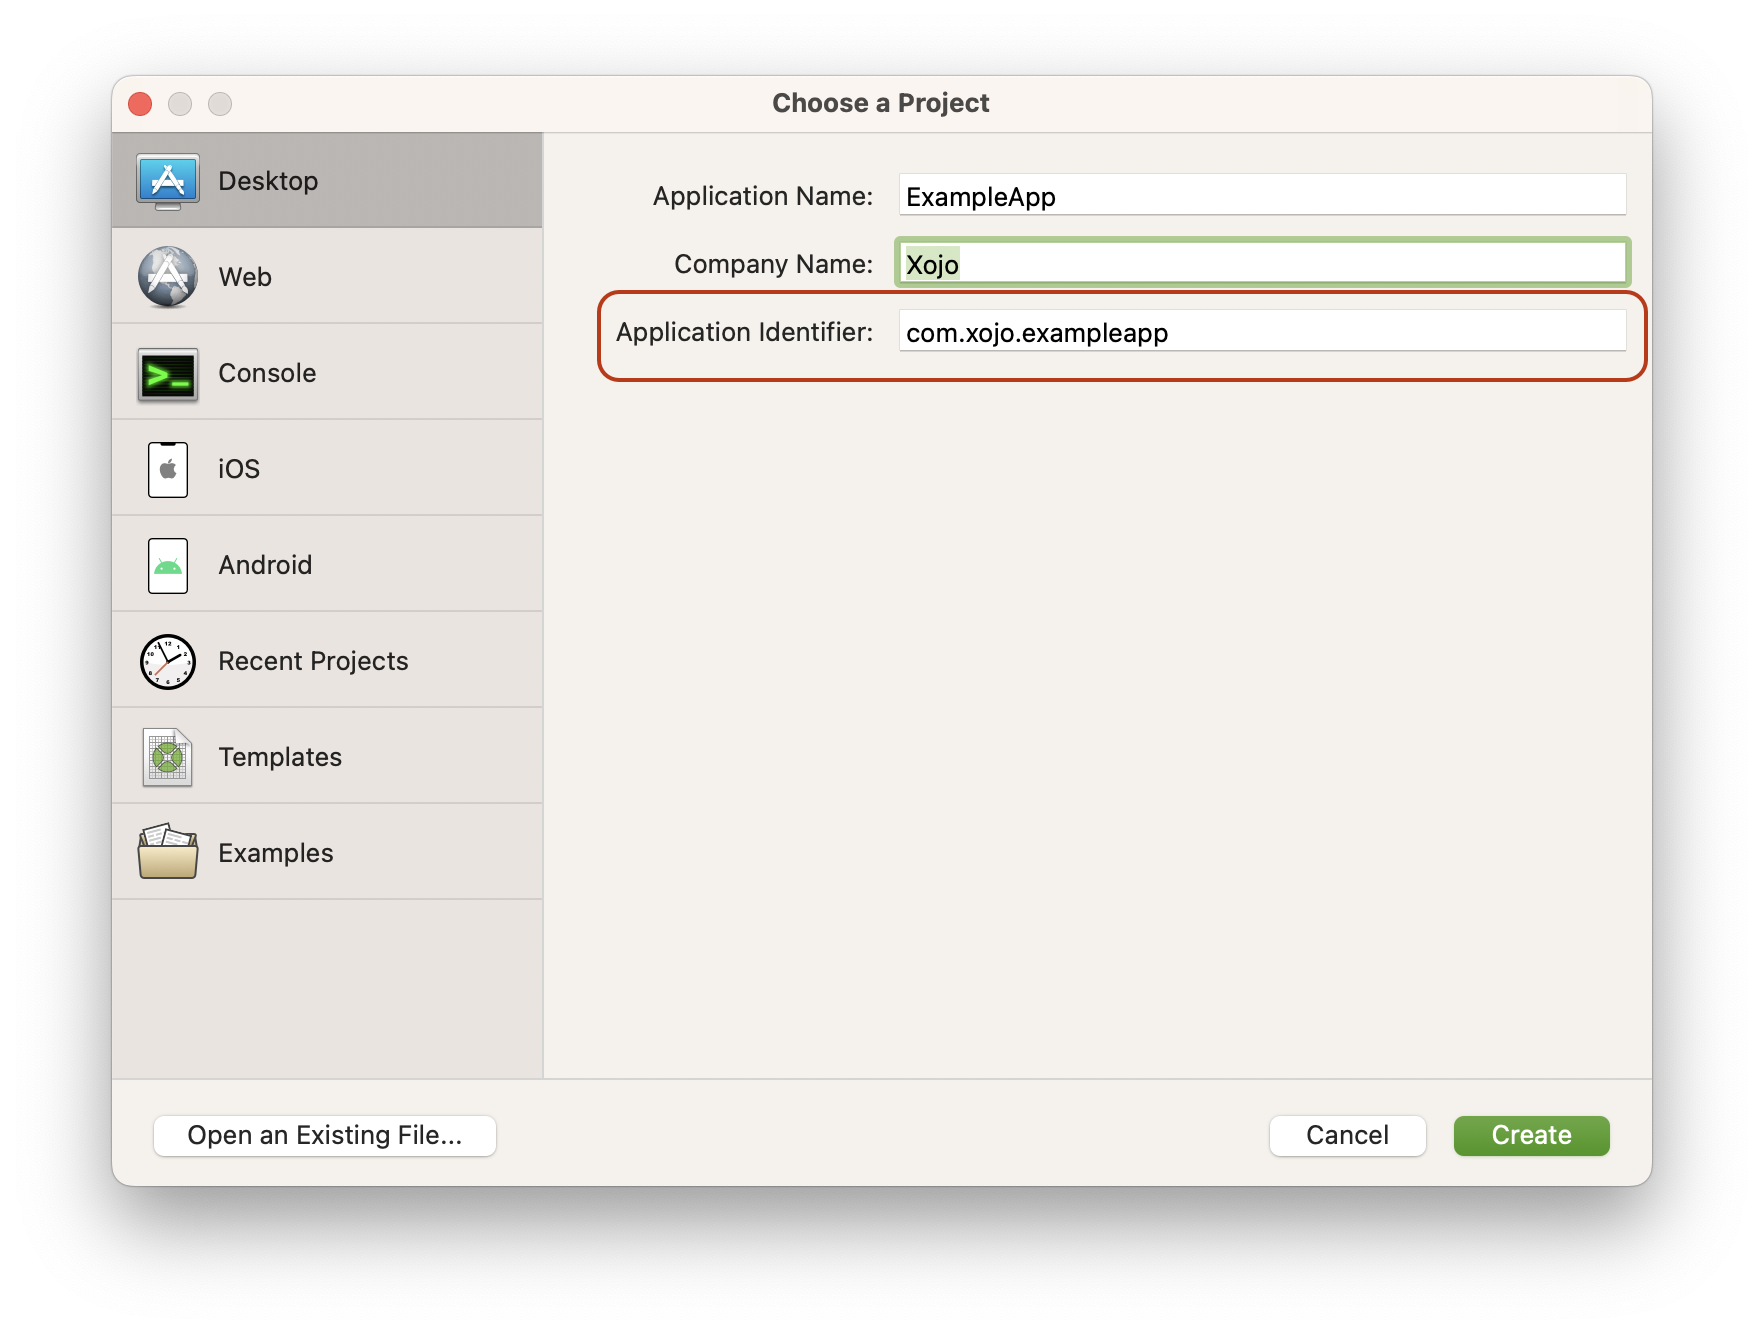
The App ID, Identifier, or ‘Bundle Identifier’ is something you should be familiar with whenever you create a new macOS or iOS app in the Xojo IDE.
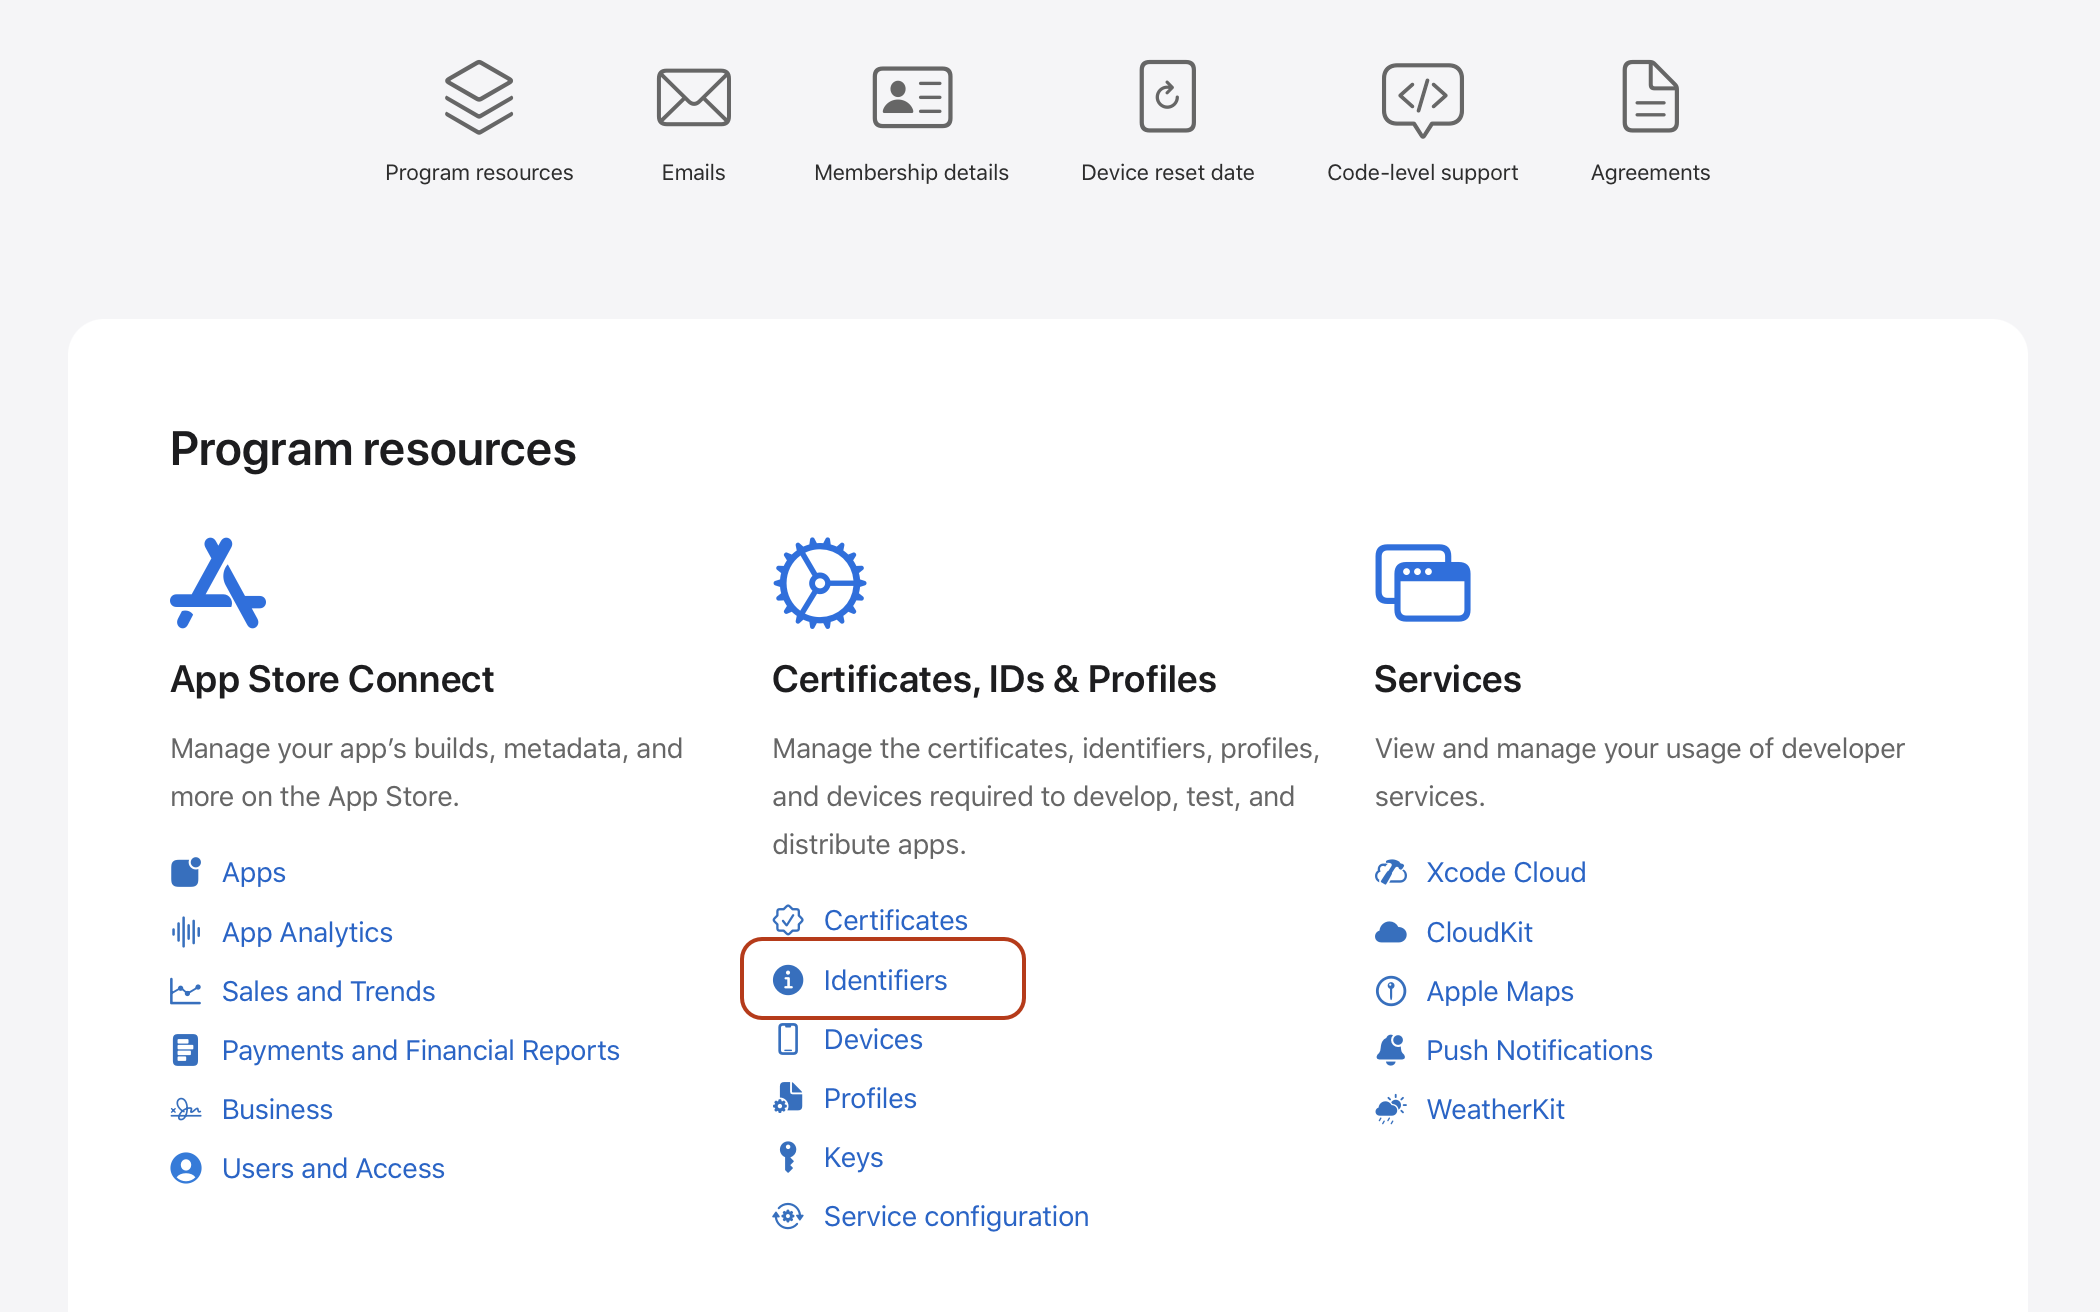
You also need to create the same App ID at developer.apple.com. Log in to the Apple Developer portal using your Apple Developer credentials, then click “Identifiers” under the “Certificates, IDs & Profiles” section.
Note: Keep in mind that you must create a new App ID and follow these steps for each macOS or iOS app you want to distribute through the Mac or iOS App Store.
On the page displayed after the previous step, click the “+” button next to the “Identifiers” header to register a new Identifier.
On the next page, ensure that “App IDs” is selected, then click “Continue”.
On the following page, select “App”, then click “Continue” again.
Now, you’ll reach the most important step—entering the explicit Bundle ID. Make sure it exactly matches the “Application Identifier” used when creating the project in the Xojo IDE.
Also, verify that the App ID Prefix matches the Team ID of the certificates installed in your Mac’s Keychain via Xcode.
Select any Capabilities and/or App Services your app requires. (For this example, none are selected.)
Click “Continue” to proceed to the summary page, where you can review all the entered details and selected Capabilities/App Services.
If everything looks correct, click “Register” to finalize the process.
Once registered, the new Identifier will appear in the list under the “Identifiers” section.
Handling Provisioning Profiles
TestFlight is an Apple service that allows developers to gather feedback from users and teammates while an app is still in development, before it becomes publicly available on the Mac or iOS App Store. When a new app build (version) is published from the Xojo IDE, it will also become available through TestFlight.
However, for this to work, the app must have a “Provisioning Profile” embedded. This profile needs to be created on the “developer.apple.com” website, as we did in the previous “App ID” section.
There are two main types of provisioning profiles: “Development” and “Distribution.” The key difference is:
“Development” profiles specify which devices an app can be installed on. They are primarily used for internal testing on user devices or, in the case of iOS apps, for running tests on a physical device using the “Run On Device” option in the Xojo IDE.
“Distribution” profiles are used for submitting apps to the App Store or making them available for TestFlight testing.
In this example, we will focus on creating a “Distribution Provisioning Profile” to ensure that apps published from the Xojo IDE are eligible for TestFlight testing.
Log in to “developer.apple.com” and navigate to the “Certificates, IDs & Profiles” section.
Select “Profiles” and click the “+” button next to the “Profiles” header.
On the next page, under the “Distribution” section, select “Mac App Store Connect” if you are creating a profile for a macOS app. For iOS apps, choose “App Store Connect” instead. Click “Continue.”
Select the “App ID” you previously created. Notice that the App ID is prefixed with the “Team ID” from when the App ID was created (e.g., “BW7PU32485”).
Under “Profile Type,” make sure the “Mac” option is selected instead of “Mac Catalyst.” Click “Continue.”
On the next page, select the same “Distribution” certificate that will be used when building the Xojo app (i.e., the “Apple Distribution” certificate installed on your Mac). Click “Continue.”
Give the Provisioning Profile a meaningful name so you can easily distinguish it later from other profiles. Click “Generate.”
After a few seconds, the Provisioning Profile summary page will appear with a “Download” button. Click it to download the profile.
NOTE: Provisioning Profiles for iOS For iOS apps, you need to create both “Development” and “Distribution” provisioning profiles.
When creating the “Development” provisioning profile, be sure to include all registered devices you want to use for installing and testing the app directly from Xojo (using the “Run On Device” option in the IDE).
Once these provisioning profiles are downloaded to your Mac, double-click on them to ensure Xcode installs them in the correct location (as of this writing: “Library > Developer > Xcode > User Data > Provisioning Profiles”).
Adding the Distribution Provision Profile to your Xojo Project
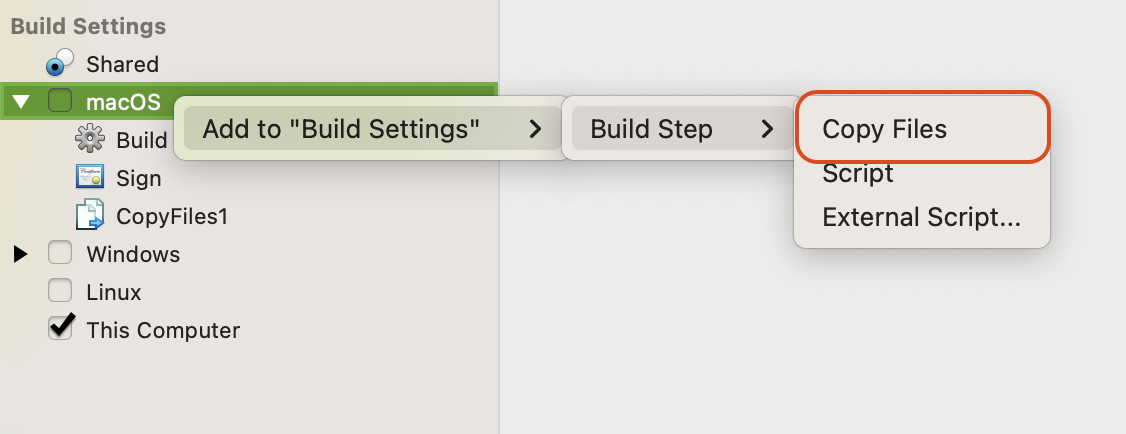
Move the downloaded macOS Distribution Provisioning Profile to a more convenient location related to your Xojo project, and rename it to “embedded.provisionprofile”.
Next, open your Xojo project and add a new “Copy Files” step:
Right-click (or use the contextual menu) and choose “Add to ‘Build Settings’ > Build Step > Copy Files”.
Select the “macOS” item under “Build Settings.”
Next, click the “Add File” button in the “Copy Files” toolbar and select your “embedded.provisionprofile” file.
In the associated “Inspector” panel, use the following values:
Name: Distribution Profile
Applies To: Release
Architecture: Any
Destination: Contents Folder
NOTE: For Xojo iOS projects, provisioning profiles are applied automatically when building or publishing the app. This happens based on the profiles installed by Xcode when you double-click them after downloading from developer.apple.com.
App Store Connect: Creating the Record for the App
You need to create an App Record for every macOS or iOS app that will be distributed through the Mac or iOS App Store. To upload an app from the Xojo IDE, it is not necessary to complete every required field in the various sections right away—you can do that at your own pace. However, you must at least have an App Record created for the app.
To do this, log in to “appstoreconnect.apple.com” using your developer credentials. Once logged in, select the “Apps” icon. On the next page, click the “+” button and choose “New App” to create a new App Record. The previous action will open a dialog where you need to enter the essential app information required to create the record.
Platforms: Select “macOS.”
Name: Enter the same name used in your Xojo project for the app (Build Settings > macOS > Mac App Name). Apple can be strict about this during the app review process if the names differ, as this will also be the name displayed in the App Store listing.
Bundle ID: Select the App ID you created for the app by following the steps in the “Handling App ID” section.
SKU: Enter any arbitrary SKU value that makes sense to you for uniquely tracking this app.
User Access: If you are a solo developer, the choice doesn’t make much difference. However, if you are part of a team, selecting “Limited Access” allows more control over which team members can access the app.
Once you are confident with the information provided, click the “Create” button to generate the new app record.
If you receive an error stating that another app has already been registered with the same name, you will need to choose a different name for your app.
NOTE: Values such as the App Name and Bundle ID can be changed later, if needed, from the “General > App Information” section on the App Record page.
Once the App Record has been created, there will be a lot of required information to fill in before the app can go through the App Store Review Process and be publicly listed in the Mac/iOS App Store upon approval. However, as mentioned earlier, you can add this information at your own pace. The most important thing right now is that, once the record is created, you have everything set up to start uploading your app builds (versions) from the Xojo IDE.
Publishing Mac Apps From Xojo
General Information
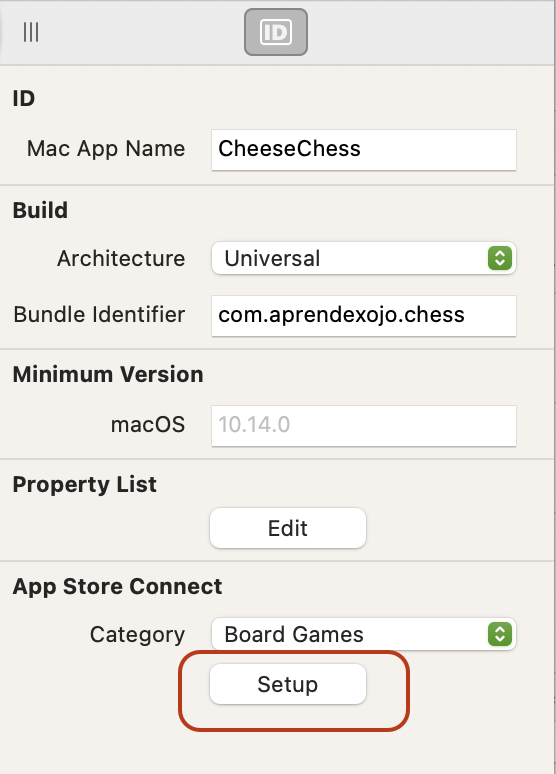
Open your Xojo project in the IDE and go to Build Settings > macOS. Then, make sure the correct values are set in the associated Inspector Panel for the following fields:
Mac App Name: This should match the name entered for the App Record on appstoreconnect.apple.com.
Bundle Identifier: This should match the App ID created for the app.
Category: Select the category that best fits your app from the available options.
App Store Connect Setup
To allow the IDE to upload the app to App Store Connect, you need an app-specific password. You can add it by clicking the App Store Connect > Setup button. If you have already created this app-specific password in a previous version of Xojo (under Build Settings > Sign > Notarization > Setup), you don’t need to do it again. Also, keep in mind that this setup only needs to be done once for all your Desktop (macOS) and iOS projects.
Signing and Sandboxing
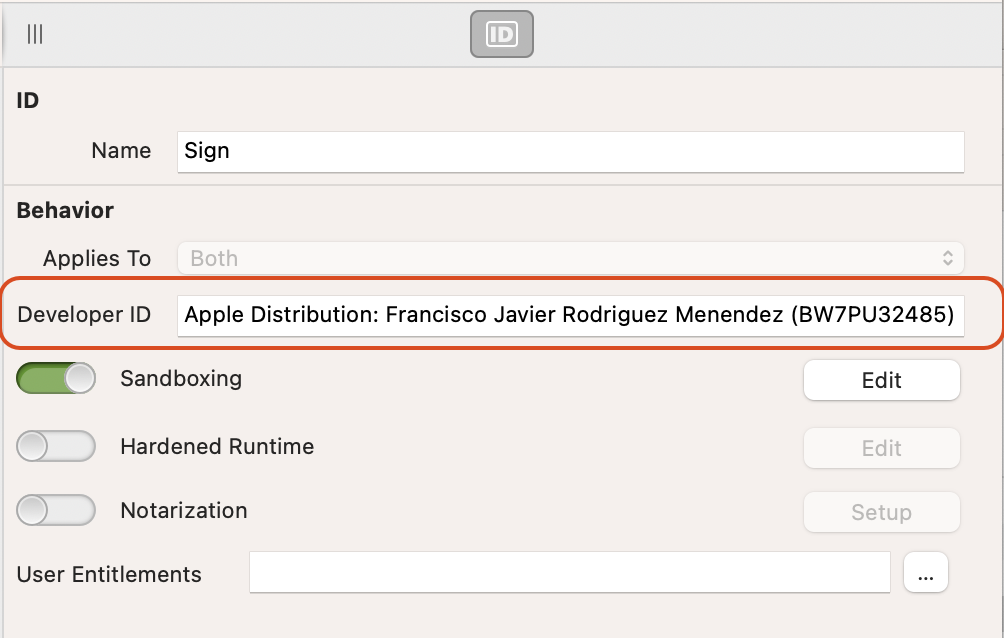
Select Build Settings > macOS > Sign in the project browser in order to access the associated Inspector Panel:
Developer ID: Type (or paste) the full string from the Apple Distribution certificate installed on your Mac. In this example, it is: “Apple Distribution: Francisco Javier Rodriguez Menendez (BW7PU32485)”. This certificate should match the one selected when the Distribution Provisioning Profile was created, and the Team ID (the value in parentheses) should match the one used when the App ID (Identifier) was created for the app at developer.apple.com.
Sandboxing: Apps uploaded to App Store Connect require Sandboxing to be enabled. Turn on this option and click the associated “Edit” button to enable the necessary sandboxed features for your app. In our example, we only enabled the ability to read/write the selected user files.
Shared Settings
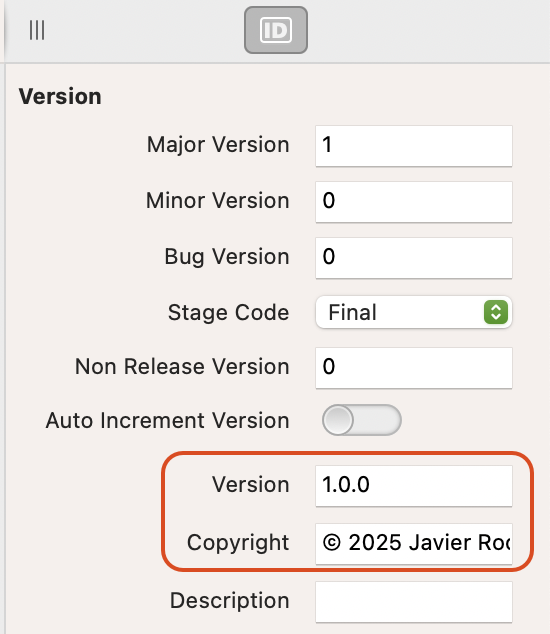
Select Build Settings > Shared in the project browser to access the associated Inspector Panel:
If you are going to publish the final (release) version of your app after it has been thoroughly tested, you will likely want to set the Stage Code value to “Final.” Additionally, make sure to enter the short version string in the Version field and the copyright information for the app in the Copyright field.
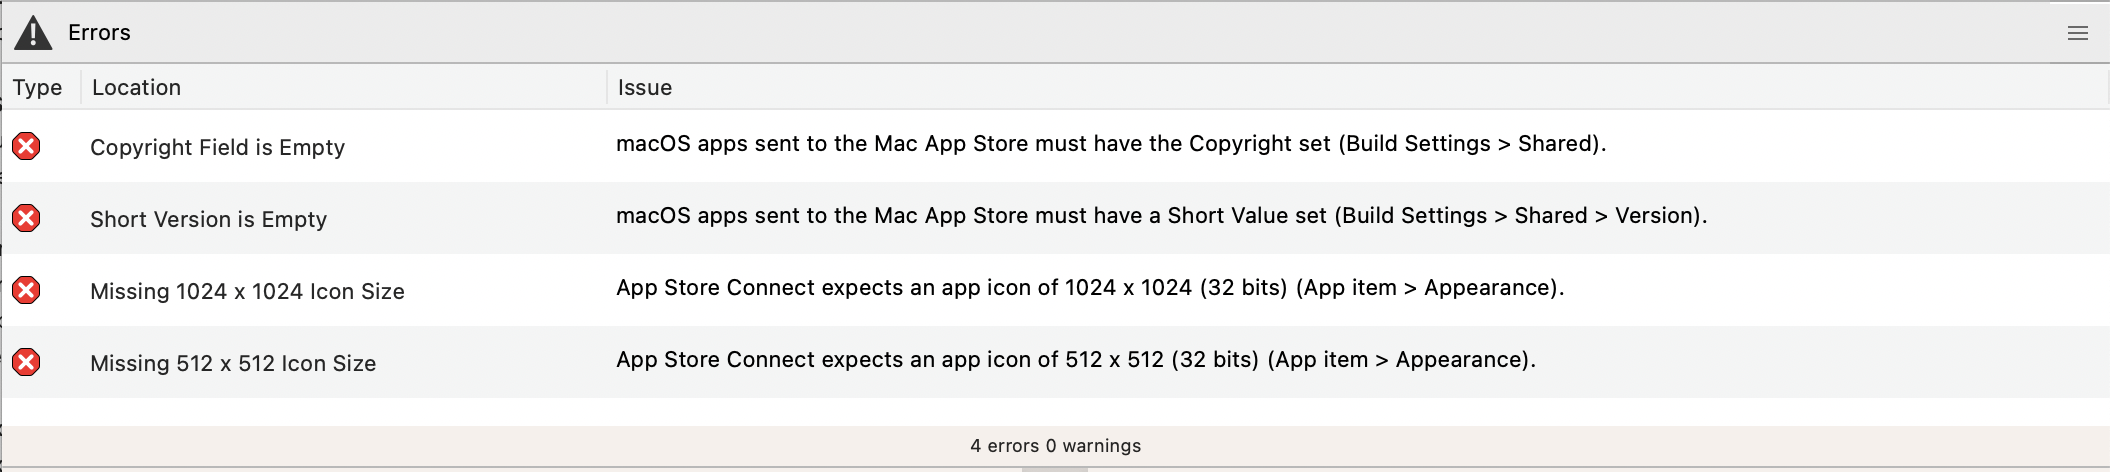
NOTE: Did you forget something? Every time you click the Publish button (or select the equivalent “Build and Publish to App Store Connect” menu item from the Project menu), the IDE will run a “checklist.” If something needs to be set in the IDE before uploading the app to App Store Connect, any errors will be shown in the IDE’s Error Panel, pointing out “what” needs to be fixed and “where” to make the changes.
App Icon
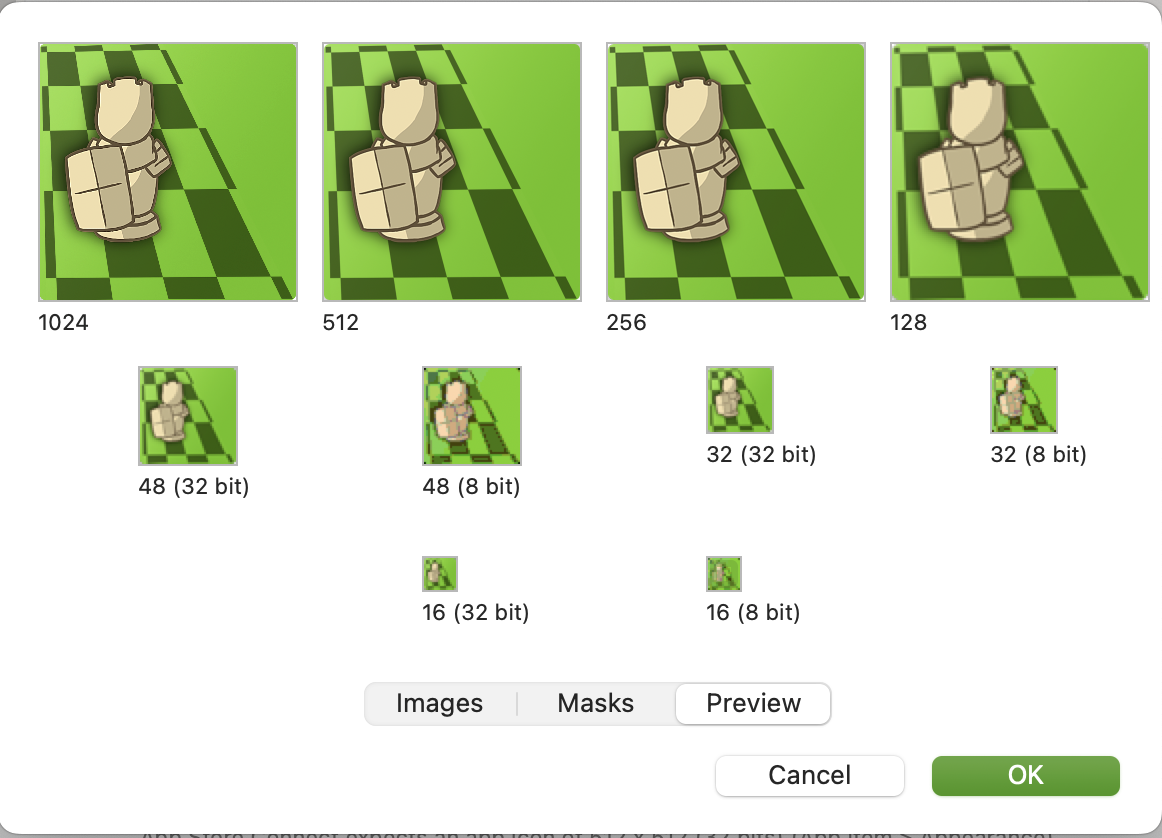
Nothing new here, apart from building your macOS app for regular or “web-based” distribution. Your app needs an icon in the required sizes. However, when it comes to publishing to the Mac/iOS App Store, this requirement is even more strict. Xojo will catch this before starting the app building process to save you time spent on compilation and uploading. So, make sure you add all the required icon sizes by selecting the App item in the project browser, then clicking the Appearance > Icon option in the associated Inspector Panel.
That action will open the Icon Editor, where you can drag and drop the different icon files for each size or paste them directly from your preferred image editor.
Publishing!
Click the Publish button. Once the “checklist” passes without any errors, a confirmation dialog will appear. Click the “OK” button to begin the process and upload your app’s new build to App Store Connect.
If everything goes smoothly, you will see a “Success” dialog at the end of the process. However, if there is an error during any of the steps, an error message dialog will provide more details about the issue, and the process will be interrupted, returning you to the IDE.
In either case—whether your new app build was successfully uploaded to App Store Connect or not—you can find the generated Log file in the same folder as the built app. If there are errors, you can open the Log file to review the information about the issue(s), which will help you resolve them before trying again. For example:
2025-01-23 12:54:35.030 *** Error: [ContentDelivery.Uploader.6000028E01C0] The provided entity includes an attribute with a value that has already been used (-19232) The bundle version must be higher than the previously uploaded version: ‘1.0.6’. (ID: d422b9bf-049f-4263-af43-8357c2fe5f00)
In this case, the Log file entry indicates that we tried to publish a build with the same version number as an already uploaded build on App Store Connect. If this new build includes changes or new features, the way to fix this issue is simply by increasing the version number (and the short version string) before publishing it.
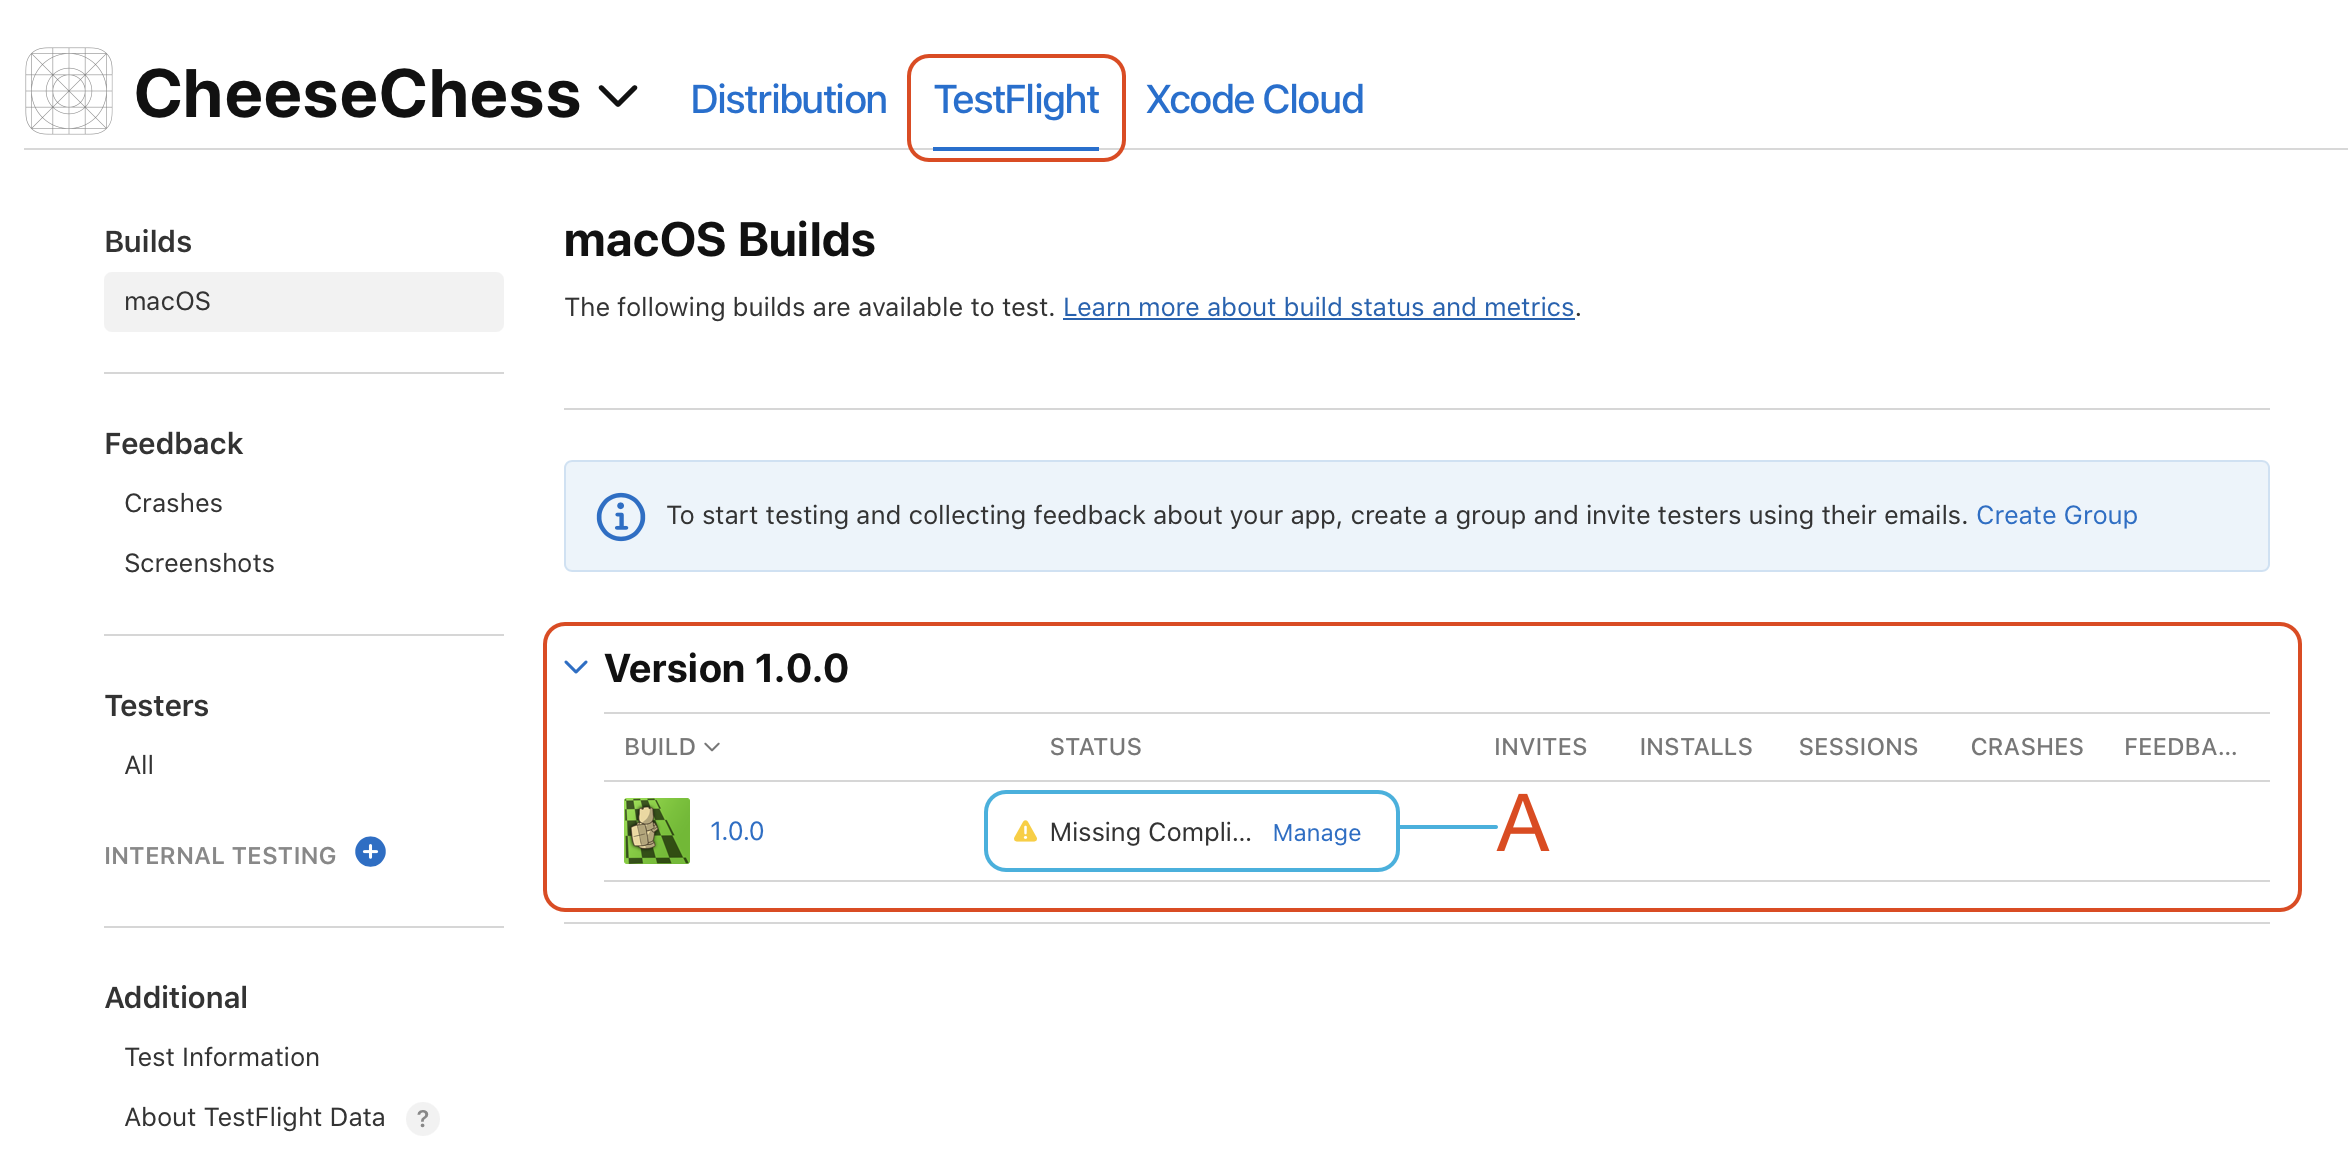
Testing with TestFlight
When you create a new app record in App Store Connect and access it, one of the tabs at the top of the page is named “TestFlight.” Click on it, and you will see all the uploaded builds of your app that are eligible for testing.
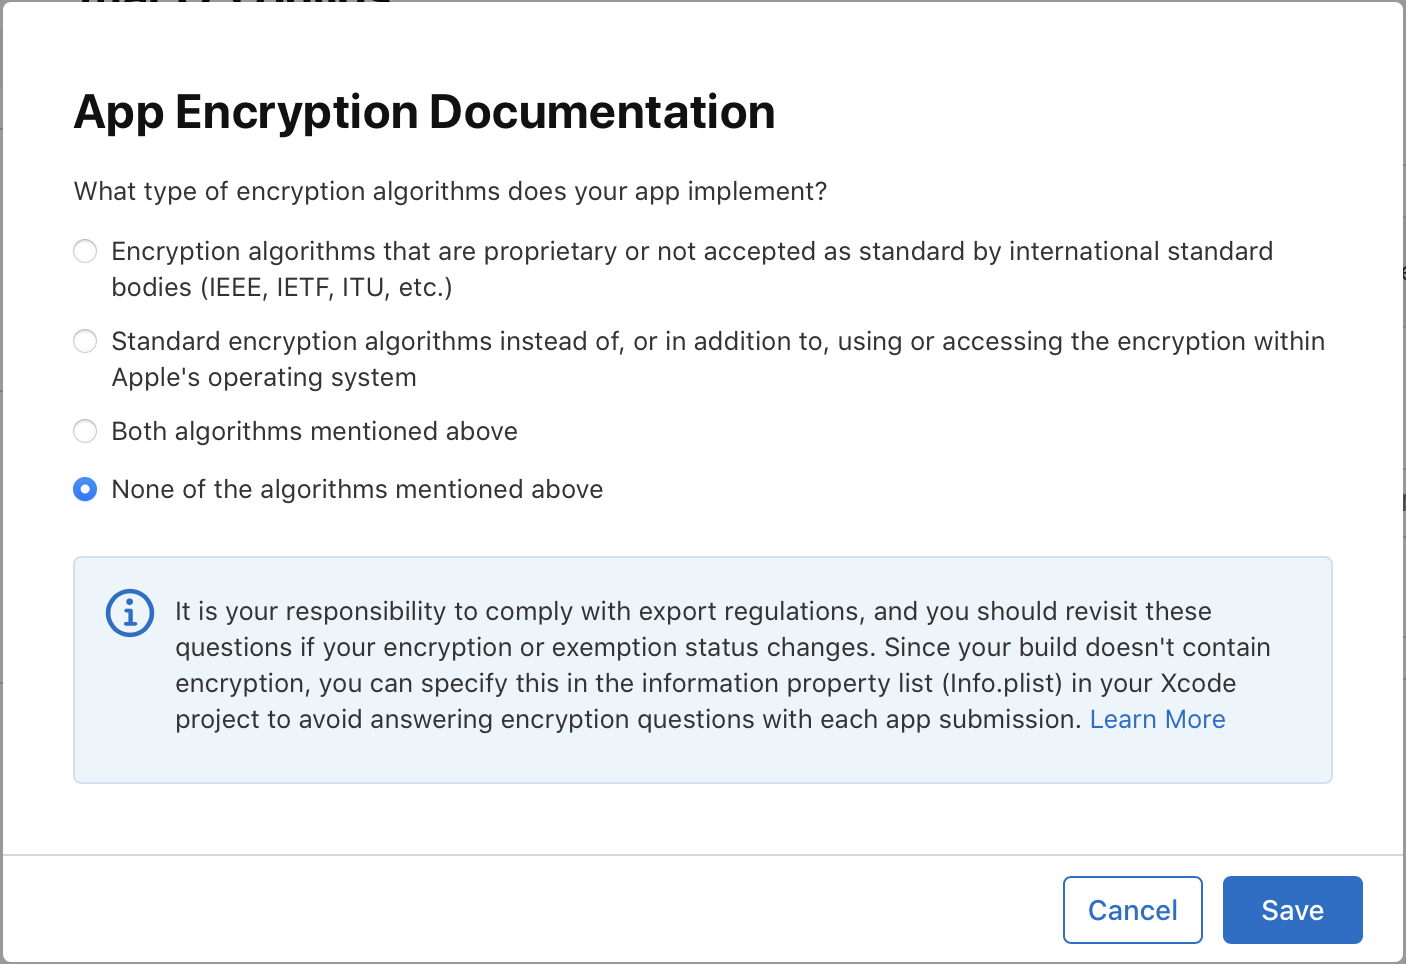
As you can see, there is a warning icon next to the app build we just uploaded (A). This is because Apple requires additional information from you regarding the app’s compliance with Encryption Export Regulations. To provide this information, click the associated “Manage” link to access the dialog where you can make your choice about it.
TIP: Use the new Property List Editor in Xojo’s IDE and add the following Key/Value pair to avoid manually going through the Encryption Export Regulations compliance process:
Key: ITSAppUsesNonExemptEncryption
Value: False
Once the requirement has been completed, the build status will change to “Ready to Submit.” As you can see, it also indicates that this build will be available to your testers for the next 90 days before expiring. This should be enough time before you send new test builds to them, anyway.
For each of your apps, you can create as many tester groups as needed. By default, there is only one entry: “Internal Testing.” You can create additional groups and add any members of your Apple Development Team to the groups you create. Click on the “+” icon to create your first group.
Give the new group a name and uncheck the “Enable automatic distribution” checkbox. Then, click the “Create” button.
Once the new internal testing group is created, you will be able to assign any uploaded (and not expired) builds of your app to it. You can also add members to the group (remember, these should be members of your Apple Developer Team!).
However, having internal testing groups might not be very helpful if you are a solo developer or part of a small team. The good news is that once you create the first, mandatory internal group, a new option will be added to the TestFlight sidebar.
External Testing
In this case, you will be able to invite up to 10,000 members to test your app. The main difference compared to internal groups is that once you select a build to be tested in any of the external groups, it must go through the Beta App Review process. This means the build won’t be immediately available to your testers until the review is complete. However, this process is only required for the first build—subsequent builds will be available immediately, just like in internal groups.
When inviting members to an external group, you have several options: you can create and share a public link, manually add testers, or even import them from a .csv file.
In any case, your testers will be able to download, install, and begin testing your app, as well as provide feedback!
In Summary
The new Publish feature simplifies the process of submitting your macOS and iOS apps to App Store Connect, making them available on the Mac App Store and iOS App Store directly from the IDE, without needing any external apps (such as Transporter).
Javier Menendez is an engineer at Xojo and has been using Xojo since 1998. He lives in Castellón, Spain and hosts regular Xojo hangouts en español. Ask Javier questions on Twitter at @XojoES or on the Xojo Forum.