
On the Apple side of code signing with developer certificates, we already know that the required root certificate, acting as the base anchor of the trust chain, is installed already on our Macs under the System Roots keychain.
But before we can reach our leaf developer certificates, we also need to have the Apple Development Intermediate certificates installed in our keychain. These are typically found in the Login keychain, though they can also be found in the System Roots or System keychains.
Installing Apple Developer Intermediate Certificates
Since Xcode 11.4.1 and later, these can be automatically downloaded and installed in the keychain, but if not, they can also can be downloaded from the Apple PKI webpage. The ones we are interested in are:
- Developer ID – G2
- Worldwide Developer Relations – G2
- Worldwide Developer Relations – G3
- Worldwide Developer Relations – G4
- Worldwide Developer Relations – G5
- Worldwide Developer Relations – G6
Note: The Developer ID – G2 certificate corresponds to the Developer ID Certification Authority. The WWDR certificates (G2–G6) correspond to the Apple Worldwide Developer Relations Certification Authority.
As you can see from the list, there are several versions (or generations) for the WWDR Intermediate certificate; so, which one should you download? The short answer: it depends.
On February, 7, 2023 the previous WWDR intermediate certificate expired; so Apple decided to rollout a new renewed version that will expire on February 20, 2030. As part of that update Apple issued additional Intermediate certificates to better segment the purpose of different certificates:
- G2: ECDSA signing for Apple Pay.
- G3: Software signing and Services.
- G4: Features supported by Apple Push Notification Service.
- G5: App Store Signing and Services.
- G6: ECDSA signing of Software and Services.
In practice, G3, G4, and G5 are sufficient for most scenarios.
Developer Certificates: The final goal!
To focus on the subject, what kind of leaf developer certificates are created from these two types of Intermediate certificates? This scheme will help:
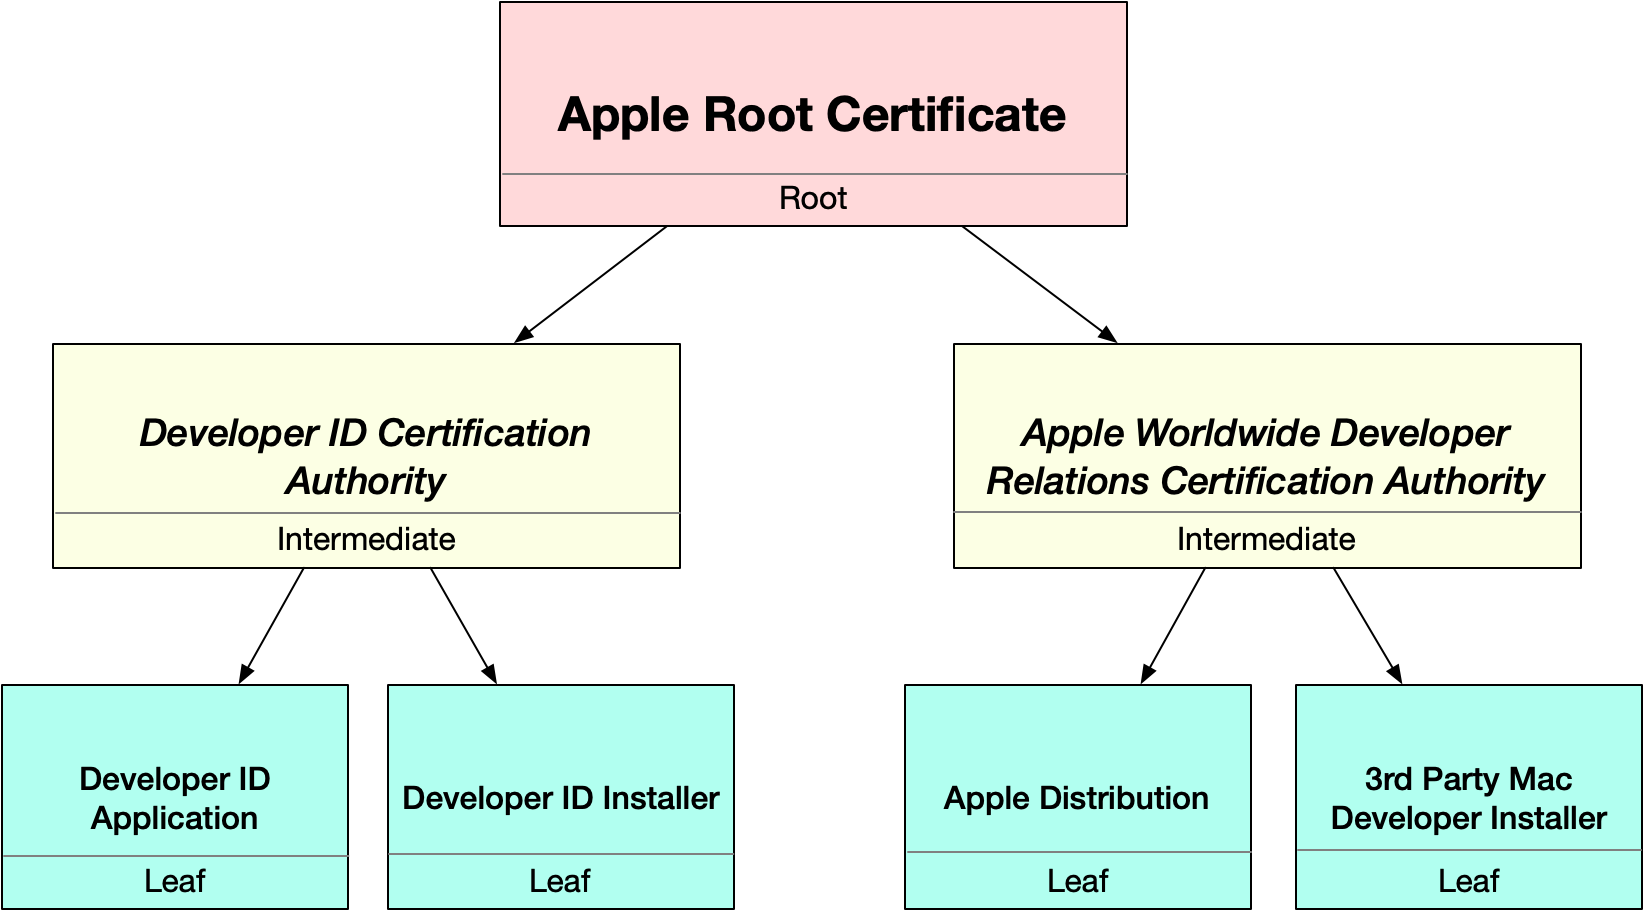
As you can see from the above diagram, there are four main leaf certificates we will use to sign our macOS apps, based on their prefix:
- Developer ID Application. Use this one to code sign a macOS app distributed outside the Mac App Store.
- Developer ID Installer. Use this one to code sign the Installer, DMG or .pgk file of a macOS app distributed outside the Mac App Store.
- Apple Distribution. This certificate is required to code sign a macOS app sent to the AppStore Connect for its distribution through the Mac App Store.
- 3rd Party Mac Developer Installer. This Certificate is required to code sign the package of the app sent to the AppStore Connect. For example, when using the Publish feature from the Xojo IDE.
Creating and Installing the Developer Certificates
As stated in the first article of this series, you need a paid Apple Developer Program membership. Once that’s in place, the easiest way to install these required certificates in your macOS Keychain is through Xcode.
So, if it is the first time you need to install them on a Mac computer:
- Go to Xcode > Preferences.
- Select Apple Accounts.
- Use your developer credentials to login into your developer account, or select it from the list if you are already logged.
- Select the Team from the list.
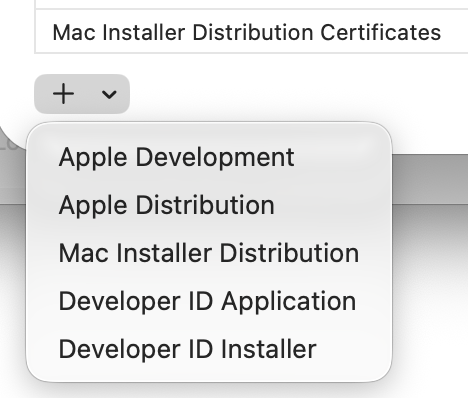
- Click the “Manage Certificates…” button.
- Click the “+” popup menu in the lower-left corner of the resulting window, and select the developer certificate you want to install (all of these if it is the first time you install them).
Note: Under the hood, Xcode follows the same process described for installing the developer certificates manually.
If you prefer to go through the manual process instead:
- Access the Apple Developer website.
- In Certificates, Identifiers & Profiles, click Certificates in the sidebar.
- On the top left, click the add button (+).
- Under Software, select Developer ID, then click Continue.
- Developer ID Application: This certificate is used to code sign your app for distribution outside of the Mac App Store Connect.
- Developer ID Installer: This certificate is used to sign your app’s installer Package for distribution outside of the Mac App Store Connect.
- Apple Development: Used to run and debug apps on macOS during development.
- Apple Distribution: Used to sign apps for submission to App Store Connect.
- Mac App Distribution: Used to sign macOS apps intended to be distributed through the Mac App Store.
- Mac Installer Distribution: Used to send the macOS app to the App Store Connect for TestFlight or distribution through the Mac App Store.
- Follow the instructions to create a certificate signing request.
- Click Choose File.
- In the dialog that appears, select the certificate request file (a file with a .certSigningRequest file extension), then click Choose.
- Click Continue.
- Click Download.
- The certificate file (a file with a .cer file extension) appears in your Downloads folder.
- To install the certificate in your keychain, double-click the downloaded certificate file. The certificate appears in the My Certificates category in Keychain Access.
It’s All About Identities
While Intermediate and Root certificates only have the Public Key on them, so they can verify other (leaf) certificates, the leaf certificates installed on your macOS Login keychain behave a bit different. Let’s see how.
Both if you use Xcode or create the CSR request manually to generate the developer certificates, using the Keychain Access app for that, in both of these scenarios a Private Key will be created and stored locally on your keychain as part of the process. Only the public key section of that private key is sent to the Apple servers so it can be included in the generated developer certificate. Once any of the possible developer certificates is downloaded and installed in the keychain, such certificate will have its private key associated with it:

The pair of the developer certificate and the associated private key is what is called an Identity.
Code signing With Developer Certificates
In fact, while we often say or hear “code signing with certificates,” the real signing of the app is done with the private key associated with that certificate. The certificate itself (and thus the public key portion of that key pair) is included in the signing process. This allows macOS to verify the signature each time the user runs the app
Do you remember the diagram showing how the “Ad-Hoc” code signing process works? Let’s compare it when the same process is done using a “Developer ID Application” Certificate… and, most important, the associated private key:
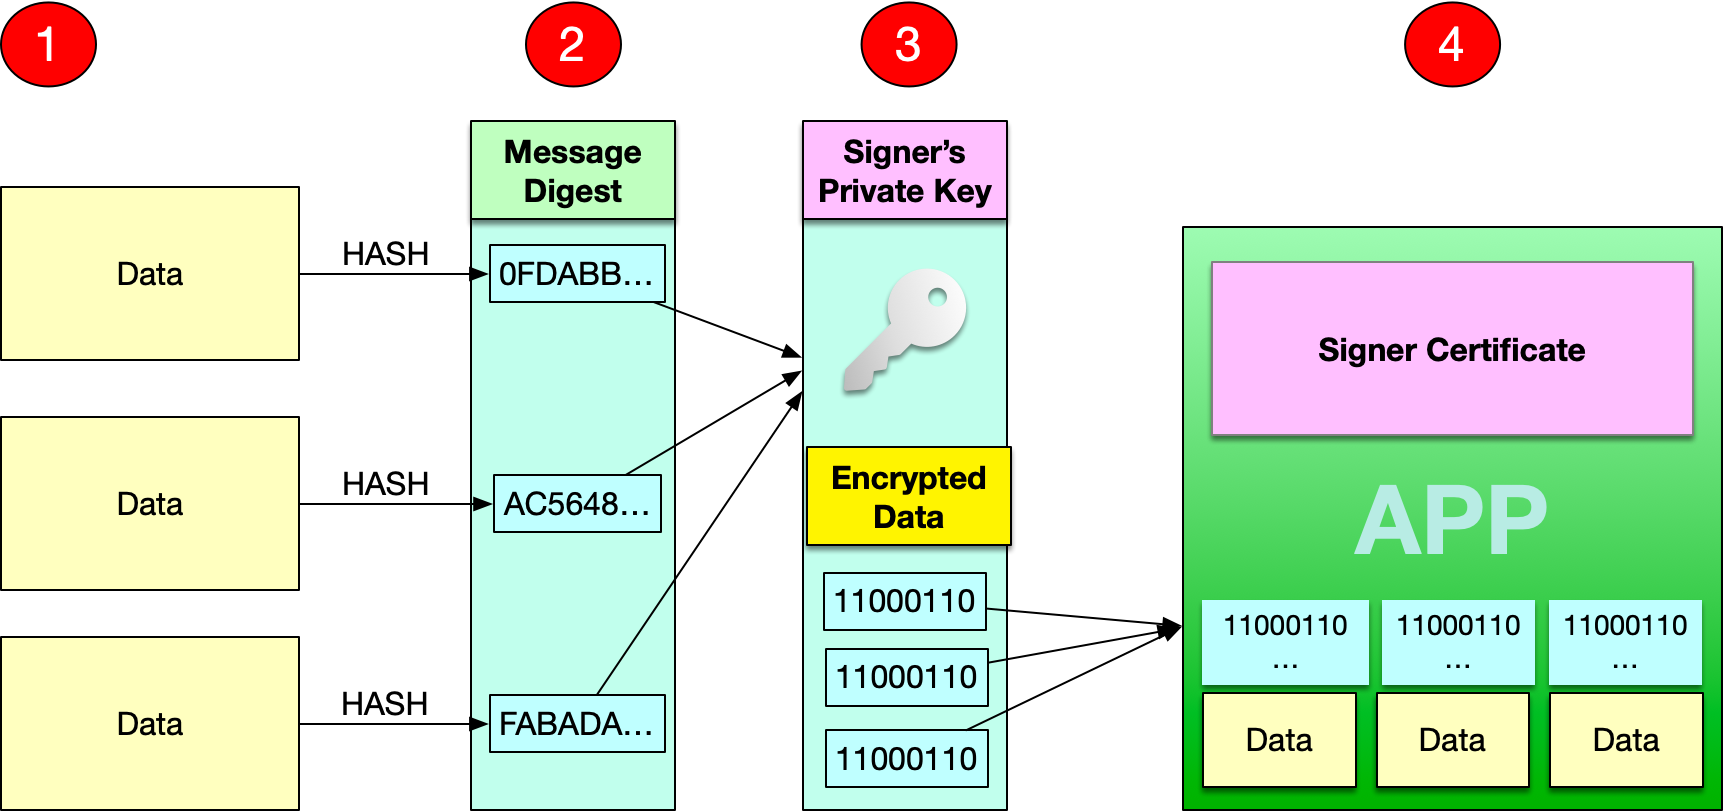
As you can see, in this case the data is cyphered using the private key from the developer certificate and, then, the certificate itself is stored as part of the app itself. So, if for example we build this time an empty Desktop app for macOS using the Developer ID Application, and open the resulting CodeResources file in a text editor we will see something different compared with the Ad-Hoc signed version:
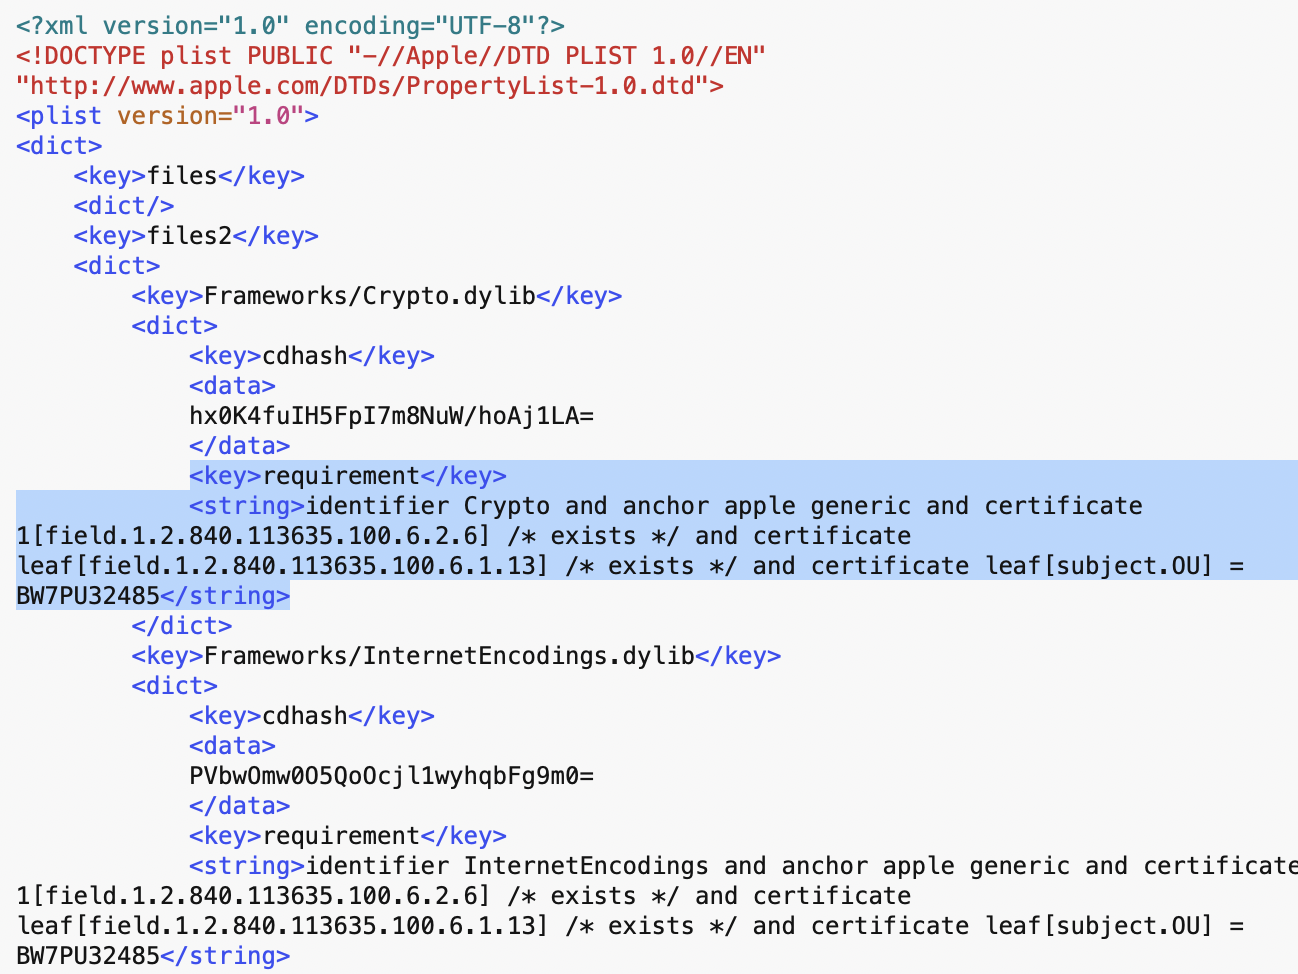
In this case the field requirement associated with each file and hash value is significantly more strict. In fact, it makes reference to the Chain of Trust Gatekeeper is required to follow and validate. In plain English, the highlighted lines come to say something like:
- Hey! make sure there is a Developer ID Application certificate (Apple Extension attribute —OID— 1.2.840.113635.100.6.1.13 for the X.509 certificate), for the developer with a TeamID BW7PU32485.
- Next, verify such certificate is issued by the “Apple Developer ID Certificate Authority” (other of the Apple-specific X.509 extension, attribute or OID. In this case: 1.2.840.113635.100.6.2.6).
- And finally, go down through the Chain of Trust and verify the previous one with the Anchor certificate (Apple Root CA, do you remember?)
So far so good. But how we can know if the app meets these requirements; and what about the certificates themselves? Well, it’s easy to check both using the codesign tool.
Open a Terminal window and type the following command:
codesign --verify -vvv "MyApp.app"
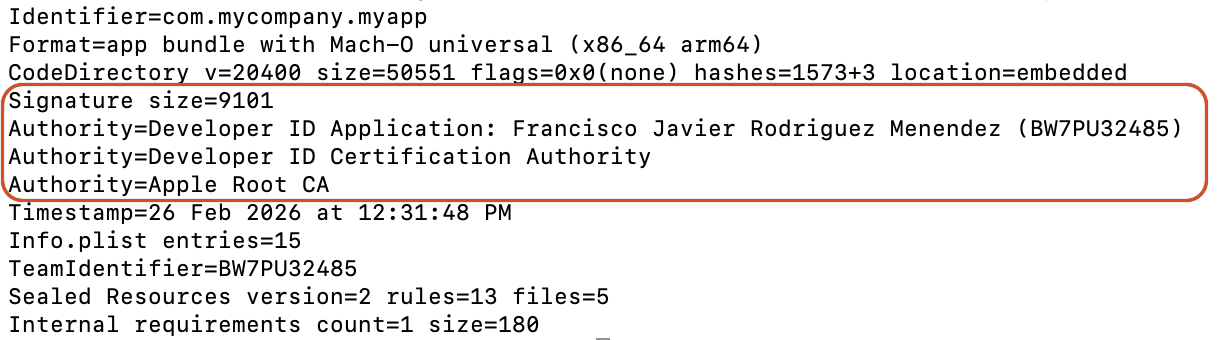
The output will be something similar to this:

As you can see in the highlighted lines, yes, it satisfies the Designated Requirements we saw in our CodeResources file! Also, the previous line states that it is valid on disk. That means:
- All of the expected files are present.
- There are no extra files.
- None of the files have been modified.
- A basic trust evaluation of the leaf certificate was successful.
- And it satisfies its own Designated Requirements (DR).
It is even possible to see the Chain of Trust for the code signature issuing:
codesign --display -vv "MyApp.app"
And if you are curious enough, it is even possible to extract the embedded certificates stored in the CMS structure within the code signature:
codesign --display --extract-certificates "MyApp.app"
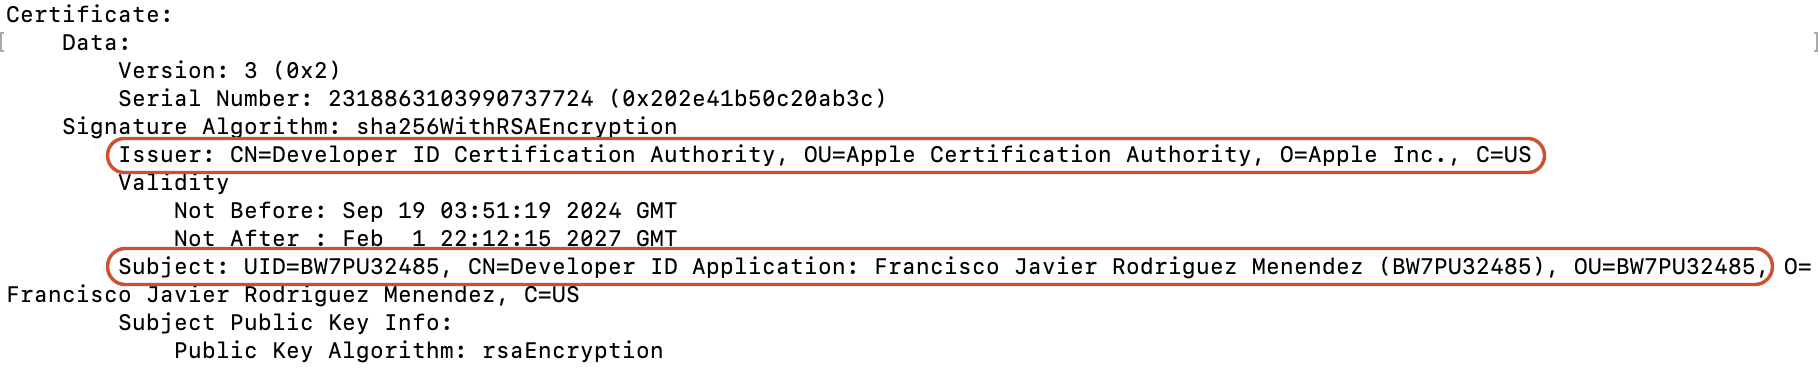
As result it will, usually, create three files. Take a closer look at the “Issuer” and “Subject” lines; specially on the Subject line for the OU value (Organizative Unit or, using Apple wording, the TeamID) for the codesign0 file. Do you remember the “leaf[subject.OU=BW7PU32485]” data from the CodeResources file? :
codesign0. This is the file for the Leaf certificate; in our example “Developer ID Application”.
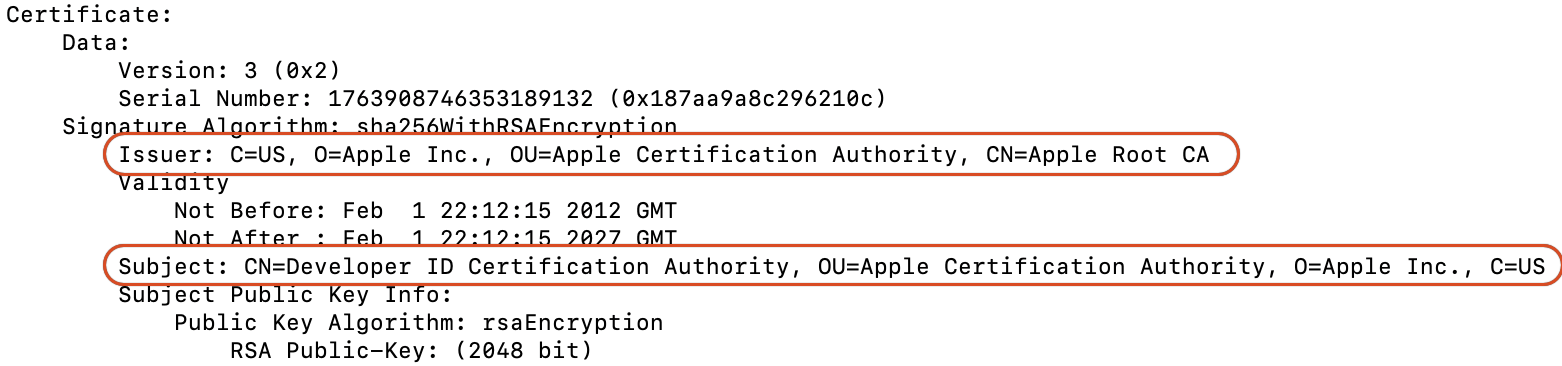
codesign1. This one is for the Intermediate Certificate; in our example “Apple Developer ID Certificate Authority”.
codesign2. This one is for the Anchor Certificate; in our example “Apple Root CA”
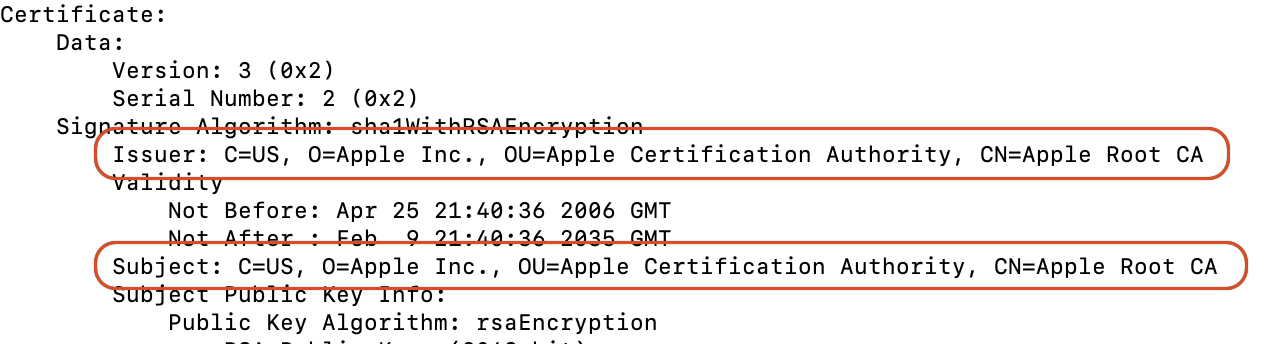
As shown by the Issuer line in the codesign0 file for our “Developer ID Application,” it points to the previous certificate in the trust chain—the Developer ID Certification Authority. The codesign1 file for the extracted Developer ID Certification Authority points to the Apple Certification Authority in its Issuer field. Finally, the codesign1 certificate points to itself because, as the Root Certificate, it serves as the anchor for the trust chain.
Wrapping up
In this second article, we delved deeper into how Apple Developer certificates work, how a macOS app is signed (Ad-Hoc or with a specific developer certificate), and how the OS’s security features validate the signing when a user tries to run the app.
In the next article, we will cover more details about signing apps for the two main distribution types: Direct distribution and Mac App Store. We will also discuss what happens when certificates expire and how to troubleshoot the most common issues related to development certificates.
Javier Menendez is an engineer at Xojo and has been using Xojo since 1998. He lives in Castellón, Spain and hosts regular Xojo hangouts en español. Ask Javier questions on Twitter at @XojoES or on the Xojo Forum.
Code Signing on macOS: What Developers Need to Know