
In this Xojo tutorial we will see how simple it is to make an iOS App that shortens an entered URL using the public API of Bit.ly. We will use our own subclass inherited from Xojo.Net.HTTPSocket, and the Declare statement in order to use some functions and methods found on the native Cocoa Touch API. In fact, the use of Declare is mandatory because with the new Xojo Framewok we don’t yet have access to the EncodeURLComponent function available with the old framework. This one is a big help in substituting any ilegal character with his hexadecimal value for the final URL’s composition.
In addition, we will also use the Declare statement to access the iOS Clipboard so we can Copy the shortened URL in order to use it in any other app installed on the device.
Before you can start with this tutorial, make sure you have installed Xcode on your Mac. You’ll need the Simulator app, included with Xcode, in order to run any iOS app developed with Xojo (you can download and install Xcode for free from the Mac App Store). You will need also a General OAuth key to use when accessing the Bit.ly’s API exposed methods. To get your own key, you have to create an account on Bit.ly and follow the instructions found here.
Of course, to follow this tutorial you also need to install Xojo on your Mac! You can always download the most recent release of Xojo from here.
Designing the interface
Run the Xojo IDE and select the iOS App template from the Project Chooser. As result, the IDE will create a new project that already includes the barebones items in order to have a functional App. In fact, clicking the Run button will launch the app on the Xcode’s Simulator showing the default View… but nothing else.
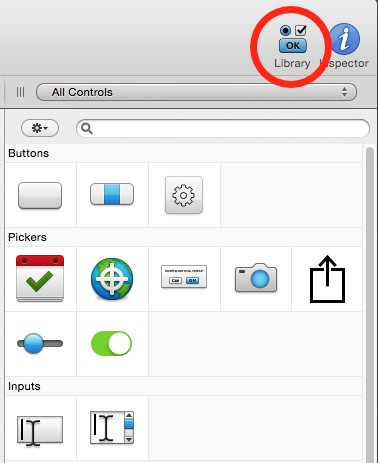
Choose the View1 item on the Navigator (the leftmost column on the IDE). This action will show the project default view on the Layout Editor. Click on the Library button and you will see all the objects or graphic components (UI elements) available for you to design the user interface for your iOS apps, as shown in this picture.
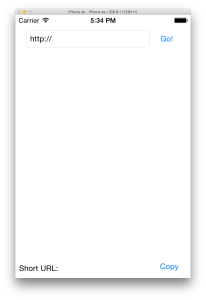
Drag the TextField control from the Library (found below the Inputs group) and drop it on the upper side of the view. Use the control handlers and the alignment guides to adjust his position and size, as shown in the following picture.

Select the just added TextField and click on the Inspector button in order to change some properties for the control. Here is the place where you can change some attributes like the control’s name (the one used to refer the control from code), the text color, keyboard type, text alignment, font size, etc. In this case, we will change these properties:
- Name: txtURL
- KeyboardType: URL
- PlaceHolder: http://
- Text: http://
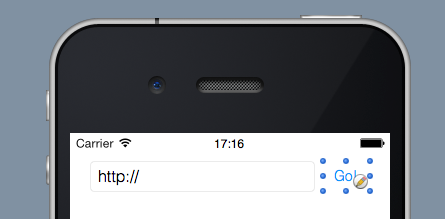
Once done, drag a Button from the Library and place it to the right of the TextField added before. Use the control handlers to adjust their size, and push on the icon with the picture of a pencil to change the label text to “Go!”, as shown in this picture.
Besides shortening the typed URL, our iOS App will also show the corresponding webpage for that URL, something as easy as placing a HTMLViewer control instance from the Library below the TextField, as shown in the following picture.
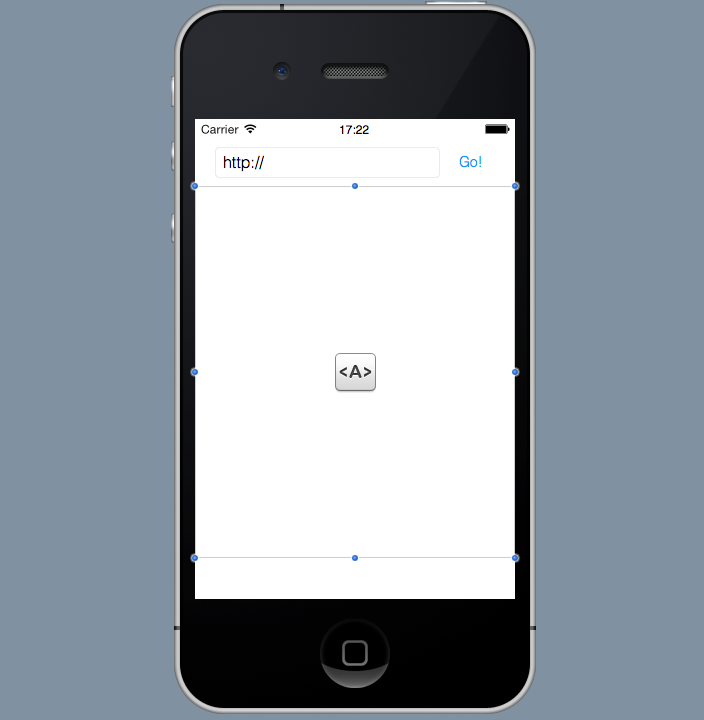
Finally, we will add a couple of Label controls below the HTMLViewer and a second Button control. The leftmost Label control will be a simple… well… label, but the second one will reflect the shortened URL. Place these controls from the Library, adjusting their sizes and positions as shown in this picture.
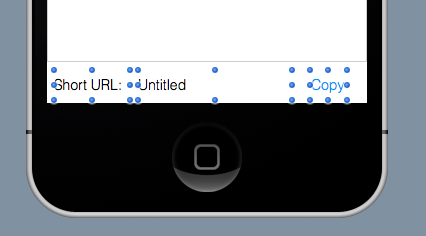
Choose the central Label, the one used to show the shortened URL, and these properties, with the help of the Inspector:
- Name: lblShortURL
- Text: (vacío)
We finished our User Interface design! (tough?) In fact, you can again click the Run button from the Xojo IDE in order to run the app on the iOS Simulator. Once again, our default View will show up and, this time, you can play with the TextField and the Buttons… but nothing will happen yet. This is normal, we have to put the code on these controls we want to execute as a reaction to some kind of user interaction (event).
Return to the Xojo IDE, stop the app execution (click on the Stop button) and change your interface designer hat with the programmer one. Yeah, it’s time to write our own subclass in charge of communicate with the Bit.ly API!
Talking with Bit.ly’s API
It’s time to write our communication class with the Bit.ly’s API. That’s the class responsible of making the web request (via HTTP protocol) to the exposed method by the remote API…and to receive and work with the returned data. And, when it comes with web communications where we have to asynchronously deal with the received answer, we have to use our inherited subclass from Xojo.Net.HTTPSocket in order to add the specialized behaviour over the one found on the base class.
Choose Insert > Class to add a new Class to the project. Click on the just added class on the Navigator and change these attributes on the Inspector:
- Name: BITLYSocket
- Super: Xojo.Net.HTTPSocket
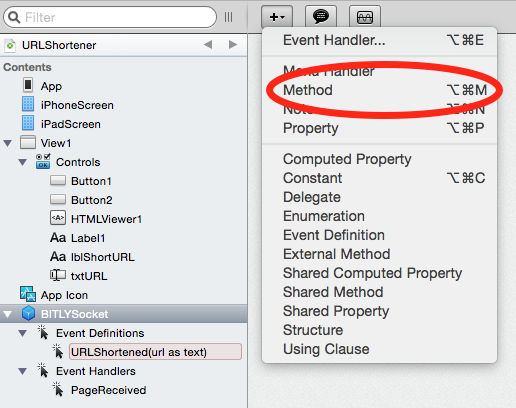
Click now the ‘+’ button on the IDE toolbar and choose the Event Handler menu option, as shown in this picture:
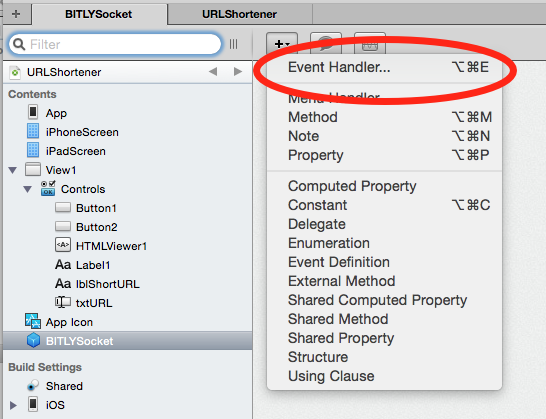
Select the PageReceived event on the resulting Window and click the Ok button. This action will add the event under the ‘Event Handlers’ hierarchy for our BITLYSocket class. In fact, this event will fire, executing the associated Xojo code, every time our socket receives data as result of our HTTP requests.
Type these lines of code in the Code Editor for the PageReceived event handler:
if HTTPStatus = 200 then
  dim data as Dictionary = xojo.data.ParseJSON( xojo.core.TextEncoding.UTF8.ConvertDataToText(content) )
  dim dataurl as Dictionary = data.Value( "data" )

  raiseevent URLShortened( dataurl.Value( "url" ) )
end if
As you can see, we check the returned Status Code to make sure that our request was properly processed (integer value 200). Next, we assign the result of parsing the returned data as a JSON structure to the ‘data’ variable, defined as a Dictionary type. (Xojo makes it really easy to interchange JSON and Dictionary structures/objects!)
The third line of code is the one in charge of creating the ‘dataurl’ Dictionary variable, and that will point to the Dictionary that really has the data we are interested in: the shortened URL. Finally, we raise a new event on our own class, passing the shortened url as Text.
You can find that the keys used in the Dictionary variables to retrieve the associated data, are the ones provided by Bit.ly in the response data, whose structure is documented and available on the Bit.ly’s API website.
To define a new event for our class, make sure that the BITLYSocket item is selected on the Navigator and click again on the ‘+’ button on the IDE Toolbar. This time, choose the ‘Event Definition’ menu option, as shown in this picture:
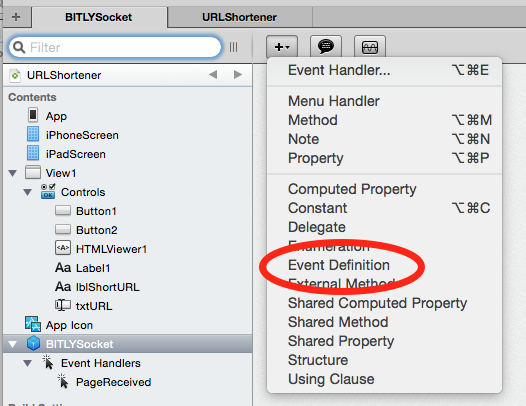
Unlike when we add a new Method to a class, the new event definition just allows us to write its signature; I mean, the event name and the parameters it will receive (if any) and/or the returned type (if proceed). After all, the code implementation for the event is a job of the Class consumer: the instances created from the class that decide to add the event.
As for our class, the added event will be responsible for passing the shortened URL to the class consumer (as we have seen in the previous code snippet), so the instance can decide what to do with the received data. In our app, this will be assigning the shortened URL (received as Text) to the central Label of our user interface.
Choose the added event and modify the following properties on the Inspector:
- Event Name: URLShortened
- Parameters: URL as Text
HTTP Request on iOS
With the BITLYSocket selected on the Navigator, we are going to add a new Method. This will be the entry point for the class consumer to pass the URL to be shortened. For that, click again on the ‘+’ button from the IDE toolbar and choose the Method menu option.
Type the following values on the associateed Inspector:
- Method Name: ShortURL
- Parameters: URL as Text
And type the following code on the Code Editor for the just added method (ShortURL):
Declare Function CFURLCreateStringByAddingPercentEscapes lib "Foundation" _
  (allocator as Ptr, origString as CFStringRef, charactersToLeaveUnescaped as CFStringRef, _
  legalURLCharactersToBeEscaped as cfStringRef, encoding as uint32) as CFStringRef

dim encodedURL as Text = CFURLCreateStringByAddingPercentEscapes(nil,url,nil,nil,&h08000100)

dim compossedURL as Text = "https://api-ssl.bitly.com/v3/shorten?access_token=" _
  + kToken + "&longUrl=" + encodedURL

me.Send("GET", compossedURL)
Here is where we find the first Declare statement on our code! In fact this one is responsible for calling the CFURLCreateStringByAddingPercentEscapes function in order to substitute the illegal characters on a URL with their hexadecimal values. This is done with the second line of code, where we call the function, assigning the result to the ‘encodedURL’ variable.
The third line of code is where we compose the final URL in order to call the Bit.ly API’s method, putting the OAuth key, present here as the kToken constant (define your own class constant, and assign your OAuth key to it), and also adding the variable that points to the URL, with all their characters correctly escaped, to the end of the string.
The last line of code is where we make the request itself, using the Send method from the HTTPSocket base class. The first parameter is the method we want to use for the request (“GET” in this case), and the second parameter is the URL for the HTTP request.
We have finished our class definition!
Putting all to work together
Let’s add an instance of our BITLYSocket class to the app. For that, select the View1 item from the Navigator and, then, drag the BITLYSocket from the Navigator over the lower part of the Layout Editor. This action will show the Shelf, where you can drop the item in order to create a new instance named BITLYSocket1 (this one will be shown also under the View1 hierarchy on the Navigator).
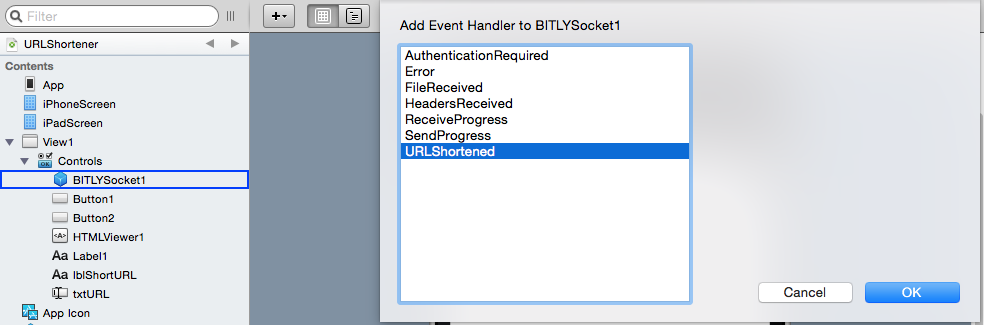
Select the BITLYSocket1 instance under the Controls section of View1 on the Navigator and add a new Event Handler. From the resulting window, you’ll see the event defined by us. Choose this event (URLShortened) and click the Ok button in order to add it to the BITLYSocket1 instance.
Type the following line of code in the associated Code Editor for the Event Handler:
lblShortURL.Text = url
This is the way we asign the received text (the shortened URL) to the Text property of the Label control instance.
But for this Event Handler to fire, we need to make the HTTP request in first place! Select the button Button1, add the Action Event Handler (the one that fires when the user pushes the button), and type the following code:
HTMLViewer1.LoadURL(txtURL.Text)
BITLYSocket1.shortURL(txtURL.Text)
Firstly, we load the web page for the URL typed on the TextField and, with the second line of code, we call the ShortURL method passing the URL as parameter. This line of code is what puts our communication socket to work!
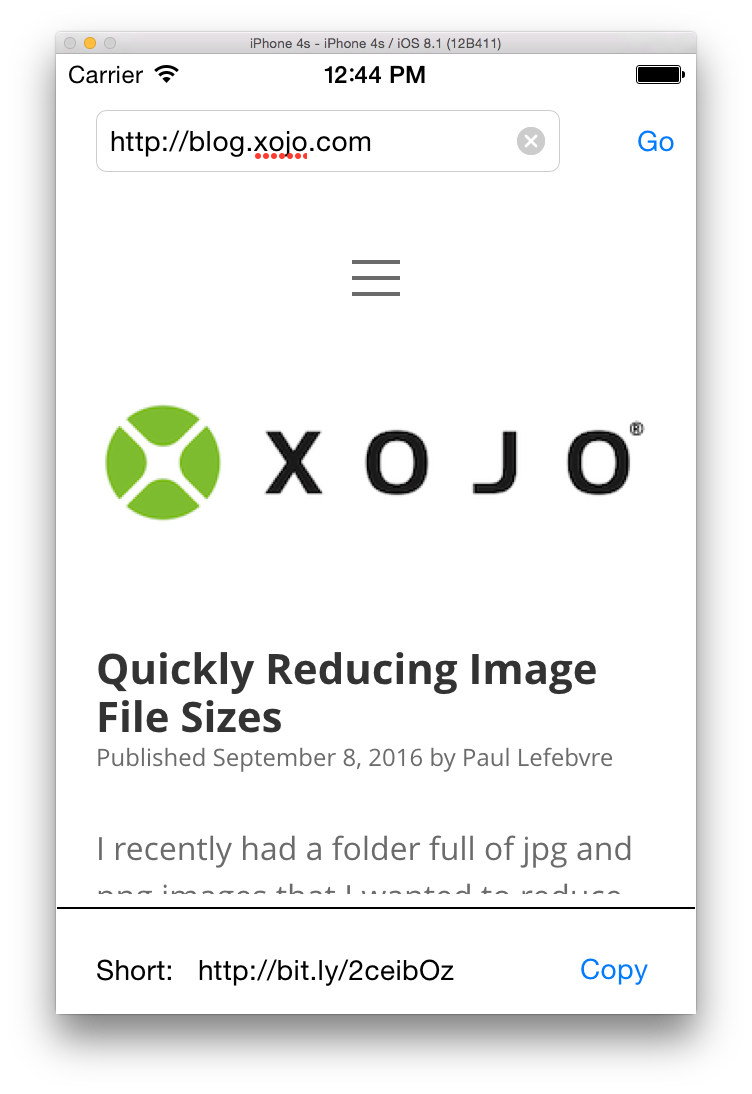
Run again the app on the iOS Simulator and type some URLs. You’ll see that now the app load the corresponding webpage and shows the shortened URL on the lower label of the interface!
As for the load of webpages on the HTMLViewer, you simply have to implement the solution published by Paul Lefebvre in this post.
Basically, create a text file with the following content and drag the file over the Project Browser in order the Xojo IDE can merge it with the global Info.plist created during the app compilation:
<?xml version=”1.0″ encoding=”UTF-8″?>
<!DOCTYPE plist PUBLIC “-//Apple//DTD PLIST 1.0//EN” “http://www.apple.com/DTDs/
<plist version=”1.0”>
<dict>
<key>NSAppTransportSecurity</
<dict>
<!– Include to allow all connections; avoid if possible –>
<key>NSAllowsArbitraryLoads</
<true/>
</dict>
</dict>
</plist>
Copying to the Clipboard
There is one last detail: If you tap on the Copy button… it simply doesn’t work. We need to put some code here too inside the Action Event Handler.
Choose the Button2 item on the Project Browser and add the Action Event Handler. Type the following lines of code to the associated Code Editor:
declare sub setValue lib "UIKit" selector "setValue:forPasteboardType:" _
  (obj_id as ptr, value as ptr, pasteboardType as CFStringRef)
declare function generalPasteboard lib "UIKIt" selector "generalPasteboard" (clsRef as ptr) as ptr
declare function NSClassFromString lib "Foundation" (clsName as cfstringref) as ptr
declare function stringWithString lib "Foundation" selector "stringWithString:" _
  (clsRef as ptr, str as cfstringref) as ptr

setValue(generalPasteboard(NSClassFromString("UIPasteboard")), _
  stringWithString(NSClassFromString("NSString"), lblShortURL.Text), "public.text")
This is the solution that allows our app to copy the shortened URL text to the iOS Clipboard. This snippet of code has been extracted from this thread on the Xojo forums, showing once more how great is the Xojo’s community!
Now, every time you tap the Copy button you’ll find the shortened URL on the Clipboard.
In short, in this tutorial we have seen how easy it is to make Web API requests from our Xojo iOS Apps, work with the returned data as JSON, and how powerful and useful the Declare statement is, in order to work directly with the methods and functions from the Cocoa Touch and Foundation frameworks from our Xojo code.
You can watch the video (in Spanish only) that talks you though this example.
Javier Rodriguez has been the Xojo Spanish Evangelist since 2008, he’s also a Developer, Consultant and Trainer who has used Xojo since 1998. He is in charge of AprendeXojo.com and the developer behind the GuancheMOS plug-in for Xojo Developers and the Snippery app, among others.