
In this tutorial we will see how to retrieve the file icon using macOS Quick Look technology and the regular file type associated with the selected file, for example JPEG, MOV, PDF, RTF, etc. Continue reading to learn how to achieve this using Declares.
Quick Look is the Apple technology in charge of creating icons and thumbnails based on a file contents. With Quick Look, the user can get a more precise preview of the contents stored in the selected file without having to open it.
You can retrieve this kind of information in your macOS Xojo Desktop apps using the Declare feature of the Xojo language, as we already have seen in other blog posts. As you probably already know, Declares give you the ability to, well, “declare” from Xojo any call to functions or methods provided by external APIs and libraries as it is the case with the Frameworks available in the macOS operating system itself.
Once we have “declared” these kind of functions from Xojo code, they will be ready to be used when calling any of your own defined methods or any of the methods directly available from the Xojo classes.
You can download the Xojo Project file from this link.
We will start by adding a new method to a Module in a Xojo Desktop project using the following method signature:
- Method Name: IconForFile
- Parameters:
Extends f As FolderItem, tSize As Size, Optional QuickLookIcon As Boolean = True - Return Type:
Picture - Scope: Global
If you are new to coding in Xojo, then probably you’ll be wondering what “Extends” means in the signature method. In brief, that means that the method will be treated as a method for the data type (or class) included next to the defined parameter; in this case the FolderItem.
The main convenience of extended class methods is that your code will be more readable and you’ll be able to call the method on a data type instance using the dot notation. So, instead of using the following syntax:
Var f As FolderItem = FolderItem.ShowOpenFileDialog("")
Var tSize As New Size
tSize.Height = 128
tSize.Width = 128

var p As Picture = IconForFile(f, tSize) // IconForFile as a regular method definition
We are able to call the method this way:
Var f As FolderItem = FolderItem.ShowOpenFileDialog("")
Var tSize As New Size
tSize.Height = 128
tSize.Width = 128

var p As Picture = f.IconForFile(tSize) // IconForFile as an extended method for the FolderItem class
Notice as the second chunk of code is calling the method using the dot notation on the FolderItem instance referenced by the f variable and how, in that case, we don’t need to provide the FolderItem variable as one of the parameters in the method call.
The second thing you’ll probably find of interest in the method definition is the use of the Optional keyword. We include that keyword in the method signature to indicate that such parameter is… well… optional; that is, you can provide the parameter in the method call or not. In fact, in the previous code snippets you might have noticed the last parameter was omitted in the method call.
In addition, we can also provide a default value for our Optional parameter; that is the value that will receive the method if we don’t provide a value of our own. In our method definition we are setting the QuickLookIcon parameter to the default Boolean value True.
Getting a Quick Look Icon… and a Regular one
With our method just added, the next step is to type in the associated Code Editor the code that will be executed when we call it. As you can see, we are using a lot of Declares here from several macOS frameworks. I have added a brief commentary about their tasks on each one of these, plus a link to the associated documentation webpage on the Developers area from Apple web, so you can continue learning or digging into their functionality and, specially, the parameters and return types declared in their original signatures so you can compare how these are translated or matched from Objective-C when declared in Xojo code.
#If TargetMacOS Then

  #Pragma DisableBackgroundTasks
  #Pragma DisableBoundsChecking
  #Pragma NilObjectChecking False

  If f = Nil Or Not f.Exists Then Return Nil

  Var path As String = f.NativePath

  // Declare for allocating (reserving memory for) an Objective-C object
  // https://developer.apple.com/documentation/objectivec/nsobject/1571958-alloc/
  Declare Function Alloc Lib "Foundation" Selector "alloc" (classRef As ptr) As ptr

  // Declare for autoreleasing (freeing from memory) an Objective-C object
  // https://developer.apple.com/documentation/foundation/nsautoreleasepool/1807021-autorelease/
  Declare Sub AutoRelease Lib "Foundation" Selector "autorelease" (classInstance As ptr)

  // Declare for getting a reference to an Objective-C class based on the received String
  // https://developer.apple.com/documentation/foundation/1395135-nsclassfromstring?language=objc
  Declare Function NSClassFromString Lib "Foundation" (className As CFStringRef) As ptr

  // Declare for getting a reference to the shared Workspace of macOS process.
  // https://developer.apple.com/documentation/appkit/nsworkspace/1530344-sharedworkspace/
  Declare Function sharedWorkSpace Lib "AppKit" Selector "sharedWorkspace" (classObject As ptr) As ptr

  // Declare for getting the Icon object from the recived file path
  // https://developer.apple.com/documentation/appkit/nsworkspace/1528158-iconforfile/
  Declare Function iconForFile Lib "AppKit" Selector "iconForFile:" (instanceObject As ptr, path As CFStringRef) As ptr

  // Declare for setting the size of an NSImage
  Declare Function setSize Lib "AppKit" Selector "setSize:" (instanceObject As ptr, size As NSSize) As ptr

  // Declare for Lock and Unlock an NSImage in Objective-C
  // https://developer.apple.com/documentation/appkit/nsimage/1519891-lockfocus?language=objc
  // https://developer.apple.com/documentation/appkit/nsimage/1519853-unlockfocus?language=objc
  Declare Sub LockFocus Lib "AppKit" Selector "lockFocus" (imageObj As ptr)
  Declare Sub UnlockFocus Lib "AppKit" Selector "unlockFocus" (imageObj As ptr)

  // Declare for getting a new Bitmap Representation based on the Locked view
  Declare Function InitWithFocusedView Lib "AppKit" Selector "initWithFocusedViewRect:" (imageObj As ptr, rect As NSRect) As ptr

  // Declare for getting an NSData object with the specified image format from a Bitmap Representation
  // https://developer.apple.com/documentation/appkit/nsbitmapimagerep/1395458-representationusingtype/
  Declare Function RepresentationUsingType Lib "AppKit" Selector "representationUsingType:properties:" (imageRep As ptr, type As UInteger, properties As ptr) As ptr

  Var targetSize As NSSize
  targetSize.Width = tsize.Width
  targetSize.Height = tsize.Height

  Var tRect As NSRect
  tRect.Origin.x = 0
  tRect.Origin.y = 0
  tRect.RectSize = targetSize

  Var data As ptr

  If QuickLookIcon Then

    //=================
    // Let's try to retrieve the icon from Quick Look

    Var dictClass As ptr = NSClassFromString("NSDictionary")
    Var numberClass As ptr = NSClassFromString("NSNumber")

    // Declare for getting an NSNumber object from the received Boolean value
    // https://developer.apple.com/documentation/foundation/nsnumber/1551475-numberwithbool/

    Declare Function NSNumberWithBool Lib "Foundation" Selector "numberWithBool:" (numberClass As ptr, value As Boolean) As ptr
    Var numberWithBool As ptr = NSNumberWithBool(numberClass, True)

    // Declare for getting an NSDictionary object from the received Key and Value
    // https://developer.apple.com/documentation/foundation/nsdictionary/1414965-dictionarywithobject/

    Declare Function NSDictionaryWithObject Lib "Foundation" Selector "dictionaryWithObject:forKey:" (dictClass As ptr, value As ptr, key As CFStringRef) As ptr
    Var dictInstance As ptr = NSDictionaryWithObject(dictClass, numberWithBool,"IconMode")

    Var fileClass As ptr = NSClassFromString("NSURL")

    // Declare for getting an NSURL object from the received path as string
    // https://developer.apple.com/documentation/foundation/nsurl/1410828-fileurlwithpath/

    Declare Function NSFileURLWithPath Lib "Foundation" Selector "fileURLWithPath:" (fileClass As ptr, path As CFStringRef) As ptr
    Var fileInstance As ptr = NSFileURLWithPath(fileClass, f.NativePath)

    // Declare for getting the Quick Look based icon thumbnail for the received file and with the specified size
    // https://developer.apple.com/documentation/quicklook/1402623-qlthumbnailimagecreate?language=objc

    Declare Function QLThumbnailImageCreate Lib "QuickLook" (allocator As Integer, file As ptr, size As NSSize, dictRef As ptr) As ptr
    Var imageRef As ptr = QLThumbnailImageCreate(0, fileInstance, targetSize, dictInstance)

    If imageref <> Nil Then

      Var BitmapImageRepClass As ptr = NSClassFromString("NSBitmapImageRep")
      Var BitmapImageRepInstance As ptr = Alloc(BitmapImageRepClass)

      // https://developer.apple.com/documentation/appkit/nsbitmapimagerep/1395423-initwithcgimage/

      Declare Function CGInitWithCGImage Lib "AppKit" Selector "initWithCGImage:" (bitmapInstance As ptr, CGImage As ptr) As ptr
      Var BitmapImageRep As ptr = CGInitWithCGImage(BitmapImageRepInstance, imageRef)

      data = RepresentationUsingType(bitmapImageRep, 4, Nil) // 4 = PNG

      AutoRelease(BitmapImageRep)
      AutoRelease(imageref)

      // Getting Xojo Picture instance from NSData object
      Var p As Picture = NSDataToPicture(data)

      data = Nil
      numberWithBool = Nil
      fileInstance = Nil
      dictInstance = Nil
      BitmapImageRepInstance = Nil
      Return p

    End If
  End If

  // If we reach this point is because there is no way to retrieve the
  // Quick Look icon for the file, it has returned a non valid object,
  // or we received the optional QuickLookIcon param set to False,
  // so we fallback to the regular one (FileType based).

  Var WorkSpace As ptr = NSClassFromString("NSWorkspace")
  Var sharedSpace As ptr = sharedWorkSpace(WorkSpace)
  Var icon As ptr = iconForFile(sharedSpace, path) // We get NSImage here

  Var resizedIcon As ptr = setSize(icon, targetSize)

  // Getting bitmap image representation in order to extract the data as PNG.

  LockFocus(resizedIcon)

  Var NSBitmapImageRepClass As ptr = NSClassFromString("NSBitmapImageRep")
  Var NSBitmapImageRepInstance As ptr = Alloc(NSBitmapImageRepClass)
  Var newRep As ptr = InitWithFocusedView(NSBitmapImageRepInstance, tRect)

  UnlockFocus(resizedIcon)

  data = RepresentationUsingType(newRep, 4, Nil) // 4 = PNG

  // Getting Xojo Picture instance from NSData object
  Var p As Picture = NSDataToPicture(data)

  data = Nil
  icon = Nil
  AutoRelease(newRep)

  Return p

#EndIf
As you can see, all the code is wrapped into a compilation conditional #If… #EndIf block. This means that the code will be compiled only if the condition is evaluated as true. In this case, it will compile only when we try to compile a desktop app for macOS as stated with the TargetMacOS keyword.
Next, we will use three #Pragma directives to speed things up a bit. In this case the pragma disable the tasks in the background, checking bound in collections like the Arrays and checking instances set to Nil, but only during the method execution, after which things return to their original settings.
The remaining code includes comments so you can see what happens at the more important points; for example whether to retrieve the Quick Look icon associated with the file or the regular one based on the file data type.
You’ll have probably noticed that we called a second method: NSDataToPicture. This method will be in charge of converting the data from an Objective-C NSDATA object to a Xojo Picture, using the technique used in previous blog posts (here and here). In this case we included it as a method call to avoid the duplication of code.
Let’s add a second method to our Module using the following values:
- Method Name:
NSDataToPicture - Parameters:
data As Ptr - Return Type:
Picture - Scope: Protected
Type the following snippet of code in the associated Code Editor:
Declare Function DataLength Lib "Foundation" Selector "length" (obj As ptr) As Integer
Declare Sub GetDataBytes Lib "Foundation" Selector "getBytes:length:" (obj As ptr, buff As ptr, len As Integer)

Var dlen As Integer
Var mb As MemoryBlock
Var mbptr As ptr

// Getting image data to generate the Picture object in the Xojo side
// We need to get the length of the raw data…
dlen = DataLength(data)

// …in order to create a memoryblock with the right size
mb = New MemoryBlock(dlen)
mbPtr = mb

// And now we can dump the PNG data from the NSDATA objecto to the memoryblock
GetDataBytes(data, mbPtr, dlen)

// In order to create a Xojo Picture from it
Return Picture.FromData(mb)
Adding Required Structures
As in previous tutorials dealing with Declares, we need to add several structures to the Module; these are required when calling to some of the declared functions in the IconForFile method. The required structures are:
- Structure NSOrigin
X As CGFloat
Y As CGFloat - Structure NSSize
Height As CGFloat
Width As CGFloat - Structure NSRect
Origin As NSOrigin
RectSize As NSSize
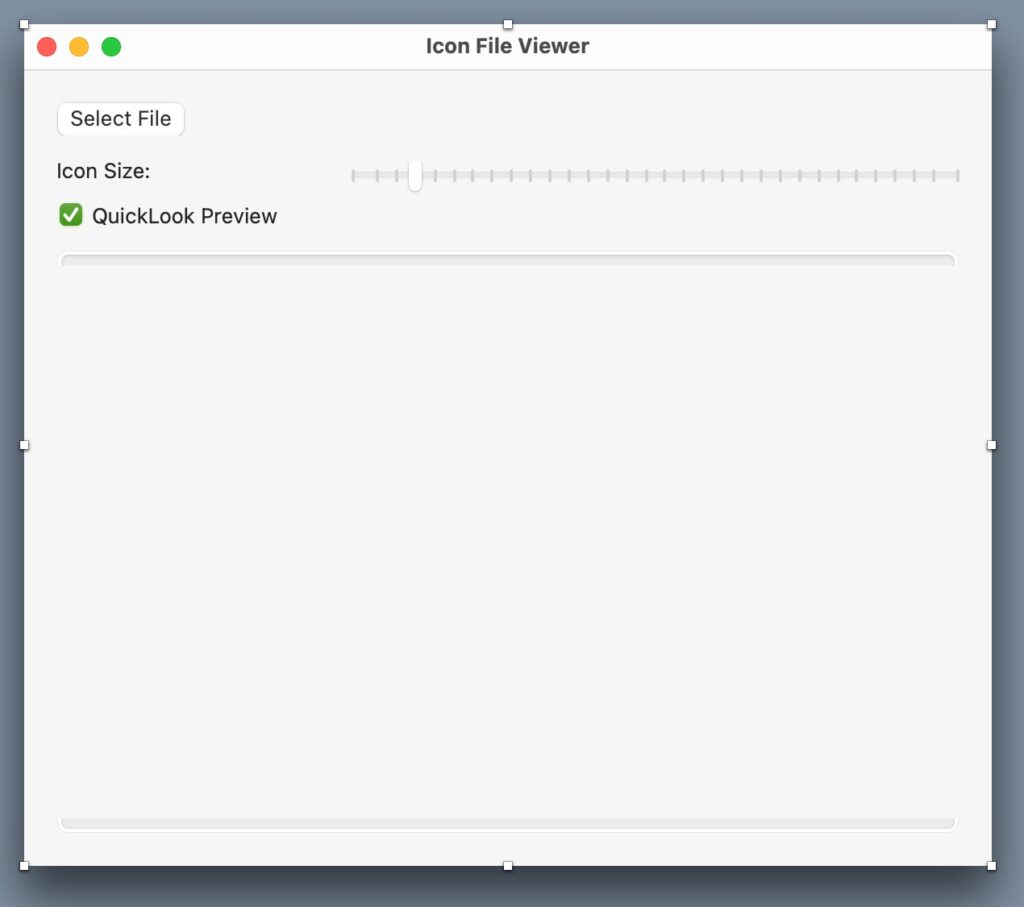
Creating the User Interface
We have prepared for retrieving the file icons on macOS, let’s continue creating a user interface for the app so we can test how it works! The final user interface will look like this:
Click on the Window1 window in the Navigator panel; that will display the window in the Layout Editor. With Window1 selected, go to the associated Inspector Panel and change the following properties:
- Name: MainWindow
- Title: Icon File Viewer
Next, with the MainWindow item still selected and displayed in the Layout Editor, drag a Button control from the Library and drop it in the top-left area of the window in the Layout Editor (you can rely on the displayed alignment guides to position the control).
With the button selected in the Layout Editor, change the following values in the associated Inspector Panel:
- Name: SelectFileBt
- Locking: Top and Left closed (locked)
- Caption: Select File
Return to the Library, drag a Label control and position it just under the button in the Layout Editor. Use the associated Inspector Panel to change the following values:
- Name: IconSizeLB
- Locking: Top and Left closed (locked)
- Text: Icon Size:
Drag a Slider control from the Library and position it just to the right of the label. Drag the right corner of the Label handler in the Layout Editor to change its width so it reaches the right margin of the window. Use the associated Inspector Panel to change the following values:
- Name: IconSizeSL
- Locking: Top, Left and Right closed (locked)
- Line Step: 32
- Allow Live Scrolling: Enabled
- Page Step: 32
- Tick Mark Style: Bottom Right
- Value: 128
- Minimum Value: 32
- Maximum Value: 1024
Once again, drag a CheckBox control from the Library and position it just below the Label in the Layout Editor. Use the associated Inspector Panel to change the following values for the CheckBox:
- Name: QuickLookCB
- Locking: Top and Left closed (locked)
- Caption: Quick Look Preview
- Visual State: Checked
The last control we need to add is an ImageViewer. Drag the control from the Library and position it just below the CheckBox. Use the ImageViewer resizing handlers in the Layout Editor so its width and height matches the right and bottom alignment guides in the window. Then, use the associated Inspector Panel to set the following values:
- Name: IconPreviewIV
- Locking: Top, Left, Right and Bottom closed (locked)
Adding Functionality to the User Interface
Let’s add the code to execute when the user interacts with certain controls. With the SelectFileBt button item selected in the Navigator or the Layout Editor, use the contextual menu to add the Pressed Event to it. Then, type the following code in the associated Code Editor:
file = FolderItem.ShowOpenFileDialog("")
If file <> Nil Then
  FileNameLB.Text = file.Name
Else
  FileNameLB.Text = ""
End If
GetIconForFile
With the IconSizeSL slider control selected, use the contextual menu to add the ValueChanged Event to it, and type the following code in the associated Code Editor:
If Self.File <> Nil Then
  GetIconForFile
End If
With the QuickLookCB checkbox item selected, use the contextual menu to add the ValueChanged Event, and type the following line of code in the associated Code Editor:
GetIconForFile
As you can see, all of these events will call the getIconForFile method, so we need to add it to the MainWindow window using the following signature:
- Name: GetIconForFile
- Scope: Public
…and type the following snippet of code in the associated Code Editor:
If file <> Nil Then
  Var tSize As New Size
  tSize.Height = IconSizeSL.Value
  tSize.Width = IconSizeSL.Value

  IconPreviewIV.Image = file.IconForFile(tSize, QuickLookCB.Value)

End If
In the final step, add the File property (as FolderItem type) to the window, because this will be the one responsible for storing the reference to the FolderItem selected by the user when they click the SelectFileBt button.
Once the File property has been added, run the app, click on the Select File button and change the slider value to retrieve the icon for the file using a different size. Try to click in the checkbox to change the retrieved icon from the Quick Look view (enabled by default) to the kind of icon associated with that particular file type.
Paul learned to program in BASIC at age 13 and has programmed in more languages than he remembers, with Xojo being an obvious favorite. When not working on Xojo, you can find him talking about retrocomputing at Goto 10 and on Mastodon @lefebvre@hachyderm.io.