
The WebImageViewer control allows you to load and display any image retrieved from a given URL. Wouldn’t it be nice to have that same kind of functionality in the Desktop and iOS versions of the ImageViewer? Continue reading and I’ll show you how to achieve just that.
Let’s start with the Desktop version. Once we’ve finished this bit, you’ll only need to repeat the same steps using the MobileImageViewer to doo the same in your iOS app- just copy and paste the events, methods and properties to your iOS project!
Begin with a new Desktop project in Xojo, add a new DesktopImageViewer by dragging it from the Library and dropping it into the Navigator. This creates a subclass of the DesktopImageViewer.
With the new CustomDesktopImageViewer still selected in the Navigator, use the associated Inspector Panel to change its name to “URLDesktopImageViewer” (of course you can use any name you want).
Adding Properties
Because we want to load an image from an URL, let’s start by adding some properties to our subclass. These will be responsible for storing the URL and the underlying URLConnection instance needed to retrieve the image data from the URL.
Start with the URL property. With URLDesktopImageViewer selected in the Navigator, choose the option “Add To URLDesktopImageViewer > Property” from the contextual menu. Once this is added, use the associated Inspector Panel to change the following fields:
- Name: URL
- Type: String
- Scope: Public
With that property still selected in the Navigator, choose the option “Convert to Computed Property”. This adds a couple of methods under the URL property: Get and Set.
Select the Set method. The code put in that method will be executed every time the user (or the code) assigns a new value to the property. Now, add the following lines of code to the associated code editor for the Set method:
mURL = value
LoadURL
You’ll likely want to display that property in the Inspector Panel so that the user can type a URL for that property using the Inspector Panel when a new instance of the class is added to the Layout Editor. In order to do that, select the URLDesktopImageViewer subclass in the Navigator and choose the Inspector Behavior option from the contextual menu. That action will bring up the following dialog:
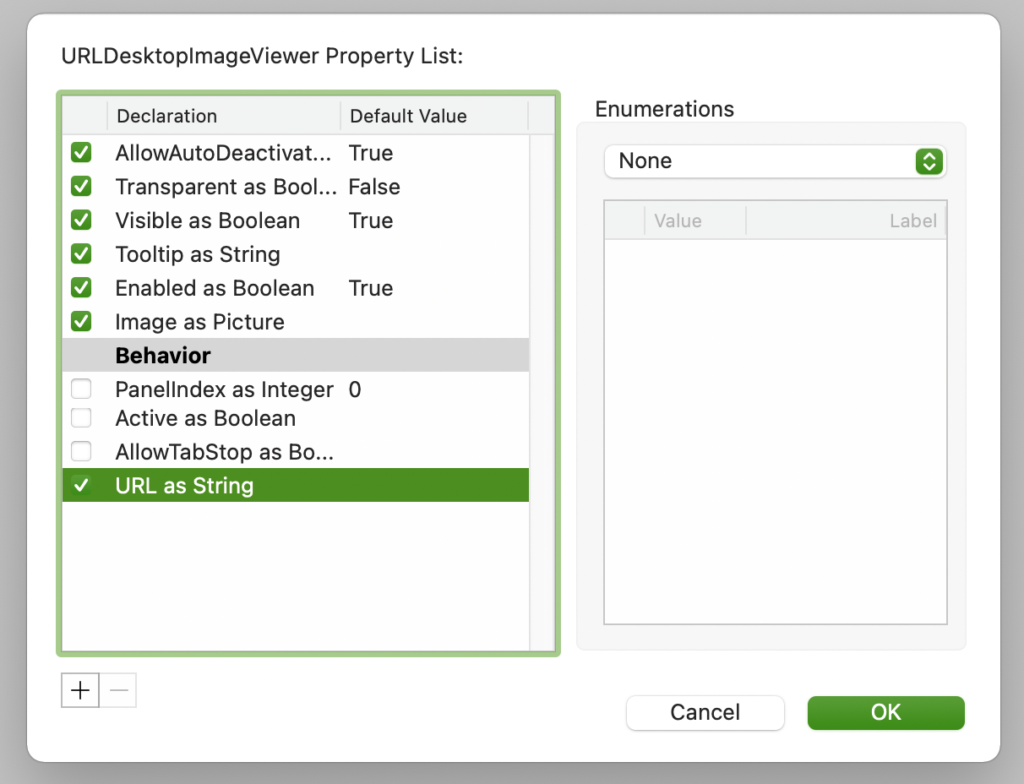
You’ll find the URL property under the Behavior section. Make sure to select the checkbox associated with the property and confirm the change by clicking the “OK” button.
Finally, add a second property to the URLDesktopImageViewer subclass. With the new property selected in the Navigator, use the associated Inspector Panel to change the following fields:
- Name: Connection
- Type: URLConnection
- Scope: Protected
Adding (and Defining) Events
With the URLDesktopImageViewer still selected in the Navigator, choose the “Add to URLDesktopImageViewer > Event Handler…” option from the contextual menu to open the “Add Event Handler” window.
Select the Opening and Closing events and click on the “OK” button to confirm and close the window. You’ll see these two events have been added under the subclass.
Select the Opening event handler in the Navigator under the subclass hierarchy (if you don’t see the event names, then click on the disclosure triangle associated with the “Event Handlers” entry). That action will bring up the associated Code Editor for the event.
Write these two lines of code:
LoadURL
RaiseEvent Opening
And because our subclass is “consuming” the Opening Event Handler, we need to create a new Event Definition for it, so the consumers of the subclass can handle their own code in that same event. To do that, with the URLDesktopImageViewer still selected in the Navigator, choose the “Add To URLDesktopImageViewer > Event Definition” option from the contextual menu. Xojo’s IDE will now add a new entry under the Events Definitions section of the class. Select it and use the associated Inspector Panel to change the following value:
- Name: Opening
Now, select the Closing event handler for the URLDesktopImageViewer subclass in the Navigator and type the following lines of code in the associated Code Editor:
If connection <> Nil Then
    RemoveHandler connection.contentReceived, WeakAddressOf ContentReceived
End If

RaiseEvent Closing
And because the subclass is consuming the Closing event handler, you’ll need to add a new Event Definition for it using the same event handler name (Closing).
Adding Methods
As you see, the code in the Set method for the URL property and the Opening Event Handler are calling the LoadURL method. So we need to add that! With the URLDesktopImageViewer selected in the Navigator, choose the “Add to URLDesktopImageViewer > Method” option from the contextual menu using the following value in the associated Inspector Panel:
- Method Name: LoadURL
And type the following lines of code in the associated Code Editor for the method:
If Me.mURL <> "" Then
    Try
      If connection <> Nil Then
        RemoveHandler connection.ContentReceived, WeakAddressOf ContentReceived
      End If

      connection = New URLConnection
      AddHandler connection.ContentReceived, WeakAddressOf ContentReceived
      connection.Send("GET", mURL)
    End Try
End If
In short, this creates a new URLConnection instance and assigns it to the Connection property. In order to handle the events generated during the URLConnection instance execution, we need to attach its events to some methods in our code. We achieve this with the AddHandler function which provides the name of the name we want to handle, in this case ContentReceived and the address of the method that will do the work. This is done by passing the method name (ContentReceived) to the function WeakAddressOf (or AddressOf, for the case).
Then, we need only to call the Send method of the URLConnection class and provide the “GET” verb and the URL that holds the picture we want to retrieve.
The last step is adding the ContentReceived method that will substitute the functionality of the ContentReceived Event Handler for our URLConnection instance.
Add a new method to the URLDesktopImageViewer subclass using the following values in the associated Code Editor:
- Name: ContentReceived
- Parameters: tCon As URLConnection, URL As String, HTTPStatus As Integer, content As String
- Scope: Public
As you can see, when we create a method that will substitute the functionality of an Event Handler, we need to provide the same type and number of parameters used by the original Event Handler, plus a first parameter that will hold the instance itself. In this case it is the parameter tCon As URLConnection.
Now type the following lines of code in the associated Code Editor:
Try

    If httpStatus = 200 Then Me.Image = Picture.FromData(content)

End Try
If we receive the “OK” status from the connection instance, then we assign the Picture created from the received data to the Image property of the control. And because things can go wrongTM, and we didn’t take care of all the possibilities in order to keep this tutorial short, that line of code is wrapped in a Try…Catch block.
Testing URLDesktopImageViewer
In order to test our subclassed control, select the Window1 item in the Navigator so the Layout Editor is open in the main area of the Xojo IDE. Then, drag the URLDesktopImageViewer item from the Navigator and drop it in the Window control displayed in the Layout Editor.
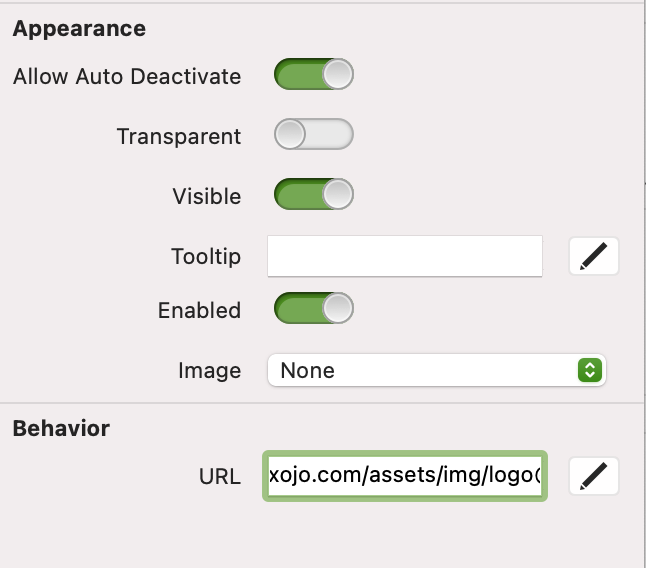
With the new control selected in the Layout Editor, use the Inspector panel to set its width and height values, and any other parameter you wish. The interesting thing here is that you’ll find the URL field under the Behavior section of the Inspector Panel; so go ahead and type any URL pointing to the image you want to retrieve (for example: https://www.xojo.com/assets/img/logo@2x.png)
Done! Run the app and if your computer is connected to the Internet you’ll see how the image is retrieved from the given URL and displayed by the ImageViewer!
Of course, you can repeat these steps (or copy and paste them) in order to re-create your own URLiOSImageViewer control, as you can see in the above screenshot, with the Xojo iOS app running in the Simulator.
Paul learned to program in BASIC at age 13 and has programmed in more languages than he remembers, with Xojo being an obvious favorite. When not working on Xojo, you can find him talking about retrocomputing at Goto 10 and on Mastodon @lefebvre@hachyderm.io.