
I was having some fun with badges, trying to recreate a design. I’ve ended up writing a few extension methods to use them on almost any WebUIControl.
But first, what’s an Extension Method anyway?
There are situations where you want to add functionality to a Xojo Framework class. Let’s say we want to add a method to every visual web control. We know that every visual control inherits from WebUIControl. This class can’t be modified, as it’s part of the framework. One option would be subclassing each control and adding new methods… but that’s so boring…

Extension Methods are part of the Modules feature, allowing us to extend classes with methods, even if we don’t have access to their source code.
Adding SetBadge and RemoveBadge methods to every visual control
The first thing you need is a Module. Press on the Add button from the toolbar and select Module. The name of the module is up to you, I’ll be using WebExtensions in this example.
Now add a new method into that module, called “SetBadge”. Then, in the inspector, ensure its visibility is set to Global, instead of Public or Protected.
The magic happens in the first parameter of this method. “Extends” is the reserved keyword for this feature, for example:
Extends myInstance As ExampleClass
Above method would be extending an imaginary class called “ExampleClass”, and its instance would be available inside that method, accessible from the variable “myInstance”.
In our case, for SetBadge, we want to use this method signature instead:
Extends control As WebUIControl, caption As String, indicator As String = "danger", top As Integer = -10, right As Integer = -10
Inside, paste the method contents:
Var classes() As String = Array("xojo-badge", "d-flex", "p-2", _
"border", "border-light", "bg-" + indicator)
classes.Add(If(caption.Length < 2, "rounded-circle", "rounded-pill"))
Var styles() As String = Array("height: 21px", "font-size: 10px", _
"align-items: center", "color: white", "position: absolute", _
"top: " + top.ToString + "px", "right: " + Right.ToString + "px", _
"z-index: 10")
If caption = "" Or caption = " " Then caption = " "
Var html As String = "<span class=""" + String.FromArray(classes) + _
""" style=""" + String.FromArray(styles, ";") + """>" + caption + "</span>"
Var js() As String
js.Add("$('#" + control.ControlID + " .xojo-badge').remove();")
js.Add("$('#" + control.ControlID + "').append(`" + html + "`);")
control.ExecuteJavaScript(String.FromArray(js))
What this little sorcery does is appending a new HTML layer into our control, using some Bootstrap’s component CSS classes. Did you notice we are using “control” instead of “Self”? It matches the “control” variable from the method definition.
Add another Extension Method for removing the badges, called “RemoveBadge”.
The method definition reads like this:
Extends control As WebUIControl
The content is a bit easier this time:
Var js As String = "$('#" + control.ControlID + " .xojo-badge').remove();"
control.ExecuteJavaScript(js)
That’s it. Plumbing done.
Now, if you have a WebButton called… “AwesomeButton”, you can set its badge using this code:
AwesomeButton.SetBadge("Hello!")
And to remove it:
AwesomeButton.RemoveBadge()
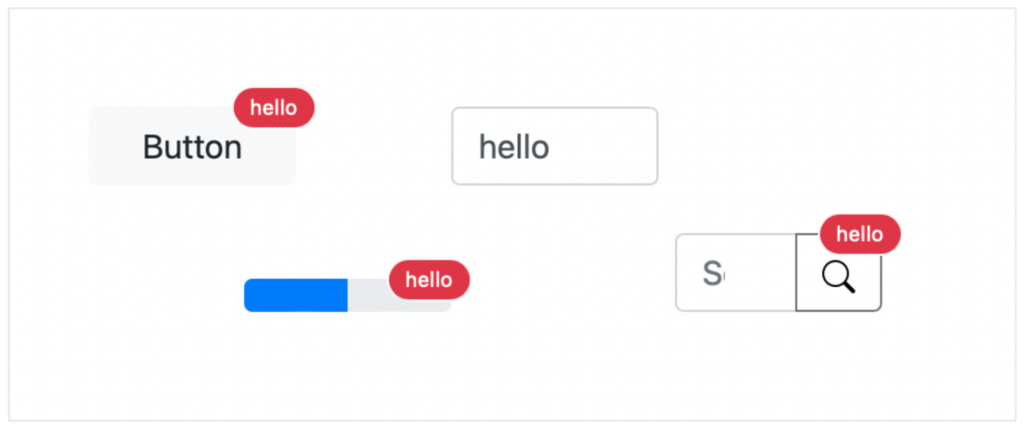
You can use these badges in different scenarios. From displaying a pending notifications counter in a WebButton, to validation errors in a WebTextField.
Adjust and play with the code to meet your needs! 🙂
You can download the example from the GitHub code repository.
Ricardo has always been curious about how things work. Growing up surrounded by computers he became interested in web technologies in the dial-up connections era. Xojo has been his secret weapon and language of preference since 2018. When he’s not online, chances are he will be scuba diving … or crocheting amigurumis. Find Ricardo on Twitter @piradoiv.