
This tutorial will show you how to deploy your SQLite based projects so they behave right on Desktop, Web and iOS, copying the database file to the right place on every target.
1. Adding the database file
You probably created your SQLite database file using an external editor; so first add that file to your Xojo project.
You can do that in several ways, but usually it’s best to add a Build Step. This way, the file will be added automatically to the folder of your choice every time you compile your app. Bonus: Doing this allows you to decide to use different paths when debugging or deploying your app.
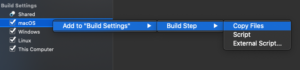
In order to add a new Build Step in a Desktop project select the target in the Build Settings then, from the contextual menu, choose the “Add to Build Settings > Build Step > Copy Files” option.
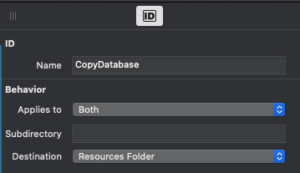
The previous action will give you access to the Inspector Panel for the just-added item where you will be able to type a name for the Build Step, choose if the copy file action will be executed both for debugging or deployment and, most importantly, choose the location where the file should be copied when the app compiles.
In fact, the Destination menu contains a number of typical paths (or most relevant folders). For example, a good Destination option would be “Resources Folder”. Of course, don’t forget to add the database file itself using the buttons on the Build Editor toolbar.
When you’re working with a Web project, you’ll find exactly the same behavior, even if you choose to deploy with Xojo Cloud.
On iOS, the only change is that you’ll have to choose the icon with an iPhone picture in it in order to access the Build Step contextual menu; in addition to the fact that every added resource needs to be signed with a certificate.
![]()
2. Copying the database file to a “Working” folder
You may think that the previous step is all you need to do, because if the database file is already copied in a well know path then you only need to provide that path as the DatabaseFile property on a new SQLiteDatabase or iOSSQLiteDatabase instance. But this is not the case.
They are many reasons you shouldn’t do that, specifically because the database would be open in read/write mode and if you write to that database file inside an application bundle, then you’ll be modifying a resource that would invalidate any certificate signature on your app.
The best thing to do is o detect every time you run the app if the database file has already been copied from the app bundle (or folder) into a target folder that doesn’t have an access problem when it is time to use the database. The Application Support folder is a good place for Desktop apps, while the Documents folder is fine for Xojo Cloud and iOS apps.
For example, if our database file is named “EddiesElectronics.sqlite” and our app name is “Xojotest”, then we can add the following code fragment into the Open Event Handler of a Desktop app:
Var source As FolderItem = SpecialFolder.Resource("EddiesElectronics.sqlite")
Var name As String = app.ExecutableFile.name.NthField(".",1)

// We check if there is a folder with the App name in special Application Data
// if not, we create it and copy the database file from Resources bundle/directory
If Not (SpecialFolder.ApplicationData.Child(name).Exists And SpecialFolder.ApplicationData.Child(name).IsFolder) Then SpecialFolder.ApplicationData.Child(name).CreateFolder
If Not SpecialFolder.ApplicationData.child(name).child(source).exists Then source.CopyTo(SpecialFolder.ApplicationData.Child(name))

Try
  // Create a SQLiteDatabase instance and try to open our database file from
  // the path
  pDatabase = New SQLiteDatabase
  pDatabase.DatabaseFile = SpecialFolder.ApplicationData.Child(name).Child("EddiesElectronics.sqlite")
  pDatabase.Connect

Catch e As DatabaseException
  MessageBox e.Message
End Try
For an iOS app, the code would be:
Var source As Xojo.IO.FolderItem = xojo.io.SpecialFolder.GetResource("EddiesElectronics.sqlite")

// We check if there is our database file already copied on the Documents Sandbox folder
// if not, we copy the database file from Resources bundle/directory
If Not xojo.io.SpecialFolder.Documents.Child("EddiesElectronics.sqlite").Exists Then
  source.CopyTo(xojo.io.SpecialFolder.documents)
End If

Try
  // Create a SQLiteDatabase instance and try to open our database file from
  // the path
  pDatabase = New iosSQLiteDatabase

  Var f As FolderItem = xojo.io.SpecialFolder.Documents
  pDatabase.DatabaseFile = f.Child("EddiesElectronics.sqlite")
  Call pDatabase.Connect

Catch e As RuntimeException
  MessageBox e.Reason
End Try
If you’re working on Xojo Cloud, the code will be even shorter. First, make sure that the Copy File Build Step has the following values in the Inspector Panel:
- Destination: Contents Folder
- Subdirectory: Documents
Then, the code will be:
Try
  pDatabase = new SQLiteDatabase
  pDatabase.DatabaseFile = SpecialFolder.Documents.Child("EddiesElectronics.sqlite")
  pDatabase.connect
Catch e as RuntimeException
  MessageBox e.Reason
End Try
What about a Web app that you host? That would mean you are in control about the folder/directory you want to use to store the app resources. Thus, it wouldn’t make much sense to automatize this process (but it is certainly doable following the same principles).
3. Simplifying the process
What we have seen already works, but that means that you need to change the file database name and probably that would change on every app you build. That also means that you’ll have to write the same code snippet again and again on every new app. Wouldn’t it be great to be able to extend the SQLiteDatabase and iOSSQLiteDatabase classes in order to simplify that?
Well, you can do that! Start by adding a new Module to the example project (for example one named “DatabaseExtensions”) with a couple of methods on it. The first method will be the one executed on our Desktop, Web and Console apps, because all of these targets use the SQLiteDatabase class.
So, add a new method using the following signature in the just-created module:
OpenDatabase( databaseName as String )
It extends the SQLiteDatabase class, adding a new method that takes as parameter the name of the file we want to copy on the “work” folder/directory.
The code you should type on this method is:
pDatabase = New SQLiteDatabase

#If TargetDesktop Or TargetConsole Or TargetWeb Then

  Var source As FolderItem = SpecialFolder.Resource( databaseName )
  Var name As String = app.ExecutableFile.name.NthField(".",1)
  // We check if there is a folder with the App name in special Application Data
  // if not, we create it and copy the database file from Resources bundle/directory
  If Not (SpecialFolder.ApplicationData.Child(name).Exists And SpecialFolder.ApplicationData.Child(name).IsFolder) Then
SpecialFolder.ApplicationData.Child(name).CreateFolder
If Not SpecialFolder.ApplicationData.Child(nam).Child(Source).exists Then source.CopyTo(SpecialFolder.ApplicationData.Child(name))

  Try
    // Create a SQLiteDatabase instance and try to open our database file from
    // the path
    pDatabase.DatabaseFile = SpecialFolder.ApplicationData.Child(name).Child(databaseName)
    pDatabase.Connect

  Catch e As DatabaseException
    MessageBox e.Message
  End Try

#ElseIf TargetXojoCloud
  Try
    pDatabase.DatabaseFile = SpecialFolder.Documents.Child( databaseName )
    pDatabase.connect
  Catch e As RuntimeException
    MessageBox e.Reason
  End Try
#EndIf
Of course, we need to add the “pDatabase” property to our module too: pDatabase As SQLiteDatabase
Now, you’ll only need to use:
OpenDatabase("EddiesElectronics.sqlite")
With the method selected in the Project Browser, click on the Attributes section of the Inspector Panel (the Cog Wheel icon), and uncheck the “iOS 64” checkbox. This way, that method will not be included when compiling for iOS apps.
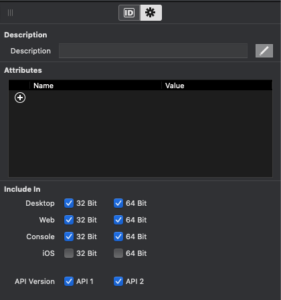
Do the same thing with the “pDatabase” property, so it is only compiled on the supported targets.
The second method is the one we will be using for iOS apps. The method signature would be:
OpenDatabase(databseName as String)
And typing the following fragment of code in the associated Code Editor:
pIOSDatabase = New iOSSQLiteDatabase

Var source As Xojo.IO.FolderItem = xojo.io.SpecialFolder.GetResource( databaseName )

// We check if there is our database file already copied on the Documents Sandbox folder
// if not, we copy the database file from Resources bundle/directory
If Not xojo.io.SpecialFolder.Documents.Child( databaseName ).Exists Then
  source.CopyTo(xojo.io.SpecialFolder.documents)
End If

Try
  // Create a SQLiteDatabase instance and try to open our database file from
  // the path

  Var f As FolderItem = xojo.io.SpecialFolder.Documents
  pIOSDatabase.DatabaseFile = f.Child( databaseName )
  Call db.Connect

Catch e As RuntimeException
  MessageBox e.Reason
End Try
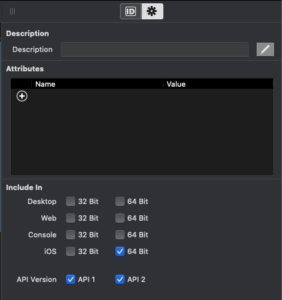
Lastly, and with the method item still selected in the Project Browser, go to the Attributes section of the Inspector Panel and make sure that the “iOS 64” checkbox is the only one selected under the “Include In” section. This way, we make sure that the method will be compiled only on iOS targets.
And do the same thing with the “piOSDatabase”, so it is only compiled for iOS targets.
To Summarize
As we see, the use of Modules in combination with OOP Class Extension is a good way to get more flexibility when developing your apps; using a common function (or method) name no matter if you are working on Desktop, Web or iOS. Additionally, that leads to a more convenient reutilization of your codeand, of course, less code to maintain through all our projects!
(You can find this article in Spanish here)