
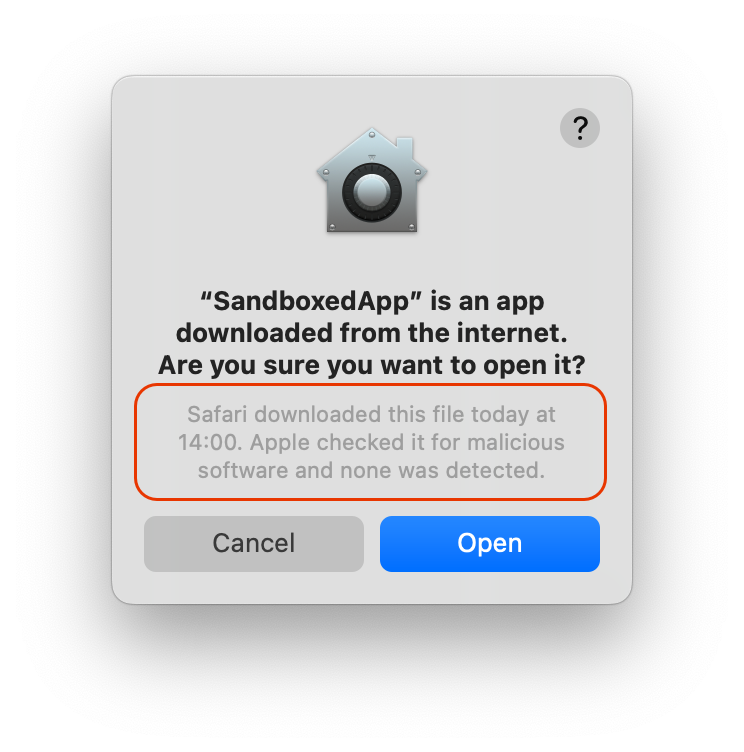
You are likely already familiar with terms like Sandboxing, hardened runtime and Notarization. After all, these are required if you plan to distribute your macOS apps through the Mac App Store. But, starting with macOS Sequoia 15 (expected in the fall of 2024), Apple has tightened the runtime security protections even more. For example, it was common to Control + click on any downloaded macOS app from Internet that has not been signed and simply choose the Open option from the contextual menu to open it. That won’t be an option under Sequoia (although it still possible to run the unsigned app).
In fact, Apple recommends to Notarize the software even if you are going to distribute it from your own website, outside of the Mac App Store. But, don’t be scared! Currently there are good third parties options available that ease the path, like App Wrapper from Ohanaware, or some OpenSource options as for example Xojo2DMG; and through this article you will see how to enable Sandboxing, runtime hardening and even Notarizing on a simple example app. Of course, this will touch only the basics and it is up to you to read the related Apple Documentation to add the entries, both the Entitlements and additional keys/values in the app Info.plist file, required by the purposes of your particular app, for example file access, camera or mic access, network access, etc.
A Bit of Common Ground
At this point, your head may be spinning if you are unfamiliar with these app security terms; so, what do Sandbox, hardened runtime and Notarizing mean when they are applied to macOS apps?
Sandboxing
When a macOS app is sandboxed, that means that macOS will create an exclusive container for everything related to the app the first time it is launched. This is what happens when installing an iOS app, too! Such a container will have its own structure to access things like documents, pictures, downloads, etc. Think about it as the own private execution space for the app:
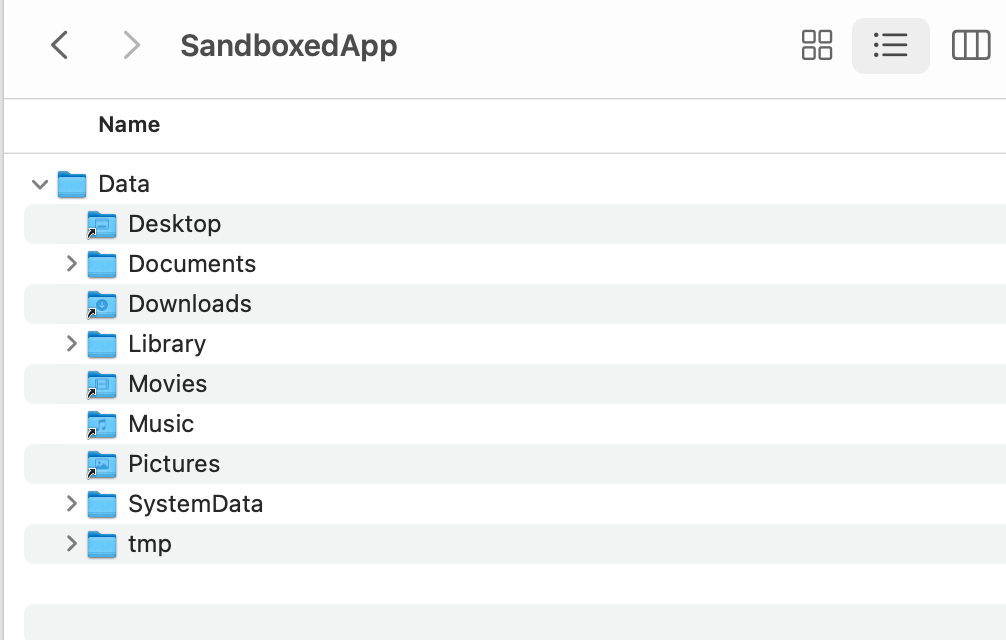
Of course, there are entitlements waiting for you so your sandboxed app can access the files created by other apps (including the Desktop, Downloads, Movies, Music and Picture folders), among other things.
Hardened Runtime
When enabled for your macOS app, hardened runtime adds an extra layer of protection to the running code itself. For example, it prevents certain classes of exploits, like code injection, dynamically linked library (DLL) hijacking, and process memory space tampering. This kind of protection is also enhanced by the System Integrity Protection (SIP).
Notarization
In brief, this is a third layer of confidence for the potential users of your macOS app. When the app is notarized, that ensures to the user that the Developer ID-signed software you distribute has been checked by Apple for malicious components. This is not related with the Apple Review process of your app when it is submitted to the Mac App Store, it’s related to the macOS Gatekeeper technology. So, when a Notarized app is downloaded from Internet, for example, Gatekeeper will use the notarization ticket attached to your app/DMG file to provide more meaningful information about the origin of the app, including if it is safe for the user to open it.
Preparation
In order to follow this article, you will need:
- Xojo. Download it for macOS if you have not done yet.
- macOS 11.3 or later.
- Xcode 13 or later. Run it at least one time and make sure that all its required components and SDKs are installed.
- Apple Developer ID. This needs to be a paid Apple Developer membership. Also, make sure you have your Developer certificates installed in the Mac.
- A working Internet connection.
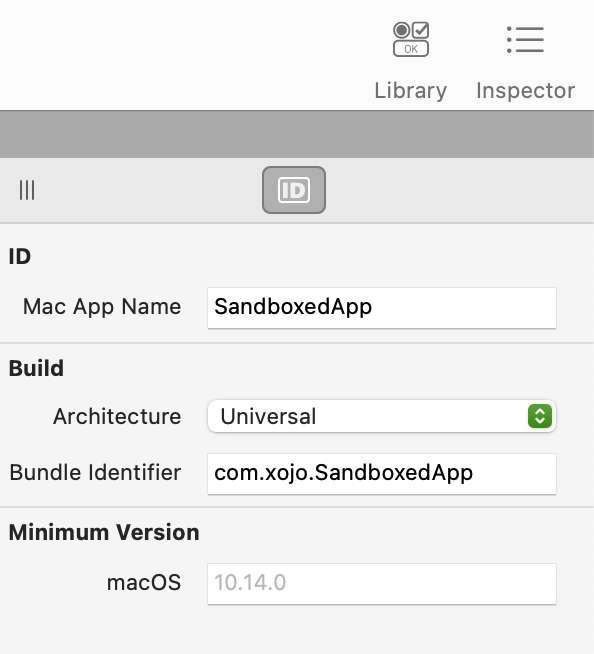
With all of this in place, open Xojo to create a macOS Desktop project and do some basic layout in the by default window. It is not required to add any functionality to keep the focus in the task at hand. Then, use Build Settings > macOS > Mac App Name to give an appropriate name to the built application (for this example I named it “SandboxedApp”).
Lastly, save the project (for example into the Documents folder) and click the Build button to build the app! It is not required at this point to assign the Developer ID in the Build Settings > macOS > Sign section, because we are going to sign it (again) in the next steps.
Creating the Entitlements File
The entitlements file is pretty similar to the Info.plist file you probably already know that is in charge of storing the required keys and values for the app to properly work. Both of these are in XML format, and the only difference is that while the Info.plist file is created for you by Xojo, the Entitlements file needs to be, currently, manually created for you.
So, open your text editor of choice (there a lot of there out there, both free and paid ones; personally I tend to use BBEdit from BareBones Software). Add the following lines to the text document and save it with the name “Entitlements.plist” (if you keep it next to the saved built macOS app, the better). This is the file where you will probably want to add more entitlement entries as your app requires them:
<?xml version="1.0" encoding="UTF-8"?>
<!DOCTYPE plist SYSTEM "file://localhost/System/Library/DTDs/PropertyList.dtd">
<plist version="0.9">
<dict>
  <key>com.apple.security.app-sandbox</key>
  <true/>
</dict>
</plist>
Sandbox Your App
With the compiled app and the entitlements file in place, open the Terminal app and type the following command and press the return key:
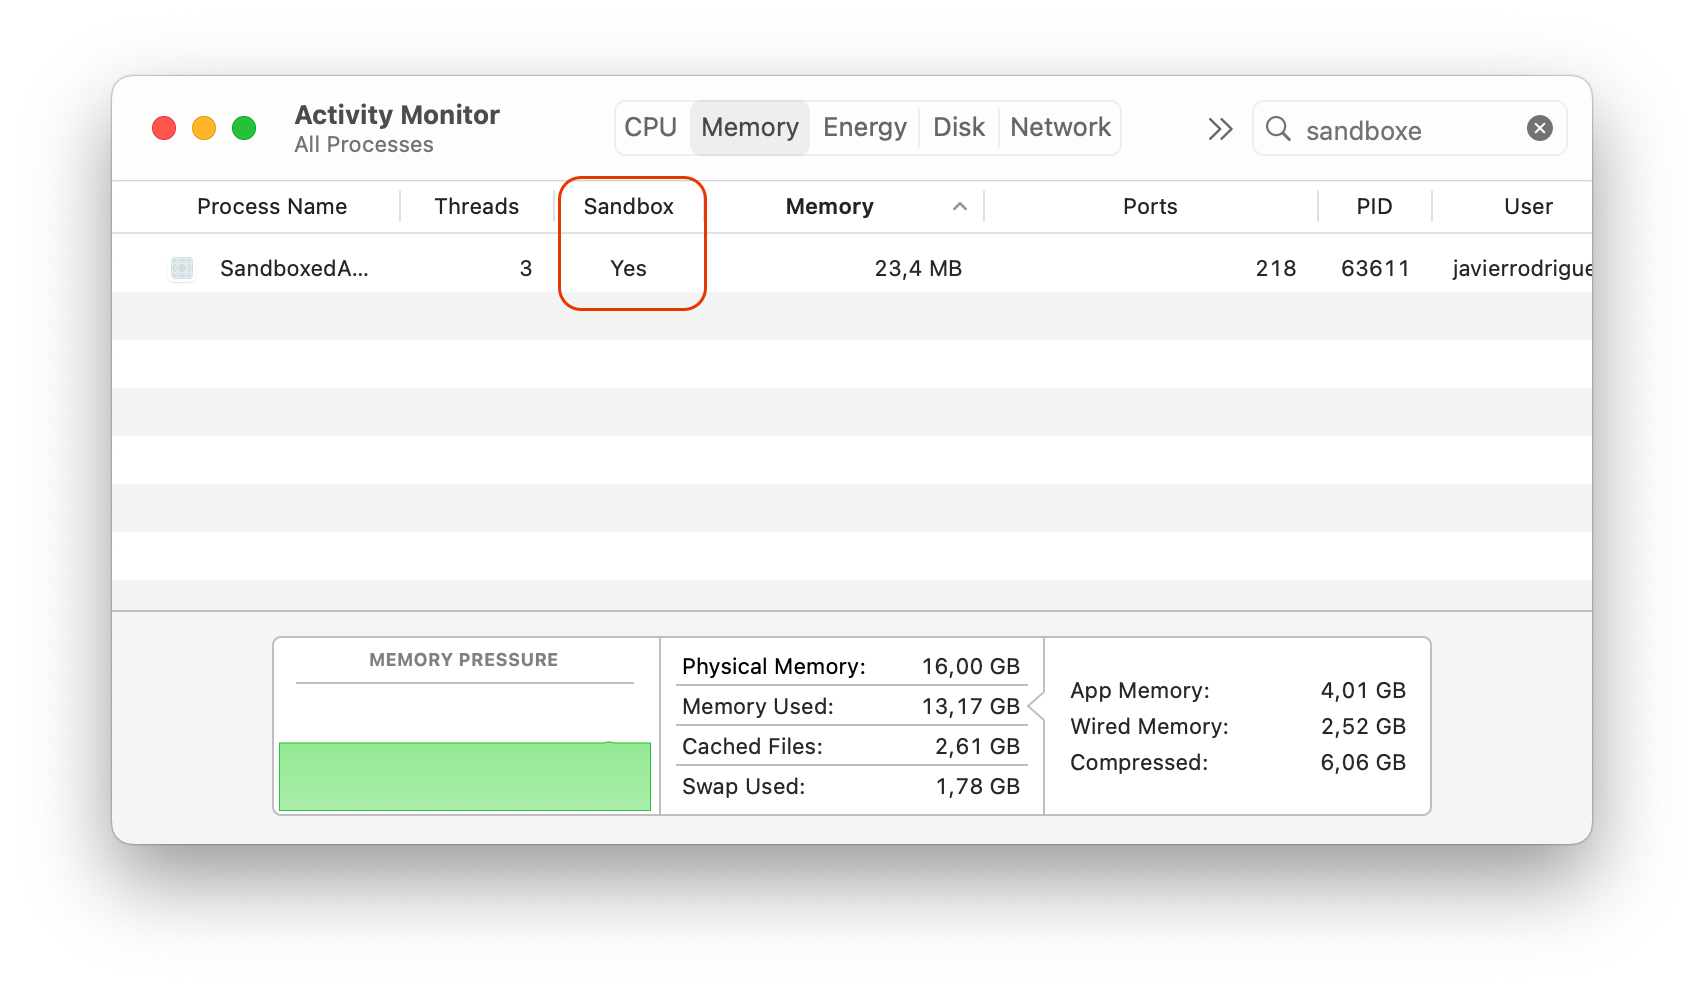
> codesign --force --deep --timestamp --entitlements <path-to-your-entitlements.plist-file> -s "Developer ID Application: <your-full-developer-name (including-the-team-id)>" <path-to-the-bundle-of-your-app>Once executed, run the “SandboxedApp”, open the Activity Monitor app and make sure that the Sandbox option is enabled under the View > Columns options. Then, use the search box of the main window to filter the displayed processes so it only displays your app. Take a look to the value under the Sandbox column and you will see that the app is now Sandboxed, and the Container for it has been created under the Library/Containers path. Quit the app when you are done.
Hardened Runtime
With our app already sandboxed, let’s look how to add the hardened option to it. Once again, type the following command in the Terminal prompt:
> codesign --force --deep --options runtime --timestamp --entitlements <path-to-your-entitlements.plist-file> -s "Developer ID Application: <your-full-developer-name (including-the-team-id)>" <path-to-the-bundle-of-your-app>As you can see, it doesn’t vary much from the previous command. All it adds is the “–options runtime” text in charge of enabling the runtime hardening. Also, as you might guess, using this command will enable the Sandboxing of the app and also the runtime hardening, at all once.
Do you want to check if it worked? Well, type the following command at the Terminal prompt:
> codesign --display --verbose <path-to-the-bundle-of-your-app>It will produce an output similar to this one:
Executable=<path-to-the-executable>
Identifier=com.xojo.sandboxedapp
Format=app bundle with Mach-O universal (x86_64 arm64)
CodeDirectory v=20500 size=43297 flags=0x10000(runtime) hashes=1342+7 location=embedded
Signature size=9100
Timestamp=13 Aug 2024 at 12:51:28 PM
Info.plist entries=15
TeamIdentifier=************
Runtime Version=11.1.0
Sealed Resources version=2 rules=13 files=4
Internal requirements count=1 size=184
It is the “flags=0x1000(runtime)” which shows that, in fact, the app runtime is hardened. Congrats!
Notarizing the App
This is the final step, but is going to require an extra step from your side. Because the notarytool command line tool, used for notarizing the app, is going to require the ID and password from your Apple ID account, plus the fact that it uses 2FA authentication, it is very convenient to create an app specific password for it.
Creating an App-Specific Password
In order to create the password used by the notarytool process, follow this steps:
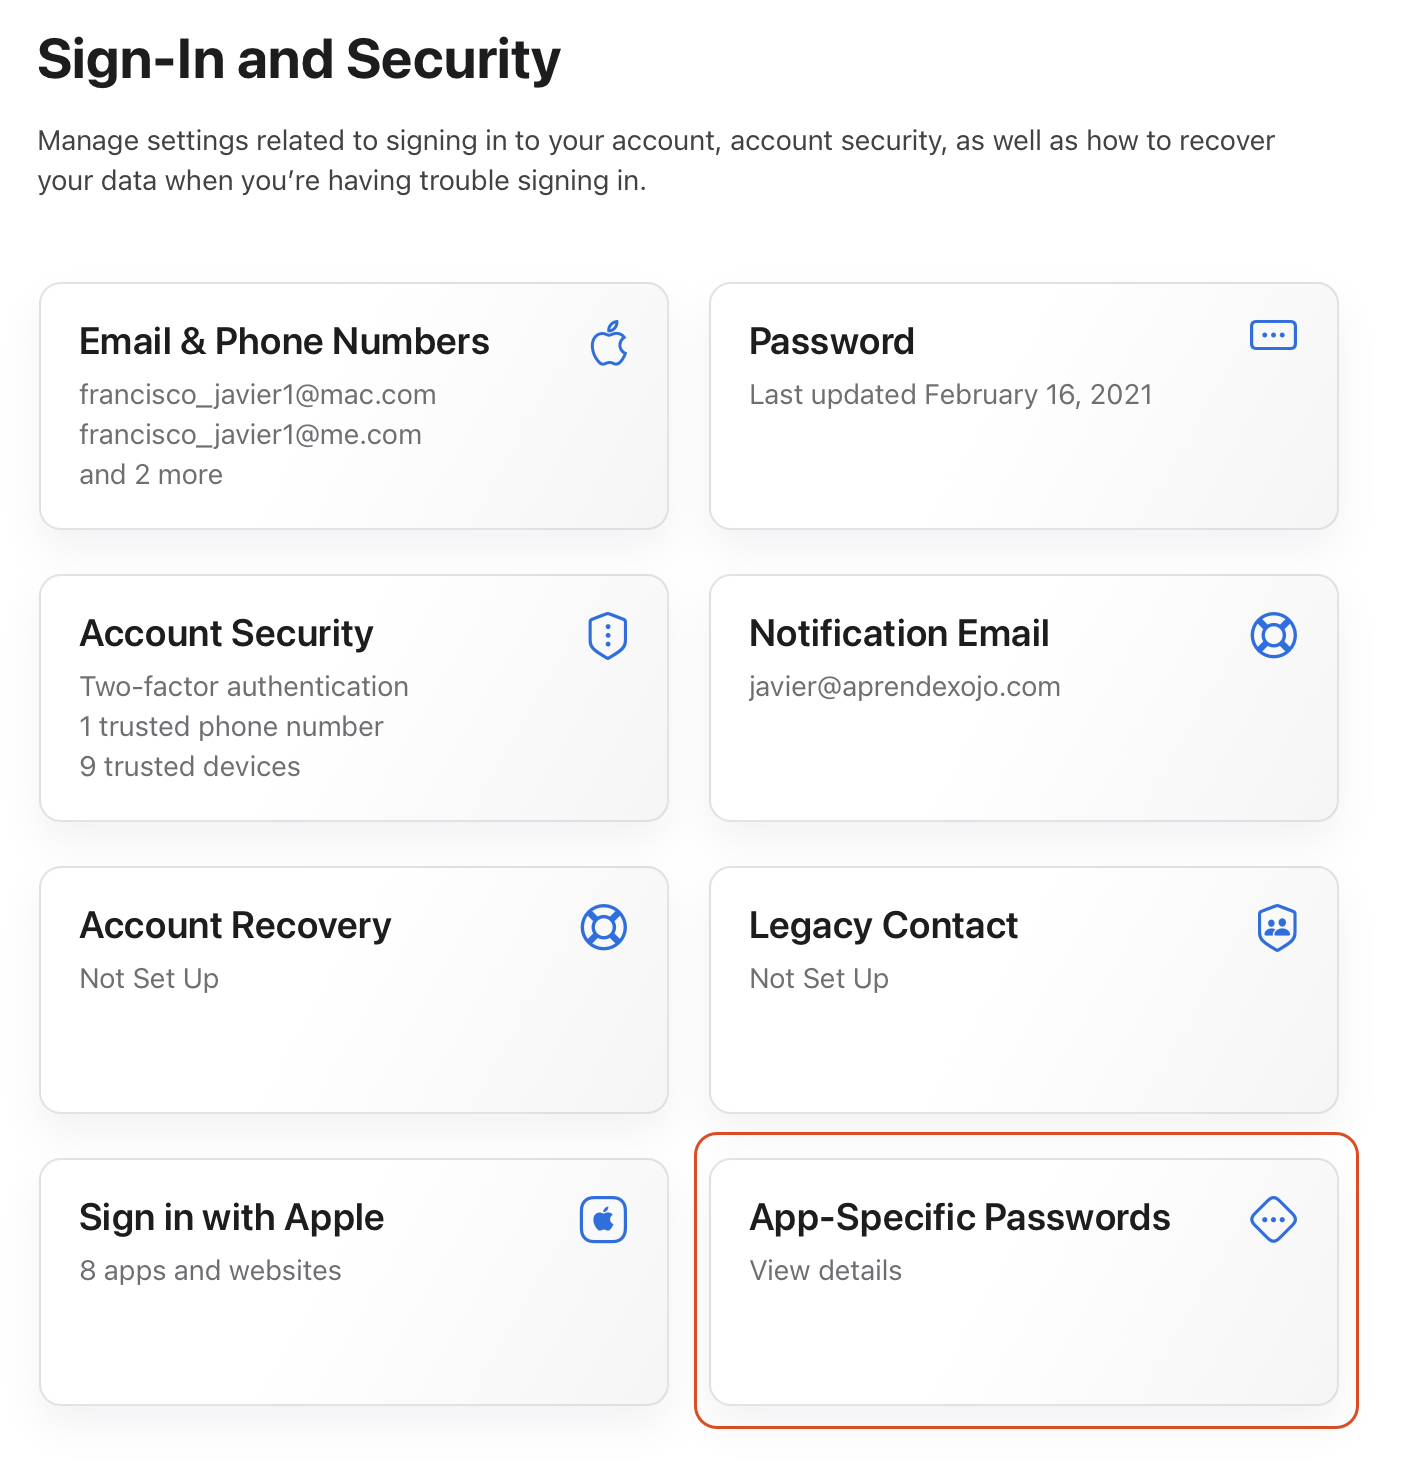
- Sign in to appleid.apple.com
- In the Sign-in and Security section, select the App-Specific Passwords option:
- The previous action will bring a new dialog displaying all the app-specific passwords already created. Click the “+” button to add a new one:
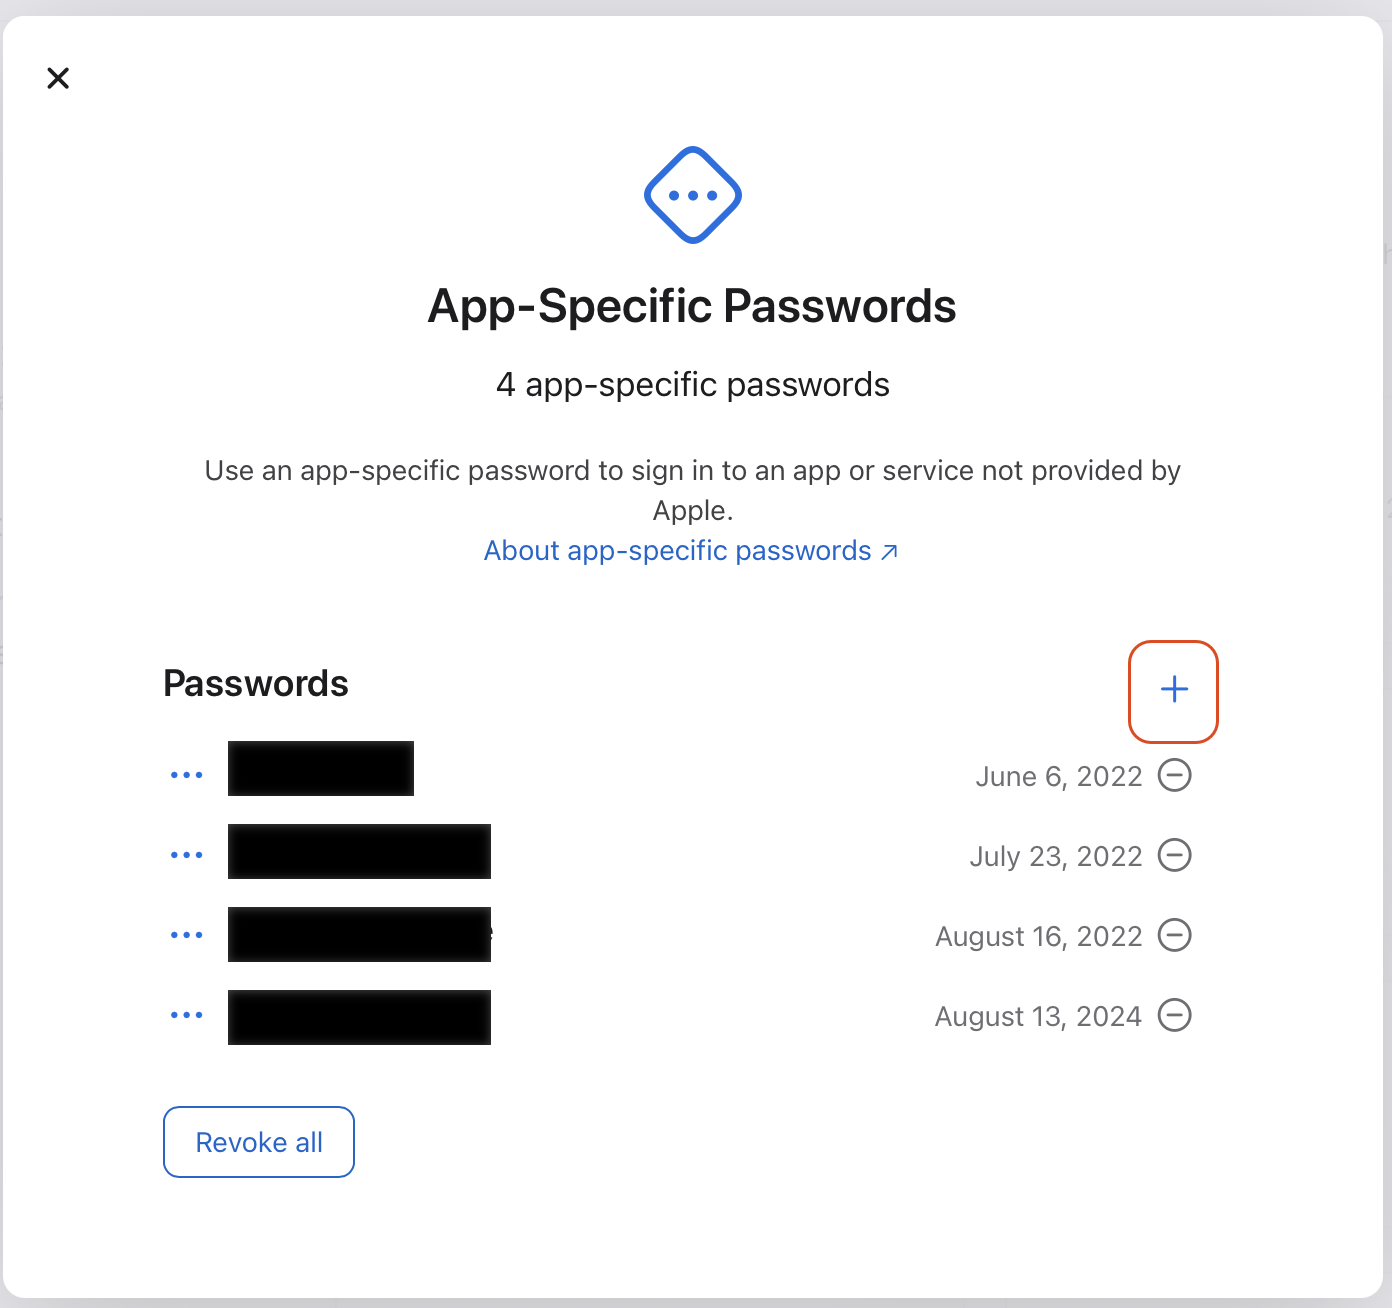
- Type a meaningful name for as the “Title” or description for your new password in the presented dialog (notarytool could be a good one):
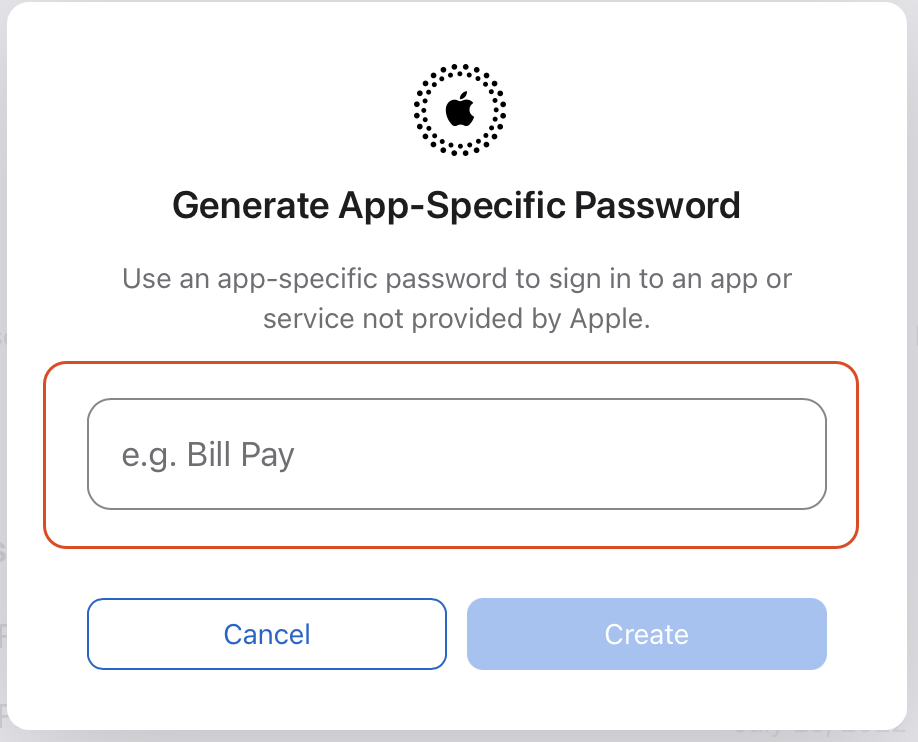
- Once you click the Create button it is possible that you will be asked to authenticate again using your Apple ID. Once done, a new dialog will present the generated password to you. Copy it and write it down (or paste it) into a safe place, because we are going to need it in the next step.
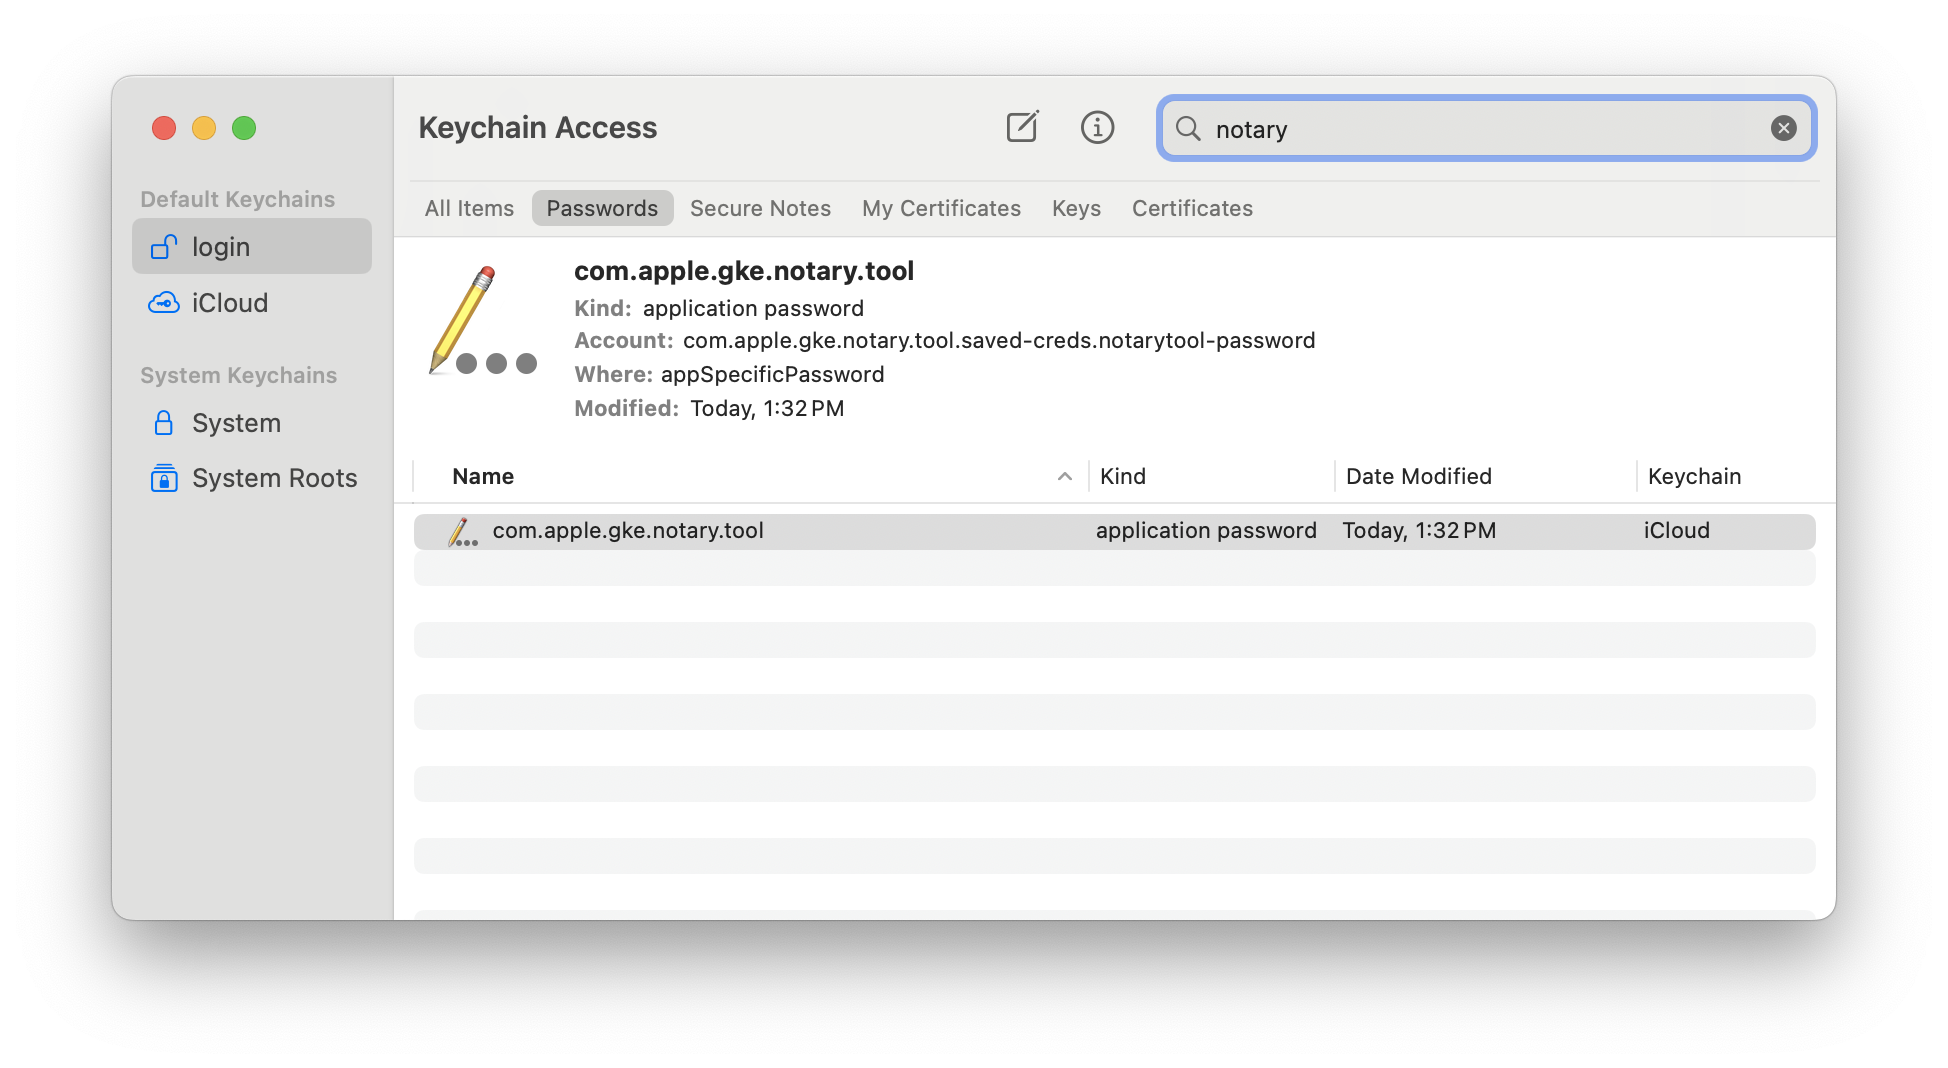
Adding the notarytool specific password to the Keychain
Because this app-specific password is going to be used by the notarytool command line tool, it would be very convenient to have it stored in the macOS Keychain. To do so, type the following command at the Terminal prompt, and press the Return key:
> xcrun notarytool store-credentials "notarytool-password" --apple-id "<your-apple-ID>" --team-id <your-developer-team-id> --password <the-password-copied-from-the-previous-step>Once executed, you will be able to see the password added to the Keychain app under the name of “notarytool-password”:
Creating a Zip file for your app
The notarization process is handled by the Apple notary service running in the Internet, what means that notarytool needs to send (upload) the bundle of your app in an appropriate format. There are two options: as a DMG file (that needs to be signed before submitting), or as a zipped file, what is even faster and easier (Trivia: Did you know how easy it is to create Zip files in Xojo code?)
So, in order to upload our app for notarization, we need to create a Zip file first. Once again, it is time to type a new command at the Terminal prompt:
> /usr/bin/ditto -c -k --keepParent <path-to-app-bundle> <path-to-generated-zip-file/file-name.zip>Uploading the app for Notarization
With our Zip file in place, we now have all the pieces to send it to the notarization process. The time spent by that process may (and will) vary depending of several factors.
In order to send the file, type the following command at the Terminal prompt:
> xcrun notarytool submit <path-to-zip-file/file-name.zip> --keychain-profile "notarytool-password" --wait After pressing the Return key, the process will start and the Terminal will output information about the progress; something similar to this:
Conducting pre-submission checks for <name-of-your-zip-file> and initiating connection to the Apple notary service...
Submission ID received
  id: <some-id-number-goes-here>
Upload progress: 100.00% (8.65 MB of 8.65 MB)
Successfully uploaded file
  id: <some-id-number-goes-here>
  path: <path-of-the-zip-file>
Waiting for processing to complete.
Current status: Accepted........
Processing complete
  id: <keep-this-id-in-a-safe-place-you-will-need-it-later>
  status: Accepted
Have you seen the last line? The “status: Accepted” means that everything worked OK, and the notarization process has been successful, but it’s better if we check! Type the following command at the Terminal prompt. This one will ask the notarytool command to download the log file in JSON format to be saved at the desired path. It is a good habit to do it, because such a log file will include some eventual error and explanation about possible errors during the notarization process, including those related to the app itself:
> xcrun notarytool log <put-here-the-value-you-saved-in-a-secure-place-from-the-id-field-in-the-previous-output> --keychain-profile "notarytool-password" <path-to-save-the-log.json>Staple the Ticket!
Assuming that everything worked OK, it is time to staple the notarization ticket to the app itself. It is not required, but is convenient to avoid online checks when the user runs the app, or Gatekeeper inspects it.
Yeah, that means using a new command from Terminal on the already signed, sandboxed and runtime hardened app bundle (not the Zip file you created for submitting using notarytool):
> xcrun stapler staple "<path-to-the-signed-sandboxed-and-hardened-app-bundle>"After that, you can check that everything went OK using the following command:
> spctl -a -vvv -t install <path-to-the-signed-sandboxed-and-hardened-app-bundle>And you should get something similar to this as the output:
source=Notarized Developer ID
origin=<your-full-developer-ID-Application>
App Distribution
That’s fine, but you will probably want to distribute your app from the Internet using a DMG container. In that case, follow these steps:
- Create a DMG container (file).
- Copy your already notarized app bundle into it.
- Notarize the DMG file.
- Staple the ticket to the DMG file.
That way the DMG container will be Notarized along with the app bundle inside it.
In Summary
As we did see, all the process of sandboxing, runtime hardening and Notarization involves a bunch of commands from the terminal, including the creation of the Zip file. But the good news is that all the process could be automated using Xojo itself! (take a look to the Shell class and the Zip method from the FolderItem class if you are not familiar with them).
As I said before, this article only on touches the basics and doesn’t dig into Provisioning Profile creation (associated with Capabilities required by the app), the Entitlements your app may need to properly work, among other topics; so you may find these Apple Developer Documentation of interest:
– Provisioning profiles.
– macOS Entitlements.
– macOS Sandbox.
– macOS Hardened Runtime.
– macOS Notarization.
Happy Xojo Coding!
Javier Menendez is an engineer at Xojo and has been using Xojo since 1998. He lives in Castellón, Spain and hosts regular Xojo hangouts en español. Ask Javier questions on Twitter at @XojoES or on the Xojo Forum.
More in this series on distributing Mac apps: